Altair 8800 Boots 4K BASIC via Front-Panel Code, ASR-33 Paper Tape
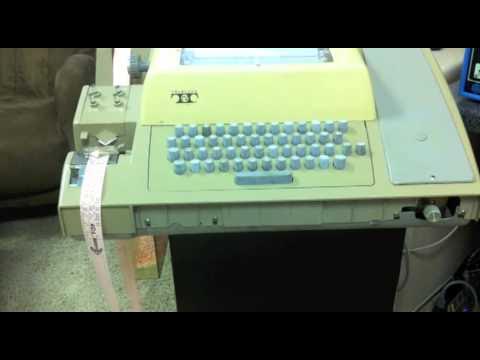
Altair 8800 - Video #7.1 - Loading 4K BASIC with a Teletype — deramp5113

deramp5113

Because early microcomputers lack built-in ROM monitors or storage controllers, operators must manually key in octal bootstrap routines and feed software directly through 110-baud terminal input streams.

AI-assisted summary of Altair 8800 - Video #7.1 - Loading 4K BASIC with a Teletype — original source. Check the original for full context.

Source published:

Key ideas

  • Loading Altair 4K BASIC version 3.2 on an Altair 8800 using an ASR-33 Teletype requires a multi-stage process: manually toggling a bootstrap loader into RAM, using it to read a checksum loader from paper tape, and then loading the interpreter itself. (0:01)
  • The 110-baud transfer rate of the Teletype's paper tape reader limits throughput to roughly 10 characters per second, requiring seven to eight minutes to load the 4K BASIC interpreter into memory. (3:51)
  • Because Altair 4K BASIC lacks a dedicated LOAD command, user programs stored on paper tape are fed directly through the terminal input stream, appearing to the interpreter as if keyed manually by the operator. (5:24)
  • The hardware featured in the demonstration is an Altair Clone, which precisely replicates the bus timings, front panel switches, and operational behavior of the original 1975 microcomputer. (8:08)

Detailed notes

## Background Published on YouTube by deramp5113 on October 5, 2013, this video demonstrates how to load and operate Altair 4K BASIC using a front panel bootloader and an authentic ASR-33 Teletype.

## TL;DR To boot an uninitialized Altair 8800 microcomputer, the presenter manually toggles a machine-code bootstrap loader into RAM using the front panel switches. The bootstrap routine initiates the ASR-33 Teletype's paper tape reader, loading a checksum loader that subsequently streams Altair 4K BASIC Version 3.2 into memory over roughly eight minutes at 110 baud. After completing the initialization dialogue and testing basic calculations, a prime number program on paper tape is fed directly through the terminal interface and executed. The host concludes by explaining that the demonstration runs on an Altair Clone, which reproduces the exact physical switches, timings, and electrical behaviors of the 1975 original.

## Atmosphere & style The presentation maintains a calm, instructional, and documentary-like tone that captures the painstaking reality of early personal computing. Watching the process feels tactile and hypnotic, filled with the rapid manual clicking of front-panel toggles, the shifting rhythm of flashing LEDs, and the steady, deafening clatter of the Teletype churning paper tape onto the floor. When the tape finishes and the room suddenly goes quiet, the emergence of the interactive terminal prompt delivers a distinct sense of retro satisfaction and technical accomplishment.

## Bulletin - [00:01](https://www.youtube.com/watch?v=qv5b1Xowxdk&t=1s) Loading Altair 4K BASIC version 3.2 on an Altair 8800 using an ASR-33 Teletype requires a multi-stage process: manually toggling a bootstrap loader into RAM, using it to read a checksum loader from paper tape, and then loading the interpreter itself. - [03:51](https://www.youtube.com/watch?v=qv5b1Xowxdk&t=231s) The 110-baud transfer rate of the Teletype's paper tape reader limits throughput to roughly 10 characters per second, requiring seven to eight minutes to load the 4K BASIC interpreter into memory. - [05:24](https://www.youtube.com/watch?v=qv5b1Xowxdk&t=324s) Because Altair 4K BASIC lacks a dedicated LOAD command, user programs stored on paper tape are fed directly through the terminal input stream, appearing to the interpreter as if keyed manually by the operator. - [08:08](https://www.youtube.com/watch?v=qv5b1Xowxdk&t=488s) The hardware featured in the demonstration is an Altair Clone, which precisely replicates the bus timings, front panel switches, and operational behavior of the original 1975 microcomputer.

## Key takeaways - [00:01](https://www.youtube.com/watch?v=qv5b1Xowxdk&t=1s) Because the Altair 8800 powers on with uninitialized RAM and lacks a ROM monitor or operating system, it cannot read peripherals until a bootstrap loader is entered manually. - [01:26](https://www.youtube.com/watch?v=qv5b1Xowxdk&t=86s) The bootstrap loader code consists of approximately 20 octal bytes toggled directly into address 0 via the front panel switches according to MITS documentation for the SIO board. - [01:26](https://www.youtube.com/watch?v=qv5b1Xowxdk&t=86s) Front panel sense switches serve as hardware configuration flags, informing the software which serial interface card is installed (all set to zero for the standard SIO board in 4K BASIC v3.2). - [01:26](https://www.youtube.com/watch?v=qv5b1Xowxdk&t=86s) Operating instructions mandate that the Teletype's paper tape reader must be physically running before the operator flips the Altair's RUN switch. - [03:51](https://www.youtube.com/watch?v=qv5b1Xowxdk&t=231s) A shift in the Altair's front panel LED activity patterns visually confirms when execution transitions from the manual bootstrap loader to the tape's checksum loader. - [03:51](https://www.youtube.com/watch?v=qv5b1Xowxdk&t=231s) Loading the complete 4K BASIC interpreter over an ASR-33 Teletype at 110 baud takes between seven and eight minutes, expelling a sizable pile of punched tape onto the floor. - [05:24](https://www.youtube.com/watch?v=qv5b1Xowxdk&t=324s) Upon successfully loading, 4K BASIC displays an interactive initialization dialog requesting memory size, terminal width, and whether to retain sine/trigonometric functions in RAM. - [05:24](https://www.youtube.com/watch?v=qv5b1Xowxdk&t=324s) Without a dedicated storage LOAD command in 4K BASIC, source programs on tape are processed directly as terminal console input line by line. - [05:24](https://www.youtube.com/watch?v=qv5b1Xowxdk&t=324s) When running a prime number generator program, the 8080 CPU eventually slows down between calculations as numbers increase, becoming compute-bound rather than Teletype print-bound. - [08:08](https://www.youtube.com/watch?v=qv5b1Xowxdk&t=488s) The Altair Clone replicates original cosmetics, mechanical toggle switches, and bus timings on modern circuitry, enabling authentic vintage workflows without endangering rare vintage hardware.

## Detailed walkthrough ### [00:01](https://www.youtube.com/watch?v=qv5b1Xowxdk&t=1s) Preparing the Altair 8800 and Teletype Setup

This demonstration shows how to load Altair 4K BASIC into an Altair 8800 microcomputer using an ASR-33 Teletype and its built-in paper tape reader. While a similar video was produced six months earlier using a PC terminal emulator over a serial port to feed the paper tape image, this demonstration features genuine vintage electro-mechanical hardware. As the presenter explains, “In the meantime, I've had the joy of purchasing and refurbing a Teletype, so now I can do the demo for real.” The earlier video retains supplementary background information, but this presentation focuses on the authentic historical process and all the effort required in the early days of personal computing just to get a working BASIC interpreter operational.

When an Altair boots up, it contains empty, uninitialized RAM with no operating system or ROM monitor. To read data through an input device, the operator must manually toggle in a small bootstrap loader via the front panel switches. This tiny program provides just enough logic to communicate with the paper tape reader over a serial interface board. The paper tape itself begins with a secondary stage known as the checksum loader. Once ingested by the bootstrap loader, the checksum loader takes control of the machine to read the remainder of the tape containing the actual BASIC interpreter into memory.

```mermaid flowchart LR accTitle: Altair 4K BASIC Bootstrapping Process accDescr: Sequence showing manual front panel entry leading to checksum loader and full 4K BASIC in memory.

subgraph FrontPanel["Front Panel Entry"] A["Manual Toggle Switches"] -->|"Enters octal code"| B["Bootstrap Loader in RAM"] end

subgraph TapeLoading["Paper Tape Read"] B -->|"Reads tape leader"| C["Checksum Loader (~256 bytes)"] C -->|"Reads main tape at 110 baud"| D["4K BASIC v3.2 Engine"] end

subgraph Interactive["Terminal"] D -->|"Prompts user"| E["Teletype Terminal Console"] end ```

[01:26](https://www.youtube.com/watch?v=qv5b1Xowxdk&t=86s) Toggling in the Bootstrap Loader

The bootstrap loader routine depends directly on the hardware configuration and software version. In this setup, the machine is configured for Altair 4K BASIC version 3.2 using an Altair Serial Input/Output (SIO) board, referencing the exact instructions provided in MITS documentation. Starting at memory address 0, the machine code bytes are toggled into the front panel switches in octal notation:

- Address 000: `041` - Address 001: `256` - Address 002: `017` - Address 003: `061` - Address 004: `022` - Address 005: `000` - Address 006: `333` - Address 007: `000` - Address 010: `017` - Address 011: `330` - Address 012: `333` - Address 013: `001` - Address 014: `275` - Address 015: `310` - Address 016: `055` - Address 017: `167` - Address 020: `300` - Address 021: `351` - Address 022: `003` - Address 023: `000`

Once the program is toggled in, the operator must configure the sense switches to tell the software which serial interface card is installed. In 4K BASIC version 3.2, all sense switches must remain set to zero for the standard SIO board. The operating instructions specifically mandate starting the Teletype's paper tape reader before pressing the run switch on the front panel. The Altair is reset to ensure execution begins precisely at memory location zero.

[03:51](https://www.youtube.com/watch?v=qv5b1Xowxdk&t=231s) Executing the Tape Read Sequence

The paper tape begins with a repeating punch pattern that serves as the tape leader. The Teletype is switched on and the tape reader is engaged, followed immediately by flipping the **RUN** switch on the Altair front panel. The LED lights on the Altair display a distinct activity pattern while the bootstrap loader executes:

> “Now, if you look over here on the Altair, what you're seeing is the bootstrap loader running. That's the light pattern you see. And when it's done loading the bootstrap loader, we'll see the light pattern change when it jumps into the checksum loader that then turns around and reads the rest of BASIC.”

After reading roughly 256 bytes—encompassing the leader section and the secondary loader—the front panel LEDs visibly shift cadence, confirming that the checksum loader has taken over execution. The checksum loader continuously ingests the primary body of 4K BASIC. Operating at 110 baud (roughly 10 characters per second), the transfer requires between seven and eight minutes to complete, spilling a sizable heap of punched paper tape directly onto the floor.

[05:24](https://www.youtube.com/watch?v=qv5b1Xowxdk&t=324s) Initialization and Executing BASIC Programs

As the trailing end of the tape clears the reader, the loader completes execution and transfers control to the newly loaded interpreter, producing a sudden, welcome silence from the loud mechanical clatter of the Teletype. The Teletype printer springs to life with the standard 4K BASIC startup dialog:

- `MEMORY SIZE?` — answered by pressing Return to automatically allocate all available contiguous memory. - `TERMINAL WIDTH?` — answered by pressing Return to accept default line width. - `WANT SIN?` — answered with `Y` (Yes) to keep trigonometric mathematical functions in memory.

BASIC announces itself with its sign-on banner and enters the interactive prompt. An immediate calculation test—`PRINT 2+2`—returns `4`.

``` MEMORY SIZE? TERMINAL WIDTH? WANT SIN? Y

4431 BYTES FREE

BASIC VERSION 3.2 [4K VERSION]

OK PRINT 2+2 4 OK ```

Because 4K BASIC does not feature a dedicated `LOAD` command for storing and retrieving code from storage peripherals, user programs on paper tape are loaded directly through the standard terminal input channel. As the presenter explains, “As far as BASIC is concerned, this is literally just typing in the program. So BASIC doesn't know that wasn't just typed in. So as far as it knows, you just typed it in.”

A short paper tape containing a prime number generator program is loaded into the reader. The Teletype feeds the tape through, printing each line as if it were keyed by hand. Once loaded, typing `RUN` executes the program, and the system begins computing and printing prime numbers. As the numerical values grow larger, the computational workload causes the processor to pause and think between calculations, causing the execution to run slower than the Teletype's mechanical 10-character-per-second output speed.

[08:08](https://www.youtube.com/watch?v=qv5b1Xowxdk&t=488s) The Hardware Platform: Altair Clone

The machine featured throughout the demonstration is an Altair 8800 Clone. The unit accurately replicates the exterior cosmetic design, mechanical switch response, operational characteristics, bus timings, and exact limitations of an original 1975 MITS Altair, while running on modern hardware underneath. This allows enthusiasts to recreate authentic vintage workflows—including driving original ASR-33 Teletypes over serial lines—without risking damage to rare, fragile vintage circuit boards. Viewers are directed to `altairclone.com` for additional technical details about the reproduction hardware.

## Mentioned Altair 8800, Altair 8800 Clone, ASR-33 Teletype, Altair 4K BASIC, Altair Serial Input/Output (SIO) board, MITS, deramp5113, altairclone.com

## Video description Loading and operating Altair 4K BASIC using a front panel bootloader and an ASR-33 Teletype.

[Source](https://www.youtube.com/watch?v=qv5b1Xowxdk)

中文简报

Altair 8800通过前面板代码与ASR-33纸带启动4K BASIC 由于早期微型计算机缺乏内置ROM监视器或存储控制器,操作员必须手动键入八进制引导程序,并直接通过110波特率的终端输入流载入软件。 为启动一台未初始化的Altair 8800微型计算机,演示者通过前面板开关手动将一段机器代码引导加载程序逐位键入RAM中。该引导程序随后启动ASR-33电传打字机的纸带阅读器,加载校验和加载程序,并在110波特率下耗时约八分钟将Altair 4K BASIC 3.2版本写入内存。在完成初始化对话并测试了基本计算后,一段存储在纸带上的素数程序被直接通过终端接口载入并运行。主持人最后说明,本次演示使用的是一台Altair Clone复刻机,它精确重现了1975年原版的实体开关、时序以及电气特性。 在Altair 8800上使用ASR-33电传打字机加载Altair 4K BASIC 3.2版本需要一个多阶段流程:先手动将引导加载程序逐位键入RAM,再用其从纸带读取校验和加载程序,最后载入解释器本身。 (0:01) 电传打字机纸带阅读器的110波特率传输速率将吞吐量限制在每秒约10个字符,需要七到八分钟才能将4K BASIC解释器完全载入内存。 (3:51) 由于Altair 4K BASIC缺少专用的LOAD命令,存储在纸带上的用户程序直接通过终端输入流载入,在解释器看来如同操作员手动键入一样。 (5:24) 演示中展示的硬件是一台Altair Clone复刻机,它精确复现了1975年原版微型计算机的总线时序、前面板开关及运行行为。 (8:08)

Reading summary

This demonstration by deramp5113 illustrates the rigorous, multi-stage process required to boot and run Altair 4K BASIC version 3.2 on an Altair 8800 Clone connected to a refurbished ASR-33 Teletype. Two-Stage Bootstrapping and Front Panel Entry (1:26) Because an uninitialized Altair boots with empty RAM lacking an operating system or ROM monitor, the operator must manually key a tiny bootstrap routine into memory address 0 via front panel toggle switches. Using octal notation dictated by MITS documentation for an Altair Serial Input/Output (SIO) board, the operator enters 20 machine code bytes (such as 041, 256, 017 through 000 at address 023) and sets all sense switches to zero to designate the installed serial hardware. Mechanical Ingestion via ASR-33 Teletype (3:51) Executing the bootstrap loader initiates communication with the ASR-33 Teletype's paper tape reader over a serial interface. The process starts by running the tape leader to ingest an initial secondary stage—a checksum loader of approximately 256 bytes. As observed on the Altair's front panel LEDs, the light pattern visibly shifts once the bootstrap loader finishes, signifying that the checksum loader has taken control of execution. Data Transfer Constraints and System Initialization (5:24) Operating at 110 baud (roughly 10 characters per second), the checksum loader requires seven to eight minutes to read the complete 4K BASIC interpreter into memory, generating a substantial pile of punched paper tape. Once read, the mechanical noise subsides and the Teletype prints the interactive startup prompt. The operator configures memory size, accepts the default terminal width, and retains trigonometric routines by answering 'Y' to 'WANT SIN?', which yields 4,431 free bytes under BASIC version 3.2. Console Emulation and Program Execution (5:24) Because 4K BASIC lacks a dedicated tape load command for peripherals, user software is ingested directly through the standard terminal input channel. Feeding a paper tape through the Teletype mimics direct manual keystrokes, printing each line to the console before running. When running a sample prime number program, the processor's calculation pauses between higher numbers eventually slow processing below the Teletype's mechanical printing speed of 10 characters per second. The demonstration relies on an Altair 8800 Clone, which replicates the original 1975 MITS machine's cosmetic switches, bus timings, and hardware constraints while employing modern internal components to drive original electro-mechanical peripherals safely.

精炼阅读摘要

本演示基于一台复刻版 Altair 8800 和一台修复后的 ASR-33 Teletype 电传打字机,完整重现了早期个人计算机通过纸带将 4K BASIC 解释器加载至空白内存的真实历史工作流程。 无系统初始状态下的两级引导机制 (0:01) 原始 Altair 8800 启动时内部 RAM 为完全空白状态,既没有操作系统也没有固化的 ROM 监视程序,因此计算机无法直接从外部设备读取数据。为了使系统具备最基本的外部通信能力,操作员必须通过机箱前面的开关组手动输入一段八进制机器码作为一级引导程序(bootstrap loader)。这段代码仅包含与串行接口板通信的极简逻辑,用于驱动纸带阅读器。 面板拨码录入与接口配置要求 (1:26) 针对 Altair 4K BASIC 3.2 版本及原厂串行输入输出(SIO)板,操作员需要依据 MITS 官方手册从内存地址 0 开始连续录入约 20 个字节的代码(如地址 000 的 041、001 的 256 直至 023 的 000)。输入完成后,还必须将感应开关(sense switches)全部置为 0,以向软件标识所接入的是标准 SIO 板。操作规范特别要求在按下前面板运行开关(RUN)启动执行前,必须先手动开启 Teletype 的纸带读取机构,并将机器复位到地址 0 执行。 纸带读取执行与校验加载流程 (3:51) 打字机读带器启动后,前面板 RUN 开关被触发,Altair 面板上的 LED 指示灯会呈现出一套特定的活动规律,显示一级引导程序正在运行。在读取大约 256 字节的引带(leader)及二级校验加载程序(checksum loader)后,指示灯的闪烁节奏发生肉眼可见的变化,标志着控制权已转交由校验加载程序接管。随后,系统以 110 波特率(约每秒 10 个字符)的速度连续读取 4K BASIC 的主体数据,整个加载过程持续约 7 到 8 分钟,并在地面堆积大量穿孔纸带。 解释器初始化与终端模拟输入机制 (5:24) 纸带尾端穿过读取器后,Teletype 停止机械噪音并开始打印初始化对话,包括询问内存大小(MEMORY SIZE?)、终端行宽(TERMINAL WIDTH?)以及是否保留三角函数支持(WANT SIN?)。由于 4K BASIC 没有内置直接读取外设纸带的 LOAD 命令,读取用户程序时完全复用了标准终端输入通道。系统将纸带穿孔直接视为用户在键盘上手动逐行敲入代码。演示中加载了一段素数生成程序,当计算的数值不断增大时,处理器的运算开销会导致停顿思考,其实际执行输出速度甚至低于电传打字机每秒 10 个字符的物理打印上限。 现代复刻硬件对复古工作流的还原 (8:08) 演示中所使用的计算机是一台 Altair 8800 Clone 复刻机。该设备底层采用现代硬件,但在外观结构、机械开关触感、运行特性、总线时序以及早期系统原有的设计限制上均与 1975 年出厂的 MITS Altair 保持一致。这种方案使爱好者能够安全地驱动真实的 ASR-33 Teletype 等老式机电设备,在避免损坏脆弱罕见的原版古董电路板的前提下,完整复现微型计算机诞生初期的操作体验。 该演示展示了早期个人计算环境启动软件所需的繁琐物理操作与严苛步骤;依托现代兼容硬件与修复的外设,这一历史引导流程得以在脱离虚拟仿真的物理实体上得到准确验证。

Detailed notes — zh

## Background 该视频由 YouTube 频道 deramp5113 于 2013 年 10 月 5 日发布。根据页面简介,视频主要展示了如何使用前面板引导程序(bootloader)与 ASR-33 Teletype(电传打字机)来加载并运行 Altair 4K BASIC。 ## TL;DR 主讲人演示了在没有现代存储设备的复古计算环境下,如何从一片空白的 RAM 逐步唤醒系统。他首先在 Altair 8800 Clone 复制机的前面板上逐字节手动拨入八进制引导加载程序,随后启动翻修后的 ASR-33 Teletype 纸带机,以 110 波特率分级读取校验和加载器与 4K BASIC 核心。在顺利完成启动问答并通过简易数学指令验证环境后,他又利用另一卷打孔纸带模拟终端击键读入素数计算程序,直观呈现了早期微机时代的典型操作流程与算力瓶颈。 ## Atmosphere & style 整段视频洋溢着纯粹而硬核的复古科技情怀,伴随着电传打字机清脆嘈杂的金属敲击声与纸带滑动的机械节奏,临场感极强。主讲人语调从容、熟稔且略带幽默,在前面板拨码的一丝不苟与等待纸带走完时的如释重负之间形成了生动的观感张力。观众能够深切体会到早期计算机爱好者面对纯机械与极简电子交互时的繁琐挑战,以及最终在终端上看到字符打印出来那一刻质朴而真实的成就感。 ## Bulletin - [00:01](https://www.youtube.com/watch?v=qv5b1Xowxdk&t=1s) 使用经过翻修的 ASR-33 Teletype 实机与 Altair 8800 Clone 复制机,完整重现了早期通过纸带加载 Altair 4K BASIC 的物理流程。 - [00:01](https://www.youtube.com/watch?v=qv5b1Xowxdk&t=1s) 在开机 RAM 完全为空的情况下,系统必须由操作员在前面板以八进制手动拨入约 20 个字节的 Bootstrap 引导程序,以接管后续数据传输。 - [03:51](https://www.youtube.com/watch?v=qv5b1Xowxdk&t=231s) 在 110 波特率(每秒约 10 个字符)的机械纸带传输限制下,完整载入 4K BASIC 需要长达 7 至 8 分钟。 - [06:27](https://www.youtube.com/watch?v=qv5b1Xowxdk&t=387s) 早期微型计算机缺乏现代存储文件指令,应用软件也是通过纸带模拟键盘字符输入的方式直接回放到 BASIC 解析器中运行。 ## Key takeaways - [00:01](https://www.youtube.com/watch?v=qv5b1Xowxdk&t=1s) Altair 8800 在冷启动时没有内置 ROM,内存完全为空,必须手动从前面板开关存入引导加载程序(Bootstrap Loader)。 - [00:01](https://www.youtube.com/watch?v=qv5b1Xowxdk&t=1s) 系统采用分级引导机制:先由手工拨入的极简 Bootstrap 读入纸带前段的 Checksum Loader,再由其校验并加载 4K BASIC 主体。 - [00:01](https://www.youtube.com/watch?v=qv5b1Xowxdk&t=1s) 主讲人使用针对 SIO 串口板的 Altair 4K BASIC 3.2,在前面板将配置位全部置 0 以声明硬件接口类型。 - [00:01](https://www.youtube.com/watch?v=qv5b1Xowxdk&t=1s) 硬件操作有严格的时序要求:必须先开启 Teletype 纸带阅读机进给空白前导区,再将 Altair 置于 RUN 状态。 - [03:51](https://www.youtube.com/watch?v=qv5b1Xowxdk&t=231s) 前面板地址与数据指示灯的闪烁节奏变化,直观指示了系统从 Bootstrap 跳转至 Checksum Loader 运行的阶段切换。 - [03:51](https://www.youtube.com/watch?v=qv5b1Xowxdk&t=231s) 由于 110 波特率的极低串行传输速率,整个 4K BASIC 载入过程持续 7 到 8 分钟,伴随巨大的机械噪声并吐出长条纸带。 - [03:51](https://www.youtube.com/watch?v=qv5b1Xowxdk&t=231s) BASIC 成功引导后,系统需通过 Teletype 终端交互配置内存大小、终端字符宽度及是否保留正弦(SIN)等数学函数以节省内存。 - [03:51](https://www.youtube.com/watch?v=qv5b1Xowxdk&t=231s) 通过即时执行 'PRINT 2+2' 并输出 4,验证了系统已正确进入 BASIC 交互式解析执行状态。 - [06:27](https://www.youtube.com/watch?v=qv5b1Xowxdk&t=387s) 在早期计算机架构中,程序输入是通过纸带直接回放字符流,BASIC 无法区分这是物理键盘敲击还是纸带自动读入。 - [06:27](https://www.youtube.com/watch?v=qv5b1Xowxdk&t=387s) 运行素数计算程序展示了 Intel 8080 处理器的算力瓶颈:随着素数变大,BASIC 运算耗时显著增加,计算速度甚至赶不上电传打字机的机械打印频率。 - [06:27](https://www.youtube.com/watch?v=qv5b1Xowxdk&t=387s) 演示采用 Altair 8800 Clone 复制机,在忠实还原原始操作手感与电气缺陷的同时,规避了损坏珍贵 1975 年古董硬件的风险。 ## Detailed walkthrough ### [00:01](https://www.youtube.com/watch?v=qv5b1Xowxdk&t=1s) 缘起与前面板引导加载程序的输入 主讲人 deramp5113 介绍,本期视频将演示如何使用 ASR-33 Teletype(电传打字机)及其自带的纸带阅读机,将 4K BASIC 加载到 Altair 8800 中。这是约半年前一个视频的重制版;当时他手头还没有真正的 Teletype,纸带镜像只能通过 PC 终端模拟器经由串口模拟输入。随后他有幸购买并翻修了一台真实的 Teletype,因此得以完成这次真正的实机演示。他感慨道,这次演示能够完整呈现“当年我们仅仅为了在 Altair 上跑起 BASIC 所经历的全部乐趣”。由于 Altair 8800 开机时内存中空无一物,只有一片完全未初始化的空白 RAM,必须先通过前面板开关逐字节手动拨入一个极简的引导加载程序(bootstrap loader),赋予机器最基本的输入处理能力,以便后续从纸带机读取数据。 这个初始的引导加载程序会去读取从 MITS 购买的官方纸带前段,即一个更为复杂的“校验和加载程序”(checksum loader),再由后者接管系统并校验读取剩下的 BASIC 本体。引导程序的具体代码取决于系统配置,本次演示使用的是针对 Altair 8800 SIO 串口板的 4K BASIC 3.2 版本。主讲人从内存地址 0 开始,通过前面板上的拨动开关手动将八进制机器码依次存入(Deposit)内存中:先存入 041 和 256,接着连续输入 017、061、022、000、333、000、017、330、333、001、275、310、055、167、300、351、003 以及 000。 输入完成后,必须向系统声明当前所采用的串口类型。在 4K BASIC 中,前面板前几位开关用来指示串口硬件;由于当前系统采用的是标准 SIO 板,对应 4K BASIC 3.2 版本,这些配置位全部需要置为 0。操作规程明确要求,在前面板拨下 RUN 运行开关之前,必须先启动 Teletype 的纸带阅读机。主讲人随后执行 RESET 复位操作,将程序指针归零至地址 0,准备开始引导。 ```mermaid flowchart TD accTitle: Altair 8800 BASIC 加载流程 accDescr: 展示从前面板拨码到最终运行 BASIC 程序的阶段流程 subgraph Phase1 ["第一阶段:前面板手动注入"] A["前面板手动拨入 Bootstrap Loader"] --> B["配置 SIO 串口参数并复位到地址 0"] end subgraph Phase2 ["第二阶段:纸带分级加载"] B --> C["启动 Teletype 读取引导前导区 (Leader)"] C --> D["Bootstrap 读入 Checksum Loader (约 256 字节)"] D --> E["Checksum Loader 接管,读取 4K BASIC 核心"] end subgraph Phase3 ["第三阶段:交互与执行"] E --> F["BASIC 启动提示符 (Memory Size / Terminal Width)"] F --> G["纸带输入 Primes 源码并运行计算"] end ``` - 核心硬件与环境:Altair 8800、ASR-33 Teletype(翻修完成并带纸带阅读机)、SIO 串口板。 - 加载软件版本:Altair 4K BASIC Version 3.2。 - 启动代码输入:从 0 地址开始,手工通过前面板开关按八进制逐字节存入 20 余个字节的 Bootstrap 代码。 - 串口识别配置:在 4K BASIC 3.2 规范下,针对 SIO 接口板,前面板指定的硬件配置位全部置 0。 ### [03:51](https://www.youtube.com/watch?v=qv5b1Xowxdk&t=231s) 纸带读取过程与 4K BASIC 的成功引导 主讲人将镜头切换到 Teletype。纸带开头是一段具有规则重复打孔样式的引导空白段(Leader)。他打开 Teletype 的纸带阅读开关,随即在 Altair 前面板上扳下 RUN 开关启动程序。此时,Altair 前面板的地址与数据指示灯开始闪烁,显示 bootstrap loader 正在执行并逐字节接收数据。大约读取了 256 字节(包含部分空白前导区及代码)后,指示灯的闪烁模式骤然改变,这表明 bootstrap loader 已成功将 checksum loader 读入内存并跳转执行,由后者继续读取纸带上后续的大量 BASIC 核心代码。 纸带在阅读机上持续以机械节奏进给,纸带的中间节点清晰可见:前段是 checksum loader 的末端,紧接着就是 4K BASIC 的数据起点。在 110 波特率的传输速率下,通信速度仅为每秒 10 个字符,完整加载整个 4K BASIC 需要漫长的 7 到 8 分钟,吐出的打孔纸带最终在地面上堆积成一大团。视频经过剪辑跳过了漫长的等待,画面切回到纸带即将见底的“真实时刻”(moment of truth)。纸带完全走完后,Teletype 尖锐嘈杂的机械运转声骤然停止,主讲人松了一口气赞叹:“Ah, nice when that noise finally stops.” 紧接着,Teletype 打印出 BASIC 的启动提问:询问 `MEMORY SIZE?`(内存大小),主讲人直接敲击回车默认全选;询问 `TERMINAL WIDTH?`(终端宽度),再次直接回车;询问 `WANT SIN?`(是否需要正弦等数学函数),主讲人键入 `Y` 回车确认。系统随即打印出完整的版本标识并进入就绪状态。为了测试环境,他在键盘上键入 `PRINT 2+2`,打字机立刻在下一行清脆地打印出答案 `4`。 - “It takes about 7 to 8 minutes to load all the basics at 110 baud, 10 characters per second.”(在 110 波特率、每秒 10 个字符的速度下,加载全部 BASIC 大约需要 7 到 8 分钟。) - 内存初始化配置:系统就绪前需通过 Teletype 回答内存空间上限、行打印字符宽度以及是否保留三角函数支持(如 SIN)。 - 成功验证:系统打印启动信息后,运行简单数学指令 `PRINT 2+2` 并正确输出了 `4`。 ### [06:27](https://www.youtube.com/watch?v=qv5b1Xowxdk&t=387s) 通过纸带输入程序与 Altair Clone 说明 虽然 4K BASIC 已经成功载入,但内存中尚无任何应用代码。主讲人指着散落在地上的长长纸带解释说,这就是刚加载完毕的 4K BASIC 实体。为了演示如何运行实际程序,他取来另一卷印有素数计算程序(Primes program)的较短纸带穿入阅读机。由于当时的基础系统根本没有现代意义上的磁盘或磁带“LOAD”文件指令,程序输入实际上完全依托于电传打字机的纸带直接回放——在 BASIC 解析器看来,这与操作员在键盘上以极快速度逐行手工敲入代码没有任何区别。纸带走完后,素数程序便全部载入内存。 主讲人在终端敲入 `RUN` 命令,Teletype 随即开始计算并逐个打印素数。由于 8080 处理器在运行 4K BASIC 解释执行算法时算力有限,随着素数数值越来越大,程序运算的时间开销逐渐增加,主讲人幽默地指出,计算机中途甚至开始比 Teletype 的机械打印还要慢,它必须在每个素数打印之间停下来“思考”一会儿。 演示接近尾声时,主讲人说明本次视频所使用的 Altair 8800 并非 1975 年的原装古董机,而是一台 Altair 8800 Clone 复制机。这款复刻机虽然内部采用了现代硬件,但在外观、前面板操作手感、硬件接口功能、性能甚至当年的架构缺陷上均做到了忠实还原。主讲人评价道:“This allows you to relive these great days in computing, including using teletypes, obviously, to experience this stuff hands-on without having to worry about damaging a vintage computer.” 这种方式让复古计算爱好者既能亲手体验原始电传打字机和纸带加载的乐趣,又完全不必提心吊胆担心烧毁珍稀的历史原件。 - 软件载入机制:早期 BASIC 无专用读取文件的 LOAD 命令,纸带内容以标准的终端字符流回放,直接模拟人工从键盘敲入带有行号的代码。 - 算力瓶颈演示:运行素数筛选程序时,计算延迟随数值增大而增加,甚至跑得比机械打字机还慢。 - 设备性质澄清:演示采用 AltairClone.com 出品的兼容克隆机,通过现代电路复刻原始 Altair 8800 的电气特性、面板开关交互与限制。 ## Mentioned deramp5113, Altair 8800, ASR-33 Teletype, 4K BASIC, MITS, Altair 8800 Clone, Intel 8080 ## Video description Loading and operating Altair 4K BASIC using a front panel bootloader and an ASR-33 Teletype. [Source](https://www.youtube.com/watch?v=qv5b1Xowxdk)

Original transcript

[0:01] In this video, we're going to load 4K [0:03] basic into an Alter 8800 using a [0:06] teletype and the paper tape reader on [0:08] the teletype. And this is a remake of a [0:10] video I did about 6 months ago. But in [0:12] that video, I didn't actually have the [0:14] teletype. Instead, the paper tape image [0:17] was loaded from a serial port just like [0:19] it would have been from a teletype, but [0:21] the data came from a terminal emulator [0:24] running on a PC. In the meantime, I've [0:26] had the joy of purchasing and refurbing [0:28] a teletype. So now I can do the demo for [0:30] real. Um the original video will have a [0:33] little bit more information about some [0:34] of the details. It's still worth [0:35] watching. This one's going to go through [0:37] the process though of getting basic up [0:39] and running. All the fun we went through [0:41] in the old days just to have um a basic [0:44] up and running on an Alter. All right. [0:46] So first of all, let's go over to the [0:47] Alter. And we're going to have to enter [0:49] the bootstrap loader because as you [0:52] recall when the alter boots up, it has [0:55] nothing inside [0:56] it except a bunch of empty uninitialized [1:00] RAM. In order to read from the paper [1:03] tape reader, we're going to have to [1:04] input a small bootstrap loader that [1:07] gives it just enough smarts to accept [1:09] data from the tape reader. That tape [1:11] reader then will read in the tape that [1:14] you would have purchased from Alter. [1:16] First part of that tape reader is [1:17] another more sophisticated loader called [1:19] the check sum loader that then turns [1:22] around and reads in the rest of basic [1:24] off a tape. All right. The bootstrap [1:26] loader would have been provided in the [1:28] manual you got from Alter. For our [1:30] particular configuration, we're loading [1:32] basic version 3.2 4K basic and we're [1:36] using an SIO port. Those two things tell [1:38] us what bootstrap loader to put in. So [1:40] I'm going to go ahead and put that in [1:41] now. Starting at location zero. All [1:43] right. The first two byes are 41 and [1:48] 256. 41. We'll deposit that in the [1:51] location zero. And then [1:55] 256 goes in the next location. Next two [1:58] bytes are 17 and [2:05] 61. 22 and zero. [2:12] 333 and [2:19] zero. 17 and [2:27] 330. 333 and 1. [2:34] 275 [2:43] 310 55 and [2:51] 167 300 [2:57] 351 and three and zero. [3:03] All right. Now, at this point, the [3:05] program has been entered. That's the [3:06] bootstrap loader with enough smarts to [3:08] read the paper tape. But before we input [3:10] the um starts paper tape reading, we [3:13] have to tell the loader and basic what [3:15] type of serial port we're using. And in [3:17] 4K basic um the first six positions or [3:20] so were used to tell that. In um later [3:23] versions of basic and the loader, these [3:25] four told basic what type of serial port [3:27] was used. These four told the loader. [3:30] But we're using an SIO board. In that [3:32] case, these bits all have to be zero for [3:34] version 4 uh I mean version 3.2 of 4K [3:38] basic. All right. So now it's ready to [3:40] run. However, the instructions say to [3:41] start the teletype paper tape reading [3:43] first before you hit run on the program. [3:46] Now we're going to want to run from [3:47] location zero. So I'm going to do a [3:48] reset to get us back to location zero. [3:51] All right. Now let's zoom out a bit and [3:53] take a look at the [3:56] teletype. All right. If you look a close [3:58] look at the paper tape, you'll see that [4:00] we're in a very [4:02] um repeating pattern over and over, that [4:04] is the the leader. Turn on the [4:08] teletype and I'm going to hit the [4:12] run. Start the program on the teletype. [4:14] I mean on the [4:17] alter. Now, if you look over here on the [4:19] alter, what you're seeing is the [4:22] bootstrap loader running. That's the [4:23] light pattern you see. And when it's [4:25] done loading the bootstrap loader, we'll [4:27] see the life pattern change when it [4:29] jumps into the check sum loader that [4:32] then turns around and reads the rest of [4:33] basic. That's about 256 bytes worth by [4:36] the time it goes through some leader and [4:38] the loader. Okay, there it just [4:39] switched. So at this point, the second [4:42] stage loader is running and it's now [4:44] going to continue to read the rest of [4:45] the tape which has face. [4:51] If we look at this tape, you can kind of [4:52] see here's [4:54] the here's the end of the check some [4:57] loader and here's now the start of [4:59] reading in [5:02] basin. All right. Well, this one will [5:04] continue for a very long time. It'll end [5:06] up eventually putting quite a pile of [5:08] paper on the [5:09] floor. Uh it takes about 7 to 8 minutes [5:13] to load all the basics at 110 characters [5:15] per second. I mean 110 bot 10 characters [5:18] per second. We're going to do a video [5:20] cut and come back to this right before [5:22] it finishes [5:22] [Music] [5:24] loading. All right, the moment of truth [5:26] is getting close. Just about out of tape [5:29] here. You can see the end of the tape [5:31] coming up. [5:41] When it's done loading, we hope to see [5:43] basic sign [5:47] on. All right, that's [5:51] it. Ah, nice when that noise finally [5:54] stops. Okay, hopefully you can read [5:56] that. It's asking memory size. We'll [5:58] just hit [6:01] return. Terminal width. We'll just hit [6:04] return. Want sign? We'll say yes. [6:14] All right, we're up and [6:22] running. All right, print 2 plus two. We [6:25] see the answer there is four. All right, [6:27] but now you still have [6:29] a an empty machine. There's still [6:32] nothing you can do with it. Um, take a [6:34] look at this pile of paper on the floor. [6:37] There's 4K basic as it loaded. I do have [6:41] another short paper tape that we can [6:42] load that'll load the primes program. [6:44] So, let's go ahead and put that [6:57] in. As far as B is concerned, this is [7:01] literally just typing in the program. [7:32] So basic doesn't know that wasn't just [7:33] typed in. So as far as it knows, you [7:35] just typed it [7:37] [Music] [7:39] in. Now you can run the [7:44] program. This is computing prime [7:46] numbers. Eventually the program gets [7:49] slower than the teletype. It has to [7:51] think in between here. [7:53] [Music] [8:08] All right. So, that's loading 4K basic [8:10] with a teletype. And then we actually [8:12] loaded a program. There is no load [8:14] command. You simply read it in from a [8:15] paper tape. And as far as basic need, [8:18] you just typed it in. And uh we're up [8:20] and running with a working basic [8:25] machine. Now, the computer used in [8:27] today's video is actually an Alter 8800 [8:31] clone computer. Uh, this computer [8:33] accurately duplicates the look and the [8:35] feel, the features, performance, and [8:38] limitations of a real Alter, but it does [8:40] it with modern hardware on the inside. [8:42] This allows you to uh relive these great [8:44] days in computing, including using [8:46] teletypes, obviously, uh, to experience [8:49] this stuff hands-on without having to [8:50] worry about damaging a vintage computer. [8:53] Be sure to visit [8:54] alterclone.com to learn more about this [8:56] great machine.