Apple Omits Connector Buffer, Sending 50 Volts Into MacBook CPUs
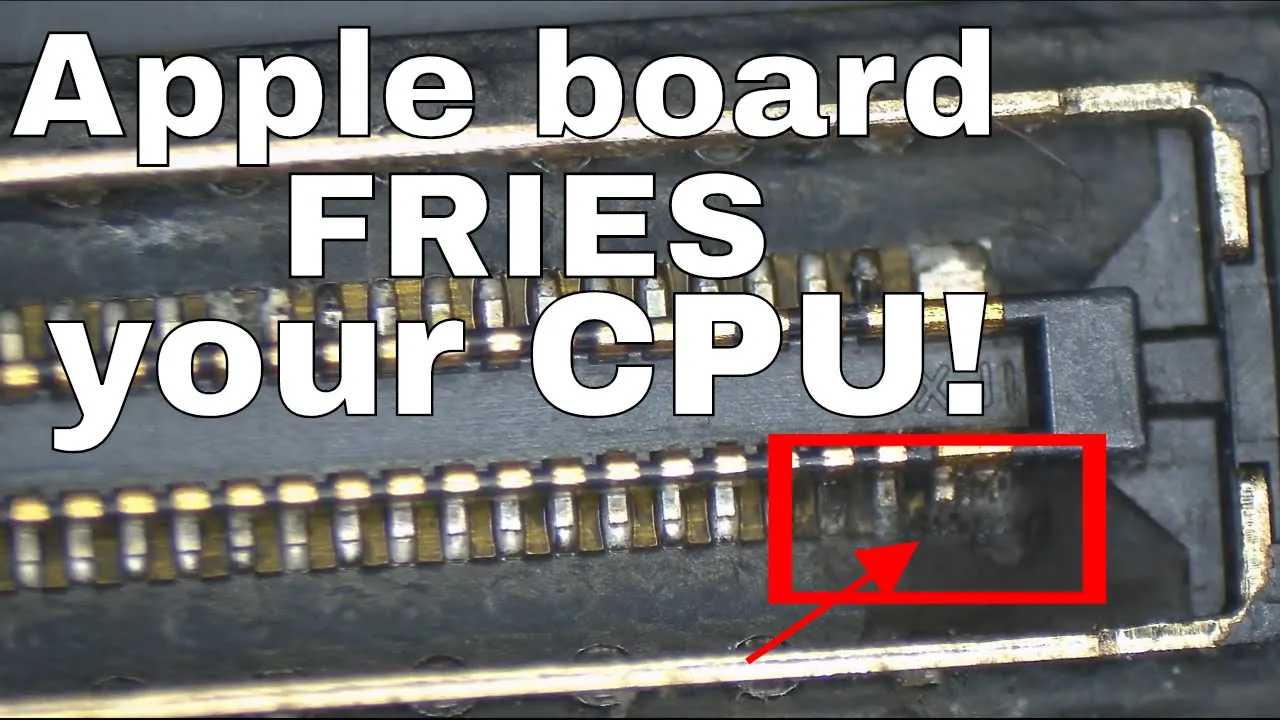
Apple botches Macbook board design: again! — Louis Rossmann

Louis Rossmann

Eliminating isolation pins between the high-voltage backlight rail and low-voltage data lines causes display arcing that fries multiplexers in 15-inch MacBooks and destroys the CPU silicon in 13-inch models.

AI-assisted summary of Apple botches Macbook board design: again! — original source. Check the original for full context.

Source published:

Key ideas

  • Apple omitted protective buffer pins on 2016–2018 Touch Bar MacBook Pro display connectors, placing a 38V–50V backlight rail directly adjacent to a 1V–3V DisplayPort AUX data line. (3:16)
  • On 15-inch models, electrical arcing across this connector destroys the internal display circuit of an NXP multiplexer chip, though the laptop can still render video to external monitors. (8:00)
  • On 13-inch models lacking discrete graphics, the identical failure mode feeds 40V–50V directly into the Intel CPU, instantly destroying the silicon and making the repair economically and practically unfeasible. (5:36)
  • Replacement NXP multiplexer chips are listed as non-stock on major distributor catalogs like Mouser due to manufacturer exclusivity, forcing independent repair shops to rely on donor logic boards or specialized secondary suppliers. (10:22)

Detailed notes

## Background Published on YouTube by independent repair advocate Louis Rossmann on December 7, 2018, this video investigates a critical hardware design flaw in USB-C MacBook Pro logic boards. The video's description highlights Rossmann's Right to Repair campaign alongside links to repair services, instructional courses, community forums, and an extensive catalog of workshop tools and diagnostic equipment.

## TL;DR Rossmann exposes an engineering flaw across 2016–2018 MacBook Pros, where Apple abandoned years of layout hygiene by routing a 38V–50V backlight rail directly adjacent to a 1V–3V DisplayPort AUX data line without an isolating ground pin. On 15-inch models, resulting electrical arcing destroys the NXP display multiplexer (MUX), whereas on 13-inch models lacking a discrete GPU, the high-voltage spike travels directly into the CPU, permanently killing the machine. After diagnosing a 15-inch MacBook Pro that outputs video only to external displays, Rossmann navigates component sourcing roadblocks, shields adjacent silicon, and removes the damaged BGA chip. Collaborating with his technician Paul, he cleans the board, solders in a donor multiplexer, and successfully restores the internal display.

## Atmosphere & style The presentation blends sharp technical critique with Rossmann's trademark dry wit, consumer frustration, and casual benchside banter. The narrative moves from righteous indignation during the schematic analysis—contrasting decade-long engineering standards against Apple's unbuffered pin layout—to the focused, tactile flow of live hot-air micro-soldering. Interspersed with jokes about Apple's proprietary supply chain and playful workplace teasing with his colleague Paul, the atmosphere feels like an unvarnished, authentic late-night repair session that culminates in the quiet relief of a working Apple logo.

## Bulletin - [03:16](https://www.youtube.com/watch?v=jahtu1_idVU&t=196s) Apple omitted protective buffer pins on 2016–2018 Touch Bar MacBook Pro display connectors, placing a 38V–50V backlight rail directly adjacent to a 1V–3V DisplayPort AUX data line. - [08:00](https://www.youtube.com/watch?v=jahtu1_idVU&t=480s) On 15-inch models, electrical arcing across this connector destroys the internal display circuit of an NXP multiplexer chip, though the laptop can still render video to external monitors. - [05:36](https://www.youtube.com/watch?v=jahtu1_idVU&t=336s) On 13-inch models lacking discrete graphics, the identical failure mode feeds 40V–50V directly into the Intel CPU, instantly destroying the silicon and making the repair economically and practically unfeasible. - [10:22](https://www.youtube.com/watch?v=jahtu1_idVU&t=622s) Replacement NXP multiplexer chips are listed as non-stock on major distributor catalogs like Mouser due to manufacturer exclusivity, forcing independent repair shops to rely on donor logic boards or specialized secondary suppliers.

## Key takeaways - [00:00](https://www.youtube.com/watch?v=jahtu1_idVU&t=0s) Louis Rossmann criticizes Apple for fundamental engineering oversights on premium-priced USB-C MacBook Pros manufactured between 2016 and 2018. - [01:18](https://www.youtube.com/watch?v=jahtu1_idVU&t=78s) Legacy MacBook Pro designs from 2012 to 2015 isolated high-voltage backlight rails from low-voltage data pairs using ground or disconnected buffer pins. - [03:16](https://www.youtube.com/watch?v=jahtu1_idVU&t=196s) On Touch Bar generation logic boards, pin 43 carries 38V to 50V directly next to the 1V to 3V DisplayPort AUX line without physical clearance or isolation. - [03:16](https://www.youtube.com/watch?v=jahtu1_idVU&t=196s) Electrical arcing or bridging at the display micro-connector allows up to 50V to surge directly into sensitive low-voltage data circuitry. - [03:16](https://www.youtube.com/watch?v=jahtu1_idVU&t=196s) On 15-inch dual-GPU MacBook Pros, the surge hits an NXP display multiplexer (MUX) chip, destroying its internal display interface while sparing external video output. - [05:36](https://www.youtube.com/watch?v=jahtu1_idVU&t=336s) On 13-inch MacBook Pros (A1706 and A1708), the DisplayPort AUX trace runs straight into the Intel CPU, killing the processor instantly when an arc occurs. - [05:36](https://www.youtube.com/watch?v=jahtu1_idVU&t=336s) Replacing a dead CPU on a 13-inch board is virtually impossible due to the unavailability of new Intel silicon and the high failure rate of salvaged donor chips. - [08:00](https://www.youtube.com/watch?v=jahtu1_idVU&t=480s) A standard diagnostic bench test demonstrates that a blown MUX chip allows normal external video over USB-C to HDMI despite a completely dead internal screen. - [10:22](https://www.youtube.com/watch?v=jahtu1_idVU&t=622s) Official component distributors like Mouser list the NXP multiplexer as non-stocked, highlighting the restrictive distribution agreements surrounding Apple parts. - [10:22](https://www.youtube.com/watch?v=jahtu1_idVU&t=622s) Because the MUX sits between the CPU and GPU, technicians must shield adjacent processors and lower hot-air station airflow to prevent collateral heat damage. - [11:49](https://www.youtube.com/watch?v=jahtu1_idVU&t=709s) BGA rework best practices require testing horizontal component movement before lifting to prevent tearing delicate copper solder pads off the board. - [13:05](https://www.youtube.com/watch?v=jahtu1_idVU&t=785s) Factory lead-free solder must be flushed with flux and leaded solder alloy to safely prepare the motherboard pads without scratching the solder mask. - [16:38](https://www.youtube.com/watch?v=jahtu1_idVU&t=998s) Installing a functional replacement MUX chip harvested from a donor board fully restores internal display output and confirms the failure diagnosis.

## Detailed walkthrough ### [00:00](https://www.youtube.com/watch?v=jahtu1_idVU&t=0s) Apple's Design Flaws and Engineering Accountability

Louis Rossmann introduces another fundamental hardware engineering flaw in Apple laptops, addressing an announcement he had previously posted on his YouTube community page. While many well-documented board defects in Apple hardware have affected models spanning from 2008 through 2015, the problem highlighted here directly strikes the USB-C generation of 13-inch and 15-inch MacBook Pros manufactured across 2016, 2017, and 2018. Rossmann emphasizes that his criticism is not fueled by blind brand animosity, but rather by the conviction that consumers paying premium prices deserve engineering that meets standard professional benchmarks. As Louis Rossmann stated:

> “As a trillion dollar company that sells three thousand dollar machines, can you do just a little bit better than something we would expect from a first-year intern?”

The recurring failure under scrutiny presents as a complete "no image" symptom on USB-C MacBook Pros. While previous historical issues—such as failing capacitors or poorly positioned components—could occasionally be chalked up to understandable engineering oversights that simply languished without revisions, Rossmann characterizes this specific layout decision as objectively terrible. To demonstrate why, he contrasts the high-voltage trace layouts of legacy MacBooks against the revised Touch Bar generation.

- Affected model years: 2016, 2017, and 2018 MacBook Pro models (13-inch and 15-inch with USB-C). - Core symptom: Complete absence of display output (no image and no backlight).

---

[01:18](https://www.youtube.com/watch?v=jahtu1_idVU&t=78s) Legacy Display Connector Architecture (2012–2015)

Examining the schematics of older MacBook Pro models, such as the 2012 non-Retina and the 2015–2016 pre-Touch Bar 13-inch Retina units, Rossmann illustrates standard electronics design principles regarding high-voltage isolation. In the 2012 design, the LCD connector houses 3V supply rails alongside low-voltage differential signaling (LVDS) data lines operating at 1V to 3V. Placed safely at the far end of the connector—buffered by an isolated or grounded not-connected (NC) pin—sits the LCD backlight rail. Because display backlights require boosting anywhere from 26V to 50V, keeping high-voltage rails physically separated from sensitive low-voltage signaling lines is an essential safety precaution that any reputable electronics engineer, including educators like Dave Jones of the *EEVblog*, would teach as basic design hygiene.

The 2015 pre-Touch Bar 13-inch MacBook Pro schematic shows this exact same protective layout philosophy. High-speed DisplayPort image pairs remain isolated from power rails by dedicated ground pins. A 5V power line and backlight data lines sit separated by grounded and disconnected buffer pins before reaching the 39V to 40V backlight output rail. Across ten years of previous motherboard revisions, low-voltage communication paths were never placed in unbuffered proximity to high-voltage boosting circuits.

```mermaid flowchart LR accTitle: Legacy LCD Connector Pin Isolation accDescr: Diagram illustrating how legacy Apple LCD connectors separated low-voltage data from high-voltage backlight rails using ground or NC pins.

subgraph DataGroup["Low-Voltage Domain"] D["LVDS / eDP Lines<br>(1V - 3V)"] end

subgraph BufferGroup["Isolation"] G["Ground / NC Buffer Pins<br>(0V Protection)"] end

subgraph PowerGroup["High-Voltage Domain"] B["Backlight Output Rail<br>(26V - 50V)"] end

D --- G --- B ```

---

[03:16](https://www.youtube.com/watch?v=jahtu1_idVU&t=196s) The Touch Bar Connector Flaw and 15-Inch Multiplexer Damage

On the 2016–2017 Touch Bar MacBook Pro logic boards, Apple abandoned this protective spacing. Inspecting the physical connector on the bench alongside the digital schematic and boardview software, Rossmann highlights pin 43, designated as `PPVOUT_S0_LCDBKLT`. This rail carries 38V to 50V to illuminate the screen. Directly adjacent to pin 43, without an intervening ground pin, not-connected buffer, or any physical clearance, sits the DisplayPort auxiliary (AUX) communication line operating at just 1V to 3V.

```mermaid flowchart TD accTitle: Touch Bar Connector Routing Consequences accDescr: Flowchart contrasting what happens when 50V jumps to the DisplayPort AUX line on 15-inch vs 13-inch MacBook Pros.

HV["Pin 43: Backlight Output<br>(38V - 50V)"] AUX["Adjacent Pin: DP AUX Line<br>(1V - 3V Data)"]

HV -->|"Arcing / Bridging across micro-connector"| AUX

subgraph Fifteen["15-Inch Models (Dual GPU)"] AUX --> MUX["NXP Multiplexer Chip"] MUX -->|"Fries internal display circuit"| RepM["Repairable:<br>Replace BGA MUX Chip"] end

subgraph Thirteen["13-Inch Models (A1706 / A1708)"] AUX --> CPU["Intel CPU with Integrated Graphics"] CPU -->|"50V kills silicon instantly"| RepU["Unrepairable:<br>Need unobtainable donor CPU"] end ```

Under the microscope, Rossmann displays the physical consequences on a customer's display flex cable: visible arcing and burned scorch marks at the corner pin where the high-voltage backlight rail jumps directly into the neighboring low-voltage trace. On 15-inch models, the DisplayPort AUX line routes to an NXP multiplexer (MUX) chip on the opposite side of the board. The MUX dynamically switches display output between the low-power integrated Intel graphics and the discrete AMD or Nvidia graphics card without screen tearing or requiring a system restart. When high voltage arcs into this line, it overloads and destroys the multiplexer's internal panel interface.

- LCD backlight rail voltage: 38V to 50V on pin 43 (`PPVOUT_S0_LCDBKLT`). - Adjacent DisplayPort AUX line voltage: 1V to 3V. - Failure mechanism: Electrical bridging or arcing directly into adjacent low-voltage silicon.

---

[05:36](https://www.youtube.com/watch?v=jahtu1_idVU&t=336s) The Catastrophic Failure Mode on 13-Inch Models

While a scorched MUX on a 15-inch machine is a challenging board-level repair, the consequences on the 13-inch MacBook Pro models (the two-port A1708 and four-port Touch Bar A1706) are far more devastating. Because 13-inch configurations lack a discrete graphics card, they do not utilize a MUX chip. Tracing the DisplayPort AUX trace through boardview reveals that the line runs straight from the connector into the Intel CPU. When the identical arcing event occurs on a 13-inch laptop, between 40V and 50V is injected directly into the central processor. As Louis Rossmann explained:

> “So yes, Apple designed a machine in a manner where if there's any teeny tiny malfunction, rather than that 40 to 50 volt power line going to ground as a safety, it's going to send that 40 to 50 volts straight to your CPU all because they didn't decide to put a pin in between the two as they've been doing for over 10 years now, which is the basic common sense of design.”

A 50-volt surge into standard 1-volt to 3-volt CPU silicon kills the chip instantly. Replacement Intel CPUs cost between $150 and $450, but brand-new replacement chips are completely unavailable to independent repair facilities. The only sourcing option is harvesting salvaged processors stripped from scrap boards in China, many of which suffer thermal or physical damage during removal. Even with a $7,000 professional BGA rework station, sourcing a reliable CPU for a Touch Bar logic board is practically impossible, turning a simple connector arc into a complete motherboard write-off.

- Affected 13-inch models: A1706 (Touch Bar) and A1708 (Function Keys). - CPU cost range: $150 to $450 per chip (salvage only; new silicon unavailable). - Consequence: Direct destruction of the CPU silicon upon display cable arcing.

---

[08:00](https://www.youtube.com/watch?v=jahtu1_idVU&t=480s) Bench Diagnostics, External Output, and Component Sourcing

Rossmann sets the 15-inch MacBook Pro onto his bench to walk through the standard diagnostic procedure for verifying this specific defect. When powered on with its internal display attached, the laptop produces neither image nor backlight. However, after disconnecting the internal display assembly and plugging a USB-C-to-HDMI adapter into an external monitor, the system boots and renders an external macOS desktop without issue. This discrepancy confirms that the graphics processors are operational, but the internal screen routing inside the MUX silicon was destroyed by a 50V surge.

```mermaid flowchart LR accTitle: Bench Diagnostic Flow for Blown Display MUX accDescr: Diagnostic steps showing internal display failure alongside functional external video output via USB-C.

Start["15-Inch Touch Bar MacBook Pro<br>(No Internal Display)"] --> Step1["Test Internal Screen"] Step1 --> Result1["Black Screen<br>(No Backlight / No Image)"] Result1 --> Step2["Disconnect Internal LCD Panel"] Step2 --> Step3["Connect USB-C to HDMI Adapter"] Step3 --> Result2["External Screen Displays macOS Desktop"] Result2 --> Conclusion["Conclusion: MUX Chip Internal Path Fried by 50V"] ```

To restore the internal display, the logic board requires desoldering the damaged BGA multiplexer and reballing and soldering a new replacement chip—a task Rossmann jokingly admits he will likely delegate to his lead technician, Paul. Looking up the NXP multiplexer part number on Mouser Electronics to determine if independent technicians can purchase stock directly, the listing returns "Non-Stocked / Call for quote." Rossmann observes that such supply-chain roadblocks usually occur when Apple demands vendor exclusivity agreements, preventing manufacturers from selling replacement microchips to anyone else in the open market.

- Diagnostic result: Functional external display output via USB-C to HDMI alongside zero internal display activation. - Repair path: Replacement of the surface-mount NXP multiplexer BGA chip. - Sourcing status on Mouser: Listed as "Non-Stocked / Call for quote" due to restrictive manufacturer distribution agreements.

[10:22](https://www.youtube.com/watch?v=jahtu1_idVU&t=622s) Sourcing Difficult Apple Components and Preparing the Work Area

Comparing the multiplexer (MUX) chip to parts like the ubiquitous ISL6259, Louis points out how hard it is to source components for Apple hardware through conventional distributors like Mouser, who list them as non-stock. He jokes about Apple's territorial behavior over its supply chain: “See that, that, that's Apple right there, that's fixing Apple products. The chips, they are, they are very jealous ex-girlfriend-y when it comes to stuff like that.” Because standard channels refuse to supply these chips, third-party repair shops have to rely on alternative vendors. Louis mentions that he plans to stock these chips on his own storefront, store.rossmanngroup.com, declaring, “We're gonna sell what Mouser refuses to.”

```mermaid flowchart TD accTitle: Sourcing Flow for Apple Proprietary Chips accDescr: Diagram illustrating how repair shops bypass non-stocking official distributors by sourcing from third-party vendors and reselling them. subgraph OfficialChannel["Official Channel"] A["Standard Distributors (e.g., Mouser)"] -->|"Lists as Non-Stock"| B["No Public Availability"] end subgraph IndependentSupply["Independent Supply Path"] C["Alternative Component Vendors"] -->|"Procured by Repair Shops"| D["Rossmann Group Store"] D -->|"Sold to Technicians"| E["Board-Level Repairs"] end ```

The repair itself presents a delicate physical challenge because the MUX chip is sandwiched directly between the CPU and the GPU. Applying hot air carelessly in this area risks destroying either massive processor. To mitigate this without dedicated factory shielding, Louis sets up a makeshift heat deflector using a rubber-coated metal spudger placed over the adjacent silicon. He also dials back the airflow on his hot air rework station below his usual setting of 120 liters per minute to keep the heat localized and prevent collateral damage.

[11:49](https://www.youtube.com/watch?v=jahtu1_idVU&t=709s) Removing the Defective MUX Chip

While waiting for the solder joints to melt under the hot air, Louis responds to a live stream viewer offering a donation for a shot of Jägermeister, thanking them but noting that he is actively working to eat healthier, drink less, and get back into shape. As the heat builds on the board, he maintains strict technique regarding BGA chip removal. He explains that you should never lift upward on a component until the molten solder lets it slide freely: “Remember, I'm not gonna pull up on this chip until I see that it can move left and right, because if I'm pulling up on it, I'm probably gonna pull it up while the joint is still half cold.”

Once the solder liquefies and the chip glides under tweezer pressure, Louis lifts the defective MUX off the logic board, revealing the tiny solder ball grid beneath. He notes the alignment orientation for the replacement and begins cleaning the residual solder off the motherboard pads.

- The MUX chip sits immediately between the CPU and the GPU, demanding thermal shielding and controlled airflow during hot air rework. - Prematurely pulling up on surface-mount BGA components before all solder joints fully liquefy will rip copper solder pads off the board. - Technicians verify solder liquefaction by nudging the component horizontally before lifting.

[13:05](https://www.youtube.com/watch?v=jahtu1_idVU&t=785s) Cleaning Pads and Solder Preparation

With the failed chip out of the way, Louis preps the logic board pads by clearing away the factory lead-free solder. He coats the area generously with Amtech NC-559-V2-TF tacky flux and sweeps a ball of leaded solder across the surface to absorb and flush out the brittle factory alloy. He stresses the need for a delicate hand with the soldering iron, ensuring he does not scratch away the solder mask or rip traces off the board: “Gently touch the board, not enough that we're pulling off the, the covering and the coating off of the traces, but just enough that we have gotten rid of all the lead-free junk.”

While working the iron, Louis banters with his shop colleague Paul about future division of labor if they can buy these chips pre-balled. Louis playfully proposes: “I was thinking that we work out a deal where I was kind of thinking I do the 15-inch ones, you do the 13-inch ones, what do you say?” Paul questions the split, and Louis jokes that giving Paul the smaller boards is actually an act of generosity meant to save space and reduce clutter on Paul's workbench. Louis then fetches a donor board to harvest another MUX chip.

[16:38](https://www.youtube.com/watch?v=jahtu1_idVU&t=998s) Installing the Donor Chip and Verifying the Display

After harvesting, prepping, and installing the donor MUX chip onto the customer's logic board, the board is reassembled for testing. Looking at the solder work completed with Paul, Louis jokes about the high stakes of component-level repair: “Look at Paul's workmanship here. We allowed to bash this board to pieces if after all this work it doesn't have an image on the internal screen?”

The machine powers up, and the internal screen immediately lights up: “Oh, Apple logo, Apple logo, okay! All right, so this is the Apple logo, which means we have fixed the issue by replacing the MUX.” With the screen successfully displaying video, Louis notes that it is 8:00 PM, signs off the clock, thanks the audience for watching, and closes with his trademark sign-off: “And as always, I hope you learned something.”

## Notable quotes > [00:00](https://www.youtube.com/watch?v=jahtu1_idVU&t=0s) As a trillion dollar company that sells three thousand dollar machines, can you do just a little bit better than something we would expect from a first-year intern? — Louis Rossmann

## Mentioned Apple, MacBook Pro, Louis Rossmann, Paul, Dave Jones, EEVblog, Mouser Electronics, Intel, AMD, Nvidia, NXP, Amtech, Jägermeister

## Video description Let's get Right to Repair passed! https://gofund.me/1cba2545 👉 If our videos have added revenue to your business, consider becoming a patron 🔵 Patreon https://www.patreon.com/rossmanngroup

🔵 We fix Macbooks & offer free estimates. https://rossmanngroup.com 🔵 Send us your Macbook for repair! http://bit.ly/sendmacbook 🔵 We'll send you a box with a pre-paid shipping label for your repair! http://bit.ly/sendyourmacbook 🔵 We offer iPhone data recovery: http://bit.ly/2BDBX4G 🔵 We offer lab hard drive data recovery: http://bit.ly/labdatarecovery

👉 LEARN HOW TO DO THIS: › In-person classes: https://bit.ly/classrg › Beginner's guide: http://bit.ly/2k6uz84 › Support forum: $29/mo http://bit.ly/boardrepairforum

👉 Donate & post a message: http://bit.ly/postamessage

👉 Below we list tools & recording gear we use, repair guides to help you learn, online chip sources, & donation links:

👉 BlackBerry, Oreo, & Clinton the cat's wish list: https://www.amazon.com/hz/wishlist/ls/2YC1L66N7T5BC?&sort=default

👉 CHIPS & COMPONENTS: › http://bit.ly/2jaAOXM

👉 Discord: https://tinyurl.com/rossmatrix

👉 TOOLS USED:

✓ Soldering Irons: › Louis' Hakko station(no tweezers): http://amzn.to/2cKkMyO › Paul's Hakko station(works with tweezers): http://amzn.to/2yMvWNy › Micro Soldering Pencil: http://amzn.to/2d5MWUP › Hot tweezers: http://amzn.to/2yMvZsZ › Atten ST-862D hot air station: http://bit.ly/atten862

✓ CHEAP HAKKO ALTERNATIVES: › TS100 soldering iron: https://amzn.to/2Gy1Fqz › Recommended tips: TS-C4: https://amzn.to/33s3jpW TS-KU https://amzn.to/2QsKT36

✓ Preferred Soldering Tips › Fine: http://amzn.to/2d5MgPn › Flat: https://amzn.to/2JnsDBT › GPU wicking: http://amzn.to/2w8chtB › Micro soldering tip: http://amzn.to/2qUSFDh

✓ Microscopes: › Microscope: http://amzn.to/2iLrE16 › Barlow lens: http://amzn.to/2yMKdKf › LED light: http://amzn.to/2nzfPT2 › CHEAP alternative microscope: http://amzn.to/2rTlHbj

✓ Soldering/Repair Supplies: › Solder: http://amzn.to/2cKkxUp › Desoldering braid: http://bit.ly/2otflOX › Flux: http://bit.ly/amtechflux › Solder paste: http://bit.ly/amtechsolderpaste › THICK insulated jumper wire: https://amzn.to/2rvtD0A › THIN insulated jumper wire: https://amzn.to/2I47DQY › Kapton tape: http://amzn.to/2yN0xuq › Tweezers: http://amzn.to/2d5NBpi › Blades: http://amzn.to/2ByWnvF › Freeze Spray: http://amzn.to/2BySozw › Conformal coating: http://bit.ly/greencoate › Conformal coating curing pen: http://bit.ly/uvpen

✓ Diagnostic tools: › USB amp meter: http://bit.ly/2B2Lu5W › USB-C amp meter: http://bit.ly/usbcamp › On-Screen multimeter: http://amzn.to/2jtgY9K › Multimeter Probes: http://bit.ly/fineprobes › CHEAP multimeter: http://amzn.to/2zjkg8U › Bench PSU: CSI3005P http://bit.ly/benchsupply › Phoneboard: https://phoneboard.co › Boardview software: https://pldaniels.com/flexbv/

✓ Ultrasonic Cleaning: › ALL MACBOOKS & CELLPHONES: Crest P1200H-45: https://amzn.to/2ITSQdw › PRE-TOUCHBAR MACBOOKS & CELLPHONES: Crest P500H-45: https://amzn.to/2Qrnhf8 › CELLPHONES ONLY: Crest P230H-45: https://amzn.to/2QsckKG › Branson EC cleaning fluid: http://amzn.to/2cKlBrp

✓ Desk supplies: › Desk: http://amzn.to/2yMShdZ › Chair: https://amzn.to/2LB8bUB › Fume Extractor: http://amzn.to/2d5MGoD › Work mat: http://amzn.to/2yMtlTR › Outlets: http://amzn.to/2yNsZwo › Gloves: http://amzn.to/2iUfumS › Durable lightning cable: http://amzn.to/2yNHzUt › Fine tipped snippers: http://amzn.to/2HGt4XB

✓ Screwdrivers: › iPhone bottom screw: http://amzn.to/2yNwX8p › Macbook bottom screw: http://amzn.to/2AKMdVb › Torx T3: http://amzn.to/2zjtxxH › Torx T5 http://amzn.to/2BLNDn4 › Torx T6 http://amzn.to/2B0XIfA › Torx T8 http://amzn.to/2CpWp68 › Phillips #0: http://amzn.to/2AJaHhM › Phillips #000: http://amzn.to/2yNqsCl

✓ RECORDING EQUIPMENT: › Work cam: https://amzn.to/2QjHnt0 › Overhead cam: http://amzn.to/2eAH0oT › Work mic: https://amzn.to/2WGIhzw › Home mic: https://amzn.to/2xfampC › Microscope camera: http://amzn.to/2icVQoG - mine is DISCONTINUED, closest one I can find. › HDMI capture: http://amzn.to/2iyGcle

👉 Affiliate: › Buying on eBay? Support us while you shop! https://www.rossmanngroup.com/ebay › Rossmann Repair Group Inc is a participant in the Amazon Services LLC Associates Program, an affiliate advertising program designed to provide a means for sites to earn advertising fees by advertising and linking to amazon.com

👉 Leave a tip for us via cryptocurrency if we've helped you out: › Credit card: http://bit.ly/postamessage › Bitcoin: 1EaEv8DBeFfg6fE6BimEmvEFbYLkhpcvhj › Bitcoin Cash: qzwtptwa8h0wjjawr5fsm0ku8kf40amgqgm6lx4jxh › Dash: XwQpZuvMvU44JT7C7Uh6xHvkSadzJw9fMN › Dogecoin: DKetsoCvwa2hF29ssgUA4Wz4hxT4kj3KLU › Ethereum: 0x6f6870feb48f08388ee345cf0261e2f03d2fa310 › Ethereum classic: 0x671bfd61ba87edf6365c97cea33d66ba73645510 › Litecoin: LWnbTTAjojZQt68ihFJFgQq3cYHUsTcyd7 › Verge: DFumZ5sMhi3JktLQpsTVtV9xUt3zKDrcZV › Zcash: t1Ko3FkphQYoQroQc8k2DVk4WKMAbmNR8PH › Zcoin: a8QdvArHmdRYe1MjiqtP6jDNe6Z4JgnRKZ

[Source](https://www.youtube.com/watch?v=jahtu1_idVU)

中文简报

苹果省略接口缓冲引脚致50伏高压直入MacBook CPU 取消高压背光供电轨与低压数据线之间的隔离引脚引发显示屏电弧放电,烧毁15英寸MacBook的多路复用器并击穿13英寸型号的CPU芯片。 Rossmann揭露了2016至2018款MacBook Pro存在的一项工程缺陷:苹果打破多年来规范的布局设计,将38V至50V的背光供电轨直接与1V至3V的DisplayPort AUX数据线相邻走线,且未设置接地隔离引脚。在15英寸机型上,由此产生的电弧会损毁NXP显示多路复用器(MUX);而在没有独立显卡的13英寸机型上,高压尖峰则会直通CPU,导致机器彻底报废。在诊断了一台仅能向外接显示器输出画面的15英寸MacBook Pro后,Rossmann克服了零件采购困难,对邻近芯片做好屏蔽,拆除了受损的BGA芯片。随后他与技术人员Paul合作清理主板,焊接了一颗拆机多路复用芯片,成功恢复了内置显示屏的正常工作。 苹果在2016至2018款带Touch Bar的MacBook Pro显示屏接口上取消了保护性缓冲引脚,导致38V至50V的背光供电轨与1V至3V的DisplayPort AUX数据线直接相邻。 (3:16) 在15英寸机型上,该接口跨引脚电弧放电会破坏NXP多路复用芯片的内置显示电路,不过笔记本仍可向外接显示器输出画面。 (8:00) 在缺少独立显卡的13英寸机型上,相同的故障模式会将40V至50V电压直接输送至英特尔CPU,瞬间击穿芯片,使维修在经济和实际操作上均不可行。 (5:36) 由于制造商的独家供应限制,Mouser等主流分销商目录中该NXP多路复用芯片均显示无现货,迫使独立维修店只能依赖拆机主板或专门的二级供应商。 (10:22)

Detailed notes — zh

## Background 该视频由知名独立维修工程师 Louis Rossmann 于 2018 年 12 月 7 日发布在 YouTube 频道。视频简介主要提供了其笔记本维修业务与数据恢复服务、维修培训课程、支持维修权(Right to Repair)立法的筹款链接,以及工作台常用的焊接工具、显微镜和耗材清单。 ## TL;DR Louis Rossmann 在视频中揭露了 2016 至 2018 款配备 Touch Bar 的 MacBook Pro 在屏幕显示电路设计上的严重缺陷:苹果放弃了沿用十多年的高低压隔离接地引脚设计,将 38V 至 50V 的背光高压引脚与脆弱的 DisplayPort 低压数据引脚直接相邻排布。这种设计极易导致击穿短路,在 13 英寸机型上会将高压直冲 CPU 造成核心报废,在 15 英寸机型上则会烧毁显卡切换用的 MUX 复用芯片。Louis 详细拆解了故障逻辑,展示了从隔热拆除损坏 BGA 芯片、焊盘清理到更换全新 MUX 芯片的实操全过程,并成功点亮内屏验证了故障根源。 ## Atmosphere & style 视频兼具专业技术硬核感与犀利的讽刺批判风格。Louis 一边以显微镜下的电路板细节和原理图进行严谨剖析,一边用辛辣幽默的语言痛斥苹果万亿市值下的“实习生级”设计水准及其对零件供应链的严苛垄断。在紧张精细的芯片拆焊操作之余,工作室内与同事 Paul 互开玩笑、推脱难修机型的打趣日常,营造出一种真实、接地气且充满极客胜利感的工作室氛围。 ## Bulletin - [03:16](https://www.youtube.com/watch?v=jahtu1_idVU&t=196s) 2016至2018款配备Touch Bar的MacBook Pro存在重大设计缺陷:LCD接口处38V-50V的背光高压引脚与1V-3V的DisplayPort数据线相邻,中间取消了过去沿用多年的接地隔离引脚,极易引发电弧击穿与烧蚀。 - [05:36](https://www.youtube.com/watch?v=jahtu1_idVU&t=336s) 在13英寸机型上,由于没有独立的显卡切换芯片,AUX数据线直连CPU,一旦高压短路将瞬间烧毁移动端CPU,且由于原厂芯片断供使得维修几乎不可能或成本极高。 - [07:48](https://www.youtube.com/watch?v=jahtu1_idVU&t=468s) 对于配备独立显卡的15英寸机型,高压击穿通常由NXP制造的MUX显卡切换芯片承受,独立维修店通过更换该芯片可修复内屏无显示故障。 - [10:22](https://www.youtube.com/watch?v=jahtu1_idVU&t=622s) 苹果对元器件供应链施加严密管控,Mouser等主流分销商无法公开销售该专有MUX芯片,迫使独立维修者只能依赖拆机料板或第三方特殊渠道采购配件。 ## Key takeaways - [00:00](https://www.youtube.com/watch?v=jahtu1_idVU&t=0s) Louis Rossmann批评苹果作为万亿美元市值企业,在两三千美元的MacBook Pro上做出了连大一实习生都不如的倒退设计。 - [01:18](https://www.youtube.com/watch?v=jahtu1_idVU&t=78s) 2012至2015款经典MacBook在屏幕接口排布上严格遵循硬件规范,在低压图像信号线与高压背光供电轨之间始终设有接地引脚进行物理隔离。 - [03:16](https://www.youtube.com/watch?v=jahtu1_idVU&t=196s) 2016款及之后的Touch Bar机型取消了隔离引脚,导致高达50V的背光高压线路与微伏级的DisplayPort AUX数据线并排相邻。 - [03:16](https://www.youtube.com/watch?v=jahtu1_idVU&t=196s) 显微镜检查证实,引脚间缺乏物理间距与地线保护极易因灰尘杂质或微小短路导致高压电弧击穿并彻底烧焦金属触点。 - [05:36](https://www.youtube.com/watch?v=jahtu1_idVU&t=336s) 13英寸MacBook Pro缺少MUX复用芯片,50V背光高压击穿接口后会毫无阻拦地直接冲入CPU并导致核心报废。 - [05:36](https://www.youtube.com/watch?v=jahtu1_idVU&t=336s) 独立维修端根本无法通过正规渠道采购到全新的MacBook移动CPU,高昂的芯片成本与严苛的BGA返修要求令13英寸该类故障几乎无法修复。 - [07:48](https://www.youtube.com/watch?v=jahtu1_idVU&t=468s) 15英寸机型在内屏黑屏且无背光的情况下仍可通过外接显示器输出画面,说明独立显卡与系统核心完好,故障局限在内屏MUX通道。 - [10:22](https://www.youtube.com/watch?v=jahtu1_idVU&t=622s) 苹果对上游芯片供应商采取排他性协议管控,导致Mouser等官方电子分销平台对NXP制造的MUX芯片常年显示无库存状态。 - [10:22](https://www.youtube.com/watch?v=jahtu1_idVU&t=622s) 主板上的MUX芯片紧邻CPU与GPU两个核心发热大户,拆焊返修时需使用临时金属工具进行严格隔热并调小热风枪风量。 - [11:49](https://www.youtube.com/watch?v=jahtu1_idVU&t=709s) 微焊接拆卸BGA芯片的核心准则是必须轻推确认底部焊球完全液化晃动后垂直夹取,严防冷焊硬拉扯断主板焊盘走线。 - [13:05](https://www.youtube.com/watch?v=jahtu1_idVU&t=785s) 焊盘清理需使用高品质助焊剂搭配含铅焊锡中和原厂无铅残锡,且烙铁操作必须轻柔以保护极其脆弱的阻焊层绿油。 - [16:38](https://www.youtube.com/watch?v=jahtu1_idVU&t=998s) 从料板取下MUX芯片并完成植球焊接后,故障机内屏成功点亮并恢复正常开机Logo,确凿证明了故障诊断与修复方案的正确性。 ## Detailed walkthrough ### [00:00](https://www.youtube.com/watch?v=jahtu1_idVU&t=0s) 苹果笔记本设计的倒退与批评初衷 Louis Rossmann 在视频开篇提到,他在 YouTube 社区动态中承诺过要揭露苹果的又一个严重设计缺陷。他过去指出的许多设计失误涉及 2008 至 2015 年间的旧款机型,而这次的问题则直接影响到 2016、2017 和 2018 年配备 USB-C 接口的 13 英寸与 15 英寸 MacBook Pro。他特别强调自己并不是出于对苹果单纯的仇恨才做这类视频,而是希望消费者在看清这些产品的内部构造后,能向苹果提出质疑。Louis 直言:“作为一家市值万亿美元、售卖三千美元电脑的公司,你们就不能做得比大一实习生的水平稍微好那么一点点吗?”(“As a trillion dollar company that sells three thousand dollar machines, can you do just a little bit better than something we would expect from a first-year intern?”)。 这类 MacBook Pro 最常见的故障之一是“黑屏无显示”(no image)。以往诸如电容失效或元件位置摆放欠佳的失误,虽然多年不修复令人遗憾,但在某种程度上尚可理解;然而这次的设计缺陷在 Louis 看来是“客观上的极其糟糕”(objectively terrible)。为了阐明问题所在,他决定先带领观众回顾旧款 MacBook Pro 在屏幕显示电路上的设计规范,作为后续对比的基准。 ### [01:18](https://www.youtube.com/watch?v=jahtu1_idVU&t=78s) 经典设计规范:高低压引脚之间的物理隔离 在打开 2012 年 MacBook Pro 的电路原理图后,Louis 详细解释了 LCD 接口(LCD connector)的引脚排布逻辑。在该设计中,一侧分布着 3V 供电轨以及一系列用于传输图像信号的 LVDS 数据线,其工作电压通常处于 1V 至 3V 之间。紧挨着低压数据信号线末端的是一个未连接引脚(通常直接接地),随后才是提供给屏幕背光的高压线路。LCD 背光电压通常在 26V 到 50V 之间。Louis 指出,将 50V 的高压线路与 1V 到 3V 的低压数据线进行物理隔离,是硬件设计中最基础、最常识的原则,像 EEVblog 的 Dave Jones 这样的专业人士能够做出更深入的技术剖析。 随后他又展示了 2015 至 2016 年未配备 Touch Bar 的 13 英寸 MacBook Pro 屏幕电路。该机型采用了 DisplayPort 图像数据线,排布依然非常严谨:图像数据线与屏幕所需的 5V 供电之间有专门的接地引脚(ground pins)进行隔离;再往上是背光电路的 5V 数据线,接着是一个接地的空脚(NC 引脚),最后才是 39V 至 40V 以上的 LCD 背光高压引脚。从 2012 年到 2015 年,苹果一直严格遵守“在低压数据线与高压背光线之间设立接地隔离”的设计准则。 ```mermaid flowchart LR accTitle: 经典款 MacBook LCD 接口引脚隔离示意图 accDescr: 展示低压数据线与高压背光线之间如何通过接地引脚实现安全隔离 subgraph LowVoltage["低压信号区域 (1V - 5V)"] direction LR D["DisplayPort / LVDS 数据线 (1-3V)"] V["屏幕供电引脚 (3V / 5V)"] end subgraph Isolation["安全隔离层"] direction LR G["接地 / NC 引脚 (GND)"] end subgraph HighVoltage["高压区域 (26V - 50V)"] direction LR B["LCD 背光供电引脚 (PPVOUT_S0_LCDBKLT)"] end LowVoltage --- Isolation Isolation --- HighVoltage ``` ### [03:16](https://www.youtube.com/watch?v=jahtu1_idVU&t=196s) Touch Bar 机型的新设计:高压与低压并排的致命隐患 切换到工作台上 2016–2017 款配备 Touch Bar 的 MacBook Pro 主板及其点位图(Boardview)后,Louis 指出了令人震惊的改动。在点位图上,43 号引脚是屏幕背光供电输出 `PPVOUT_S0_LCDBKLT`,其电压处于 38V 至 50V 之间;然而紧贴着它的下一个引脚就是 DisplayPort 辅助通道(DisplayPort AUX channel),中间没有任何间距,也没有任何接地引脚进行隔离保护。 在 15 英寸机型中,这条 DisplayPort AUX 线路直通主板另一侧的双显卡切换多路复用芯片(MUX 芯片)。MUX 芯片的作用是在 CPU 内部集成的 Intel 核显与独立的 AMD/Nvidia 独显之间实现无缝画面切换,使用户无需手动拨动物理开关或重启系统。Louis 讽刺道,让 1V 到 3V 的脆弱数据线与 40V 到 50V 的高压供电线在微型接口上紧紧贴在一起,后果显而易见。在显微镜镜头下,他向观众展示了故障机屏幕排线插头的拐角处:引脚之间发生了严重的高压电弧击穿与烧蚀,金属触点被彻底烧毁发黑。 - 背光线路工作电压:38V 至 50V 之间 - 数据信号线路工作电压:1V 至 3V 之间 - 物理缺陷特征:高压引脚与低压 AUX 引脚相邻排布,中间缺乏任何地线(GND Pin)隔离,极易因杂质、形变或电弧造成击穿烧毁 ### [05:36](https://www.youtube.com/watch?v=jahtu1_idVU&t=336s) 13 英寸机型的毁灭性灾难:直击 CPU 的 50V 高压 Louis 接着分析了情况更为惨烈的 13 英寸机型(如 A1706 和 A1708)。有人可能会认为“烧了 MUX 芯片换一颗就行”,但在没有独立显卡的 13 英寸机型上,并没有独立的 MUX 芯片,该 DisplayPort 数据线是直接接入 CPU 的。 这就意味着,只要接口处发生哪怕最微小的短路或击穿故障,40V 至 50V 的背光高压就会毫无阻拦地直接冲入 CPU,将其瞬间摧毁。Louis 愤怒地指出,这些移动端 CPU 的单颗成本在 150 至 450 美元之间,而且普通独立维修人员根本无法从正规渠道采购到全新芯片。维修店唯一的芯片来源就是从中国回收的拆机料板上拆卸下来的二手 CPU,由于拆焊工艺问题往往本身就带有暗病;即使维修店拥有价值 7000 美元的高端 BGA 返修台,面对 Touch Bar 机型损坏的 CPU 也是巧妇难为无米之炊。他尖锐地抨击:“苹果设计出这样一台机器:一旦发生哪怕一丁点儿小故障,原本应该出于安全考量泄放至地线的 40 到 50 伏高压,会直接灌进你的 CPU 并将其彻底烧毁,而这一切仅仅是因为他们没有像过去十多年那样在中间留出一个引脚”(“Apple designed a machine in a manner where if there's any teeny tiny malfunction rather than that 40 to 50 volt power line going to ground as a safety it's going to send that 40 to 50 volts straight to your CPU all because they didn't decide to put a pin in between the two as they've been doing for over 10 years now”)。 ```mermaid flowchart TD accTitle: 高压击穿后果流程图 accDescr: 对比 15 英寸机型烧毁 MUX 芯片与 13 英寸机型直接击穿 CPU 的不同破坏路径 Fault["引脚打火击穿 (38V-50V 串入 AUX 信号线)"] subgraph Model15["15 英寸机型 (配有独立显卡)"] M15["AUX 信号线"] --> MUX["MUX 切换芯片承受高压"] MUX --> MUX_Burn["MUX 芯片击穿损坏<br/>(主板尚有修复希望)"] end subgraph Model13["13 英寸机型 (仅有集成核显)"] M13["AUX 信号线"] --> CPU["高压直冲 CPU 核心"] CPU --> CPU_Dead["CPU 彻底报废<br/>(维修成本极高且芯片断供)"] end Fault --> Model15 Fault --> Model13 ``` ### [07:48](https://www.youtube.com/watch?v=jahtu1_idVU&t=468s) 实机故障诊断与采购阻碍 面对 13 英寸机型,CPU 击穿几乎判了死刑;而对于 15 英寸机型,由于 MUX 芯片挡在了前面,主板往往还有一线生机。Louis 现场演示了对一台 15 英寸故障机的诊断流程:首先给机型通电,机身屏幕不仅没有背光,连图像信号也完全消失;接着他拔掉内置屏幕的排线,通过 USB-C 转 HDMI 适配器接入显微镜的外接显示屏。外接屏幕随即成功亮起并显示画面。这确凿地证明了独显核心与系统运行正常,损坏的仅仅是 MUX 芯片内部负责驱动内屏的那部分电路——它被 50V 高压彻底击穿烧毁。 Louis 表示接下来需要取下损坏的 MUX 芯片并更换全新元件,他调侃自己可能会把植锡(reballing)的工作搞砸,因此大概率会求助于店内技术娴熟的同事 Paul。为了寻找替换配件,Louis 登录了 Mouser(贸泽电子)网站查询这颗由 NXP(恩智浦)生产的芯片。然而商品页面显示为“无库存,需致电询价”(Non-stocked, call for quote)。Louis 讽刺这种状态背后通常代表苹果像个“嫉妒心爆棚的前女友”(jealous ex-girlfriend)一样施压供应链厂商,严禁芯片原厂将这些专用零配件公开销售给苹果体系之外的任何独立维修者。 - 故障表现差异:内置屏幕完全无图像无背光,但通过 Type-C/HDMI 能够正常输出外接显示信号 - 元件型号与供应链受限:该 MUX 芯片由 NXP 制造,因苹果对上游供应链的专供协议和严密控制,在公开电子元器件分销平台通常处于缺货或无法直接下单的状态 ### [10:22](https://www.youtube.com/watch?v=jahtu1_idVU&t=622s) 苹果的零件垄断与简易隔热屏蔽方案 在查找芯片货源时,Louis 再次谈到了苹果供应链的封闭性。想要从 Mouser 等正规大型电子元器件分销商处购买这类专用芯片简直是天方夜谭,库存状态永远显示为“缺货(non-stock)”。对于这种严密的元器件管控,Louis 形象地打了个比方:“See that that that's Apple right there that's fixing Apple products the chips they are they are very jealous ex-girlfriend-y when it comes to stuff like that.” 不过,市场上仍有其他渠道的卖家供货,Louis 表示自己的网店(store.rossmanngroup.com)很快就会备货上架这款芯片,“我们专门卖 Mouser 不愿卖的东西”。 拆卸这枚芯片在操作上极具技术挑战:它正好夹在中央处理器(CPU)和图形处理器(GPU)之间,稍有不慎就可能用热风枪把昂贵的 CPU 或 GPU 吹爆废掉。为了保护周围核心芯片,Louis 现场制作了一个“高科技散热遮挡片”——实际上是用带橡胶包裹的金属撬棒临时充当隔热盾,遮盖住脆弱的周边区域。同时,他刻意把热风枪的风量调低,不再使用平时习惯的 120 档大风量,以防止热量过度扩散到旁边的关键大芯片上。 - 关键芯片位置:紧邻 CPU 与 GPU 之间,受热风险极高 - 防护措施:自制橡胶包裹金属撬棒作为隔热屏障 - 热风参数微调:降低吹风气流,避免吹散或烤坏相邻 BGA 芯片 ```mermaid flowchart TD accTitle: 芯片拆卸与隔热流程 accDescr: 展示拆卸显示复用芯片时如何防范周围核心元件过热并安全取下芯片的步骤 subgraph Prep ["防过热准备"] A["评估布局: MUX 夹在 CPU 与 GPU 之间"] --> B["放置隔热屏蔽: 橡胶金属撬棒遮挡"] B --> C["微调热风枪: 调低风量避免热量外溢"] end subgraph Rework ["拆卸操作"] C --> D["持续均匀加热芯片"] D --> E{"轻触测试是否左右晃动?"} E -- "否: 焊点未完全融化" --> D E -- "是: 焊锡全部液化" --> F["垂直取下 MUX 芯片"] end ``` ### [11:49](https://www.youtube.com/watch?v=jahtu1_idVU&t=709s) 拆卸 BGA 芯片的手法与工位日常调侃 在等待芯片加热软化的过程中,直播间观众赞助了一杯野格酒(Jägermeister)以表支持。Louis 笑着表示感谢,但打趣说自己现在更想把钱花在健康营养的食物上,必须少吃少喝、努力健身恢复体型。聊天室里针对苹果封闭生态的玩笑也层出不穷,有人调侃“离开苹果后千万别回她的短信和邮件”。 当焊锡开始融化时,Louis 强调了微焊接 BGA 芯片的核心绝招:千万不要在芯片还没彻底松动前硬往上拔,否则焊盘半冷半凝固时硬扯,极易连根拔断主板上的线路。Louis 轻轻夹住芯片并施加轻微推力,直到亲眼确认芯片能够顺畅左右晃动,证明底部锡球已全部化为液态,才果断将其垂直夹下。芯片取下后,主板上露出了原装的无铅焊球点阵。 - 直播间互动:观众赞助“野格酒”,Louis 戏称要拿来买营养餐减重 - BGA 拆焊核心守则:严禁冷焊硬拉,必须确认可左右晃动后再起子,防止扯断焊盘 - 芯片极性标识:取下时需同步确认芯片点位朝向,确保后续焊接方向正确 ### [13:05](https://www.youtube.com/watch?v=jahtu1_idVU&t=785s) 清理焊盘残锡与工作台上的“分工谈判” 拿下芯片后,Louis 马上着手清理残留焊锡。他挤上了一大团 Amtech NC-559-V2-TF 助焊膏,利用烙铁拖着一颗含铅焊球在焊盘表面轻轻滑过。这一步的目的是让含铅焊锡中和并带走主板上粗糙难熔的原厂无铅焊锡垃圾,操作时烙铁头动作必须极度轻柔,“轻触主板,力度刚好清理掉无铅焊锡,同时绝对不能刮破走线表面的绿油阻焊层”。 清理期间,Louis 看着身旁的同事 Paul 开启了讨价还价模式。如果以后能直接买到预植球好的芯片,这种维修就会轻松很多。Louis 试探性地向 Paul 提议:“I was kind of thinking I do the 15 inch ones you do the 13 inch ones what do you say?” Paul 追问理由,Louis 一本正经地胡扯说,因为 13 英寸主板体积小,放在 Paul 的桌上更省地方,这样 Paul 的工作台就不会被杂乱堆满。Paul 则淡定回怼称自己根本不在意桌子乱不乱,果断识破了 Louis 想把小尺寸、更紧凑更难修的主板甩给他的小算盘。 - 使用焊剂:Amtech NC-559-V2-TF 高品质免洗助焊膏 - 焊盘除锡技巧:以铅锡融合法中和无铅锡,刀头轻滑避免伤及阻焊漆与脆弱铜箔 - 趣味拌嘴:Louis 试图以“节省桌面空间”为由,说服 Paul 包揽全部 13 英寸机型的主板维修 ### [16:38](https://www.youtube.com/watch?v=jahtu1_idVU&t=998s) 焊接复位与点亮内屏的胜利时刻 在完成 donor(料板)芯片的取料与清洁处理后,新的复用芯片(MUX chip)被重新焊接回故障机主板。由于维修过程漫长且耗费心力,现场充斥着紧张又期待的气氛。检查完 Paul 的精细焊接做工后,大家甚至开玩笑打赌:要是费了这么大劲把芯片换上,内接屏幕还是无法显示画面,大家干脆把这块板子彻底砸个稀巴烂算了。 主板被迅速装回外壳插上排线进行开机测试。随着通电启动,屏幕在片刻黑暗后瞬间跳出了白色的苹果标志(Apple logo)。看到屏幕被点亮,Louis 兴奋地宣布:“Oh Apple logo Apple logo okay all right so this is the Apple logo which means we have fixed the issue by replacing the MUX.” 这一结果确凿证明之前的排查毫无偏差,屏幕无显示的罪魁祸首正是那颗损坏的显示复用芯片。此时墙上的钟正好敲过八点,完美收工的 Louis 在镜头前向观众致谢告别:“Thank you everybody for watching and as always I hope you learned something.” - 诊断验证:更换 MUX 复用芯片后,内屏成功点亮并显示苹果开机标志,故障彻底排除 - 维修总结:逻辑板设计将 MUX 夹在发热大户 CPU 与 GPU 中间,既增加了芯片热损坏风险,也极大提高了手工返修难度 - 告别结语:时钟指向晚间 8 点整,准时下班并奉上标志性结语“希望大家学到了新东西” ## Notable quotes > [00:00](https://www.youtube.com/watch?v=jahtu1_idVU&t=0s) As a trillion dollar company that sells three thousand dollar machines, can you do just a little bit better than something we would expect from a first-year intern? — Louis Rossmann ## Mentioned Apple, MacBook Pro, Louis Rossmann, Paul, Dave Jones, EEVblog, Touch Bar, A1706, A1708, Intel, AMD, Nvidia, NXP, Mouser, Amtech, YouTube ## Video description Let's get Right to Repair passed! https://gofund.me/1cba2545 👉 If our videos have added revenue to your business, consider becoming a patron 🔵 Patreon https://www.patreon.com/rossmanngroup 🔵 We fix Macbooks & offer free estimates. https://rossmanngroup.com 🔵 Send us your Macbook for repair! http://bit.ly/sendmacbook 🔵 We'll send you a box with a pre-paid shipping label for your repair! http://bit.ly/sendyourmacbook 🔵 We offer iPhone data recovery: http://bit.ly/2BDBX4G 🔵 We offer lab hard drive data recovery: http://bit.ly/labdatarecovery 👉 LEARN HOW TO DO THIS: › In-person classes: https://bit.ly/classrg › Beginner's guide: http://bit.ly/2k6uz84 › Support forum: $29/mo http://bit.ly/boardrepairforum 👉 Donate & post a message: http://bit.ly/postamessage 👉 Below we list tools & recording gear we use, repair guides to help you learn, online chip sources, & donation links: 👉 BlackBerry, Oreo, & Clinton the cat's wish list: https://www.amazon.com/hz/wishlist/ls/2YC1L66N7T5BC?&sort=default 👉 CHIPS & COMPONENTS: › http://bit.ly/2jaAOXM 👉 Discord: https://tinyurl.com/rossmatrix 👉 TOOLS USED: ✓ Soldering Irons: › Louis' Hakko station(no tweezers): http://amzn.to/2cKkMyO › Paul's Hakko station(works with tweezers): http://amzn.to/2yMvWNy › Micro Soldering Pencil: http://amzn.to/2d5MWUP › Hot tweezers: http://amzn.to/2yMvZsZ › Atten ST-862D hot air station: http://bit.ly/atten862 ✓ CHEAP HAKKO ALTERNATIVES: › TS100 soldering iron: https://amzn.to/2Gy1Fqz › Recommended tips: TS-C4: https://amzn.to/33s3jpW TS-KU https://amzn.to/2QsKT36 ✓ Preferred Soldering Tips › Fine: http://amzn.to/2d5MgPn › Flat: https://amzn.to/2JnsDBT › GPU wicking: http://amzn.to/2w8chtB › Micro soldering tip: http://amzn.to/2qUSFDh ✓ Microscopes: › Microscope: http://amzn.to/2iLrE16 › Barlow lens: http://amzn.to/2yMKdKf › LED light: http://amzn.to/2nzfPT2 › CHEAP alternative microscope: http://amzn.to/2rTlHbj ✓ Soldering/Repair Supplies: › Solder: http://amzn.to/2cKkxUp › Desoldering braid: http://bit.ly/2otflOX › Flux: http://bit.ly/amtechflux › Solder paste: http://bit.ly/amtechsolderpaste › THICK insulated jumper wire: https://amzn.to/2rvtD0A › THIN insulated jumper wire: https://amzn.to/2I47DQY › Kapton tape: http://amzn.to/2yN0xuq › Tweezers: http://amzn.to/2d5NBpi › Blades: http://amzn.to/2ByWnvF › Freeze Spray: http://amzn.to/2BySozw › Conformal coating: http://bit.ly/greencoate › Conformal coating curing pen: http://bit.ly/uvpen ✓ Diagnostic tools: › USB amp meter: http://bit.ly/2B2Lu5W › USB-C amp meter: http://bit.ly/usbcamp › On-Screen multimeter: http://amzn.to/2jtgY9K › Multimeter Probes: http://bit.ly/fineprobes › CHEAP multimeter: http://amzn.to/2zjkg8U › Bench PSU: CSI3005P http://bit.ly/benchsupply › Phoneboard: https://phoneboard.co › Boardview software: https://pldaniels.com/flexbv/ ✓ Ultrasonic Cleaning: › ALL MACBOOKS & CELLPHONES: Crest P1200H-45: https://amzn.to/2ITSQdw › PRE-TOUCHBAR MACBOOKS & CELLPHONES: Crest P500H-45: https://amzn.to/2Qrnhf8 › CELLPHONES ONLY: Crest P230H-45: https://amzn.to/2QsckKG › Branson EC cleaning fluid: http://amzn.to/2cKlBrp ✓ Desk supplies: › Desk: http://amzn.to/2yMShdZ › Chair: https://amzn.to/2LB8bUB › Fume Extractor: http://amzn.to/2d5MGoD › Work mat: http://amzn.to/2yMtlTR › Outlets: http://amzn.to/2yNsZwo › Gloves: http://amzn.to/2iUfumS › Durable lightning cable: http://amzn.to/2yNHzUt › Fine tipped snippers: http://amzn.to/2HGt4XB ✓ Screwdrivers: › iPhone bottom screw: http://amzn.to/2yNwX8p › Macbook bottom screw: http://amzn.to/2AKMdVb › Torx T3: http://amzn.to/2zjtxxH › Torx T5 http://amzn.to/2BLNDn4 › Torx T6 http://amzn.to/2B0XIfA › Torx T8 http://amzn.to/2CpWp68 › Phillips #0: http://amzn.to/2AJaHhM › Phillips #000: http://amzn.to/2yNqsCl ✓ RECORDING EQUIPMENT: › Work cam: https://amzn.to/2QjHnt0 › Overhead cam: http://amzn.to/2eAH0oT › Work mic: https://amzn.to/2WGIhzw › Home mic: https://amzn.to/2xfampC › Microscope camera: http://amzn.to/2icVQoG - mine is DISCONTINUED, closest one I can find. › HDMI capture: http://amzn.to/2iyGcle 👉 Affiliate: › Buying on eBay? Support us while you shop! https://www.rossmanngroup.com/ebay › Rossmann Repair Group Inc is a participant in the Amazon Services LLC Associates Program, an affiliate advertising program designed to provide a means for sites to earn advertising fees by advertising and linking to amazon.com 👉 Leave a tip for us via cryptocurrency if we've helped you out: › Credit card: http://bit.ly/postamessage › Bitcoin: 1EaEv8DBeFfg6fE6BimEmvEFbYLkhpcvhj › Bitcoin Cash: qzwtptwa8h0wjjawr5fsm0ku8kf40amgqgm6lx4jxh › Dash: XwQpZuvMvU44JT7C7Uh6xHvkSadzJw9fMN › Dogecoin: DKetsoCvwa2hF29ssgUA4Wz4hxT4kj3KLU › Ethereum: 0x6f6870feb48f08388ee345cf0261e2f03d2fa310 › Ethereum classic: 0x671bfd61ba87edf6365c97cea33d66ba73645510 › Litecoin: LWnbTTAjojZQt68ihFJFgQq3cYHUsTcyd7 › Verge: DFumZ5sMhi3JktLQpsTVtV9xUt3zKDrcZV › Zcash: t1Ko3FkphQYoQroQc8k2DVk4WKMAbmNR8PH › Zcoin: a8QdvArHmdRYe1MjiqtP6jDNe6Z4JgnRKZ [Source](https://www.youtube.com/watch?v=jahtu1_idVU)

Source quotes

[0:00] Louis Rossmann: As a trillion dollar company that sells three thousand dollar machines, can you do just a little bit better than something we would expect from a first-year intern?

Source quotes

[0:00] Louis Rossmann: As a trillion dollar company that sells three thousand dollar machines, can you do just a little bit better than something we would expect from a first-year intern?

Original transcript

[0:00] as I said in the YouTube community page [0:01] today I was gonna bring you yet another [0:03] Apple design flaw many of the design [0:05] flaws that I've discussed in apple [0:06] products affect products from two [0:08] thousand eight nine ten eleven twelve [0:10] thirteen fifteen [0:12] however today we're gonna get to a flaw [0:15] that's affecting machines from 2016 17 [0:17] and 18 I want it to be clear when I say [0:20] this that it's not just pure hatred for [0:22] Apple products that I do this it's [0:24] because I hope that the consumers of [0:25] Apple products when they realize that [0:27] their design in this way ask the company [0:29] can you do better as a trillion dollar [0:31] company that sells three thousand dollar [0:33] machines can you do just a little bit [0:36] better than something we would expect [0:37] from a first-year intern so today we're [0:39] going to be going over a very common [0:40] problem on the 13 and 15 inch MacBook [0:43] Pros with USB C charge ports which is no [0:47] image I want to go over the design flaw [0:48] that causes no image how it manifests [0:50] itself what it looks like and why this [0:53] is a really bad design and contrast [0:55] older machines with many of the design [0:57] flaws that I discuss here I'm talking [0:59] about things like a scamp failing or [1:01] this thing being placed in the wrong [1:02] place and stuff where you could okay [1:04] it's kind of understandable that this [1:05] mistake could occur and it sucks that [1:07] you didn't fix it after a few years but [1:09] understandable to some extent here this [1:12] is just objectively terrible in a way [1:16] that I would like to show you so let's [1:18] go over how it is that some of the older [1:21] MacBook Pros are designed when it comes [1:22] to image circuitry before we get to [1:24] anything else so I'm gonna open up a [1:27] schematic to an older MacBook Pro this [1:31] is gonna be the LCD connector on let's [1:34] say a 2012 MacBook Pro and this is [1:37] similar to the design that was used into [1:39] later years so if we were to look at all [1:42] the signals over here on this LCD [1:44] connector you'll see that we have three [1:46] volts over here then we have a bunch of [1:48] data lines LVDS data lines and these are [1:51] all data lines that are going to be [1:53] somewhere between one and three volts [1:55] and then all the way at the end we have [1:57] a not connected pin which is typically [2:00] going to be grounded and then we have [2:02] the high voltage of LCD backlight so LCD [2:05] backlight is typically going to be [2:06] somewhere between 26 and 50 volts that's [2:08] a high voltage line and you typically [2:09] want to separate that from your low [2:11] voltage data lines this is a basic basic [2:13] principle [2:13] design I'm sure someone like Dave Jones [2:15] over at eevblog who you should check out [2:17] could definitely explain this in more [2:19] depth in detail than I can so let's take [2:21] a look at the screen circuit in a [2:24] 13-inch 2015-16 macbook pro before the [2:27] touch bar so we have all these [2:29] DisplayPort image lines over here very [2:31] similar layout to where you had the LVDS [2:33] lines separate from the power lines then [2:35] you have a few ground pins over here and [2:39] the ground pins are going to be [2:41] separating the image data lines from the [2:44] 5 volts the screen needs to work and [2:45] then up here you're going to have a 5 [2:49] volt data line for the backlight circuit [2:52] you have a not connected pin which is [2:54] going to be grounded and then after the [2:57] grounds at pin you have LCD backlight so [2:59] same thing as is true from the 2012 [3:02] model to the 2015 model is that you have [3:05] separation between your data lines down [3:08] here which are low voltage lines and [3:10] your 39 to 40 low volt backlight line [3:13] now let's take a look at how it is the [3:16] newer MacBook Pros are designed so this [3:19] is going to be what I have on my desk so [3:20] this over here is a MacBook Pro touch [3:23] bar from 2016-17 this is the LCD [3:27] connector which is going to be attaching [3:30] to the screen now let's take a look at [3:31] what that looks like on the board view [3:33] software if we were to find the LCD [3:37] connector on the schematic you'll see [3:39] that over here we have a backlight pin [3:41] on pin 43 see this ppv out Sol LCD [3:46] backlight that's going to be somewhere [3:47] between 38 to 50 volts and right next to [3:50] it with no separation no ground pin no [3:52] nothing [3:53] you have DisplayPort aux Channel now [3:56] let's take a look at where DisplayPort [3:58] aux channel is going to be going to that [4:00] goes to a much chip on the other side of [4:03] the board see this so this is a much [4:05] chip now the purpose of the MUX is to [4:07] take the graphics from the Intel [4:08] integrated within the CPU and then the [4:10] graphics from the AMD or the Nvidia [4:12] chipset and switch between them [4:13] seamlessly so that when you're switching [4:15] between the Intel integrated graphics [4:17] and the high-definition discrete [4:19] graphics card that you don't see messing [4:23] up on the screen and you don't have to [4:24] reboot to change graphics chip so you [4:26] don't need like a physical switch to do [4:27] it [4:27] the purpose of the MUX that is going to [4:29] be analyzing the image for both of them [4:31] so if we look over here you'll see that [4:34] the data line which is typically [4:36] somewhere between 1 and 3 volts is [4:39] sitting right next to the 40 to 50 volt [4:43] backlight line with no pin in between [4:47] there's no separation there now you may [4:49] think that's not a big deal what could [4:50] possibly happen if you have a 40 to 50 [4:53] volt power line right next to a 1 to 3 [4:55] volt data line on a micro connector well [4:58] this is what happens let's bring that up [5:00] in the microscope so you can see why [5:02] this is some of the dumbest design I've [5:04] ever seen that so if we look at this [5:06] cable you can see where there is burning [5:10] in the corner look at that see that no [5:17] good that is where things are jumping [5:20] around that is in the original cable now [5:22] you may say this is not a big deal Lois [5:25] you can just replace the MUX chip it's [5:26] easy to row you just have to replace [5:28] this one chip and then everything's fine [5:30] easy breezy beautiful covergirl as that [5:32] commercial from 20 years ago that I [5:34] can't get out of my head would say but [5:36] what about the machines that don't have [5:38] a discrete graphics chip what about the [5:39] a 1708 and a 1706 13 inch MacBook Pro [5:43] glad you asked let's check out what [5:45] those look like on the schematic and [5:47] board view over here all right so we're [5:49] just going to take a look at the display [5:50] connector over here same terrible awful [5:54] design you have right over here you have [5:56] backlight line right next to DisplayPort [6:00] line and let's see where this goes to [6:04] now remember this only has one graphics [6:07] chip not too so that DisplayPort line is [6:10] going to go straight to the CPU so what [6:16] happens on this machine when there's any [6:19] teeny tiny malfunction any sort of thing [6:22] that's gonna make the voltage go from [6:23] this pin over here to this pin over here [6:25] you see yes you send 40 volts straight [6:28] to your CPU and you destroy the CPU [6:30] these CPUs cost anywhere from 150 to 450 [6:35] dollars depending on which one you got [6:37] in your machine further they're not [6:39] available to people like me if I want to [6:41] get a CPU [6:41] the best thing that I'm going to get is [6:43] a CPU that somebody in China ripped off [6:46] of a donor board most likely destroyed [6:48] in the process which is why even if you [6:50] have the $7,000 machinery to replace a [6:51] CPU good luck getting one for a touch [6:54] bar so yes Apple designed a machine in a [6:56] manner where if there's any teeny tiny [6:59] malfunction rather than that 40 to 50 [7:02] volt power line going to ground as a [7:04] safety it's going to send that 40 to 50 [7:06] volts straight to your CPU all because [7:09] they didn't decide to put a pin in [7:11] between the two as they've been doing [7:12] for over 10 years now which is the basic [7:15] common sense of design I'm sure Dave [7:17] Jones a TV blog could talk more about [7:18] why this is a thing and how even first [7:21] year engineering students would be [7:23] taught something like this yet for some [7:25] reason a multitrillion-dollar company [7:27] has decided to just make machines that [7:28] kill their CPUs so if you have a touch [7:31] bar that has no image no backlight [7:33] there's nothing like that it's most [7:36] likely because your CPU got 40 to 50 [7:38] volts and you can check your screen [7:39] cable to get an idea of whether this [7:40] happened because when that happens when [7:42] that CPU gets that little shock of 40 to [7:44] 50 volts it's very easily visible now [7:48] when this happens with to the 13-inch [7:50] machines there's honestly not much we [7:52] can do because of the 13-inch machines [7:53] again you need to replace the CPU and we [7:56] cannot get those with the 15-inch [7:57] machines there is hope and you are able [7:59] to replace a chip called the much chip [8:01] so the first diagnosis that we do on the [8:03] 15-inch machines to see if there's even [8:05] any sort of hope of it is we like to [8:08] compare what the image that we get on [8:10] the internal screen to what it is we get [8:12] from the USBC app so I'm going to check [8:17] that here so let's see what it is that [8:19] we get on the on the screen here so I'm [8:23] gonna plug this thing in so you can see [8:25] what type of image we get and I'm gonna [8:29] give it a minute as can be seen no [8:32] picture not just no backlight no picture [8:35] no nothing no screen activation totally [8:38] invisible [8:38] now I'm gonna unplug the machine and I'm [8:41] gonna unplug the screen in the machine [8:43] and we're going to see what happens if [8:45] we plug it into my microscope adapter so [8:51] this is HDMI cable just get the okay [8:55] take this plug the HDMI over here and [9:02] let's see what it is we get on the [9:04] screen image as you can see this has the [9:13] capability to send an image to an [9:14] external screen but not an internal [9:16] screen and that's because within the MUX [9:19] the circuit to send the image to the [9:23] internal screen has gotten 50 volts sent [9:27] to it as a result of this this lovely [9:29] lovely design here so we're gonna do is [9:32] we're gonna find that MUX and we're [9:34] gonna replace it with a new one and by [9:37] we I mean most likely Paul since I'm [9:39] probably gonna come pre balling it and [9:41] ask him to save me he's a good guy he [9:46] gets he deserves more credit [9:47] I believe you can actually buy this chip [9:49] off of Mouser let's see if you can get [9:50] this thing off of Mouser and here we go [9:52] so it looks like you can actually get [9:54] this chip off a Mouser and soon maybe [9:57] even office store tower Rossmann group [9:58] calm all right non stalked call for [10:01] quote that this means something special [10:03] so non stalked call for quote means that [10:06] most likely Apple is being all jealous [10:09] like jealous ex-girlfriend D and saying [10:11] I don't want you talking to nobody else [10:14] I don't want you selling this to anybody [10:17] but us but this is made by nxp and it [10:21] looks less so this is probably gonna be [10:22] something similar to like the ISL six to [10:25] five nine or again like good luck [10:26] finding stuff like this yeah you never [10:29] non-stock yeah see that see that that [10:32] that's Apple right there that's fixing [10:33] Apple products the chips they are they [10:36] are very jealous ex-girlfriend II when [10:38] it comes to stuff like that so but it [10:40] looks like there are other sellers and [10:42] this is definitely gonna be something [10:43] that we're gonna be stocking soon on [10:45] stored our rossmann group comm we're [10:47] gonna sell what Mouser refuses to and [10:50] now there is a little bit of trickiness [10:53] here is that this chip is located [10:55] between the CPU and the GPU so you want [10:58] to not burn your CPU or your GPU while [11:01] you're doing this so just a little bit [11:03] of skill building so I'm [11:04] gonna have a I'm gonna use a high-tech [11:06] heatsink over here which is going to be [11:10] a metal spudger with rubber rubber [11:13] surrounding it like that and we're going [11:16] to use that to cover so that I can [11:19] remove that MUX [11:34] I'm gonna lower my air a little bit I'm [11:36] not going to use 120 air like I usually [11:38] would [11:49] enjoy a shot of Jagermeister for this [11:51] great content thank you very much [11:52] let me try to put it towards something a [11:54] little bit more nutritious doing my best [11:57] then drink less eat less got to get back [12:01] in shape [12:09] when you leave Apple don't reply to her [12:11] texts her email says mr. name I can't [12:13] say on stream how's it going Chris long [12:23] remember I'm not gonna pull up on this [12:25] ship until I see that it can move left [12:28] and right because if I'm pulling up on [12:30] it I'm probably gonna pull it up while [12:31] the joint is still half cold so now I [12:33] see since I was squeezing the ship hard [12:35] that it was able to move left and right [12:37] so I'm gonna pull it off and there you [12:39] go those are the balls under my chip and [12:45] also this is the proper orientation of [12:46] the chip first thing to do is just suck [12:53] up all my balls there [13:05] you know Paul if we can buy this chip [13:07] Preval this actually this is not gonna [13:08] be a repair so I was thinking that we [13:12] work out a deal where I was kind of [13:14] thinking I do the 15 inch ones you do [13:17] the 13 inch ones what do you say what's [13:20] wrong with that why because they're [13:23] smaller I figured it would save space on [13:24] your desk cause you don't want your desk [13:26] to be all cluttered and stuff I don't [13:27] mind my desk being a little bit [13:28] cluttered all right so we got a nice [13:35] amount of Amtech nc5 v 9 v 2 TF flux and [13:38] were just gonna run a solder ball over [13:39] there pick up all of that junky [13:41] lead-free solder that I don't want to [13:43] use and gently touch the board not [13:45] enough that we're pulling off the the [13:49] covering and the coating off of the [13:53] traces but just enough that we have [13:55] gotten rid of all the lead-free junk so [13:58] now we're going to take another board [14:00] with another MUX chip [14:34] you [16:38] look at Paul's workmanship here we [16:43] allowed to bash this board to pieces if [16:44] after all this work it doesn't have an [16:45] image on the internal screen [16:58] you [17:48] Oh Apple logo Apple logo okay [17:51] all right so this is the Apple logo [17:53] which means we have fixed the issue by [17:55] replacing the mocks [18:15] it is 8 o'clock yep off the clock thank [18:22] you everybody for watching and as always [18:24] I hope you learned something