Classroom Demo Shows CO2 Lifts Enclosed Heat 9°C Above Ambient Air
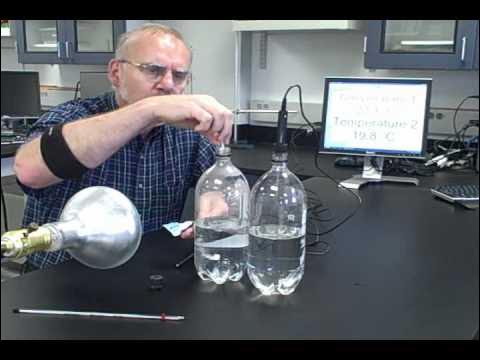
Erik Christensen
Trapped carbon dioxide retains significantly more thermal energy than normal air, producing a 9°C temperature disparity under identical radiant heat exposure.
AI-assisted summary of The Greenhouse Gas Demo — original source. Check the original for full context.
Source published:
Key ideas
- Erik Christensen adapts a National Weather Service/NOAA greenhouse gas demonstration using two clear soda bottles, water, and Alka-Seltzer tablets. (0:17)
- After nearly an hour of exposure to a lamp positioned about 40 centimeters away, the bottle enriched with carbon dioxide measured 9°C warmer than the ambient air control bottle. (2:27)
- The experiment is designed to fit easily into a single class period without requiring specialized laboratory equipment, as meaningful temperature divergence emerges well before an hour. (2:27)
Detailed notes
## Background Published on YouTube by Erik Christensen on June 14, 2011, "The Greenhouse Gas Demo" presents an educational experiment showing how elevated carbon dioxide levels influence temperature. According to the description, the video outlines a short, effective, and dramatic demonstration designed to illustrate the warming effects of greenhouse gases.
## TL;DR Erik Christensen introduces an accessible science activity adapted from National Weather Service and NOAA educational materials to demonstrate greenhouse warming using common household items. Two clear soda bottles half-filled with water are prepared—one containing standard ambient air as a control, and the other enriched with carbon dioxide using effervescent Alka-Seltzer tablets. Both containers are exposed to radiant heat from a shared lamp placed approximately 40 centimeters away while temperature probes track thermal changes. After heating, the carbon dioxide-rich bottle warms to a temperature 9°C higher than the control, offering educators a quick and vivid proof-of-concept for the greenhouse effect.
## Atmosphere & style The presentation carries an approachable, practical, and casual instructional tone, reminiscent of a friendly science teacher sharing a handy classroom demonstration. Christensen speaks in a relaxed and conversational manner, casually chuckling about using generic Walmart tablets and suggesting everyday alternatives like tape and modeling clay. The demonstration feels encouraging and delightfully straightforward, culminating in a satisfying reveal when the simple setup produces an unmistakable 9°C temperature gap.
## Bulletin - [00:17](https://www.youtube.com/watch?v=kwtt51gvaJQ&t=17s) Erik Christensen adapts a National Weather Service/NOAA greenhouse gas demonstration using two clear soda bottles, water, and Alka-Seltzer tablets. - [02:27](https://www.youtube.com/watch?v=kwtt51gvaJQ&t=147s) After nearly an hour of exposure to a lamp positioned about 40 centimeters away, the bottle enriched with carbon dioxide measured 9°C warmer than the ambient air control bottle. - [02:27](https://www.youtube.com/watch?v=kwtt51gvaJQ&t=147s) The experiment is designed to fit easily into a single class period without requiring specialized laboratory equipment, as meaningful temperature divergence emerges well before an hour.
## Key takeaways - [00:17](https://www.youtube.com/watch?v=kwtt51gvaJQ&t=17s) The greenhouse gas demonstration is based on educational resources published by the National Weather Service and NOAA. - [00:17](https://www.youtube.com/watch?v=kwtt51gvaJQ&t=17s) The experiment requires basic equipment: two clear plastic soda bottles filled halfway with water, stoppers, thermometers, and a single light source. - [00:17](https://www.youtube.com/watch?v=kwtt51gvaJQ&t=17s) Everyday household alternatives like modeling clay or tape can replace laboratory rubber stoppers, and standard glass thermometers can substitute for digital probes. - [00:17](https://www.youtube.com/watch?v=kwtt51gvaJQ&t=17s) The control bottle captures standard ambient air above the water line to establish a baseline for comparison. - [00:17](https://www.youtube.com/watch?v=kwtt51gvaJQ&t=17s) Carbon dioxide is generated inside the second bottle by dissolving generic effervescent Alka-Seltzer tablets in the water before sealing the chamber. - [00:17](https://www.youtube.com/watch?v=kwtt51gvaJQ&t=17s) Both bottles are irradiated simultaneously by a single common lamp to ensure equal exposure to radiant heat. - [02:27](https://www.youtube.com/watch?v=kwtt51gvaJQ&t=147s) Under identical radiant heating at roughly 40 cm, the CO2-enriched bottle became 9°C warmer than the control bottle. - [02:27](https://www.youtube.com/watch?v=kwtt51gvaJQ&t=147s) The dramatic temperature divergence demonstrates that carbon dioxide traps and retains more thermal energy than regular ambient air. - [02:27](https://www.youtube.com/watch?v=kwtt51gvaJQ&t=147s) Light bulb wattage and distance from the containers are primary variables that determine the rate and absolute scale of warming. - [02:27](https://www.youtube.com/watch?v=kwtt51gvaJQ&t=147s) Because the heating disparity becomes noticeable rapidly, teachers can easily run and review the demonstration within a single standard class period.
## Detailed walkthrough ### [00:17](https://www.youtube.com/watch?v=kwtt51gvaJQ&t=17s) Experimental Setup and Generating Carbon Dioxide
Erik Christensen introduces a straightforward science demonstration designed to illustrate the warming effect of greenhouse gases, noting that the activity is adapted from a National Weather Service learning lesson found on a NOAA website. The experiment is designed to be accessible enough for students to perform at home or for teachers to conduct in a school classroom. The setup requires two clear plastic soda bottles, each filled approximately halfway with water, along with a pair of stoppers and thermometers. While Christensen uses rubber stoppers sourced from a chemistry lab, he points out that everyday alternatives such as modeling clay or tape over the bottle opening work just as well. For measuring temperature, a standard glass thermometer can be suspended inside, though Christensen opts for digital Vernier Go!Temp probes connected directly to a computer for continuous monitoring. A single lamp serves as the common heating source placed in front of both containers.
```mermaid flowchart TD accTitle: Greenhouse Gas Demonstration Setup accDescr: Experimental layout showing a heat lamp radiating toward two sealed soda bottles containing different gas environments. subgraph HeatSource ["Heating Source"] L["Heat Lamp"] end subgraph ControlBottle ["Control Bottle"] B1["Half-filled with Water"] A1["Ambient Air Atmosphere"] P1["Vernier Go!Temp Probe"] B1 --- A1 --- P1 end subgraph TestBottle ["CO2 Test Bottle"] B2["Half-filled with Water"] T2["Alka-Seltzer Tablets"] A2["CO2-Enriched Atmosphere"] P2["Vernier Go!Temp Probe"] B2 --- T2 --> A2 --- P2 end L -->|"Radiant heat (~40 cm)"| ControlBottle L -->|"Radiant heat (~40 cm)"| TestBottle ```
To establish the control, the first bottle is sealed with a stopper and fitted with a temperature probe to monitor the ambient air pocket above the water line. The second bottle is prepared to demonstrate the impact of an atmosphere enriched with carbon dioxide. Christensen explains the objective of the second container: “Now, the second one we want to develop some CO2 in the bottle to see the effect on the change in temperature of the atmosphere as it's heated.” To generate the carbon dioxide, he drops effervescent tablets into the water—noting with a laugh that he simply bought generic, cheap Alka-Seltzer tablets from Walmart. As the tablets fizz and bubble vigorously to release gas, he quickly secures the rubber stopper and inserts the second digital temperature probe to seal the chamber tightly. With both bottles prepped and sealed, he turns on the lamp, announcing that he will leave the setup to run under the light for an hour before returning to evaluate the temperature divergence between the two environments.
- **Primary materials**: Two clear soda bottles, water (filled halfway), two rubber stoppers (or clay/tape), Vernier Go!Temp digital probes (or standard glass thermometers), a heat lamp, and Alka-Seltzer tablets. - **Source curriculum**: National Weather Service / NOAA educational materials. - **Experimental control**: Bottle 1 contains normal air and water; Bottle 2 contains water, effervescing Alka-Seltzer producing carbon dioxide, and trapped gas.
---
[02:27](https://www.youtube.com/watch?v=kwtt51gvaJQ&t=147s) Temperature Results and Educational Applications
Returning after nearly an hour of illumination, Christensen checks the digital logs to evaluate the outcome of the experiment. The lamp had been positioned approximately 40 centimeters away from the bottles, and the resulting thermal difference between the two environments is substantial. Christensen highlights the dramatic disparity in warming: “You didn't need to wait an hour, but my temperature change for the approximately 40 cm that I had from this light bulb to these bottles was 9° C warmer in the bottle with the CO2.” The pronounced rise in heat clearly demonstrates that trapped carbon dioxide retains significantly more thermal energy than standard air under an identical radiation source.
Christensen discusses the physical variables that educators and students should consider when replicating the lab, pointing out that both the wattage of the light bulb and its distance from the bottles will alter the absolute rate and magnitude of warming. However, he emphasizes that the core lesson remains strikingly easy to reproduce without specialized or costly laboratory equipment. Because the temperature divergence manifests rapidly, teachers do not even need to wait a full hour; the experiment can easily be started at the opening bell of a class period and reviewed before dismissal. Highlighting how readily accessible the components are—reiterating that basic off-brand Alka-Seltzer from Walmart works perfectly—Christensen concludes by wishing viewers good luck with running the demonstration themselves.
- **Measured outcome**: The carbon dioxide-rich bottle reached a temperature 9°C higher than the ambient air bottle. - **Distance to heat source**: Approximately 40 centimeters from the light bulb to the bottles. - **Key experimental variables**: Lamp wattage and distance between the light source and the bottles. - **Classroom timing**: While run for an hour in the demonstration, noticeable temperature differences emerge quickly enough to fit within a single, short class or lab period.
## Mentioned Erik Christensen, National Weather Service, NOAA, Vernier Go!Temp, Alka-Seltzer, Walmart
## Video description This discusses a short, but very effective and dramatic demo to show the effect on temperature of increased levels of carbon dioxide.
[Source](https://www.youtube.com/watch?v=kwtt51gvaJQ)