Star Wars Trench Run Lifts Dialogue, Tactics From 1955 Dam Busters
The Non-Conformist
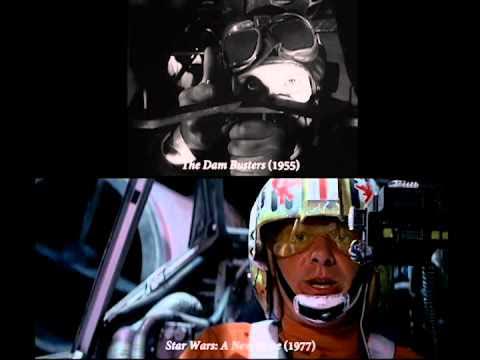
Scene-by-scene comparisons demonstrate that the climactic Death Star attack mirrors the 1955 British war film across tactical briefings, cockpit dialogue, and pacing beats nearly line for line.
AI-assisted summary of Star Wars Origins: The Dam Busters - Side by Side Scene Comparison — original source. Check the original for full context.
Source published:
Key ideas
- The side-by-side comparison demonstrates that George Lucas's climactic Death Star trench run in Star Wars (1977) heavily borrowed dialogue, staging, and narrative beats from The Dam Busters (1955). (0:00)
- Mission briefings in both films establish near-impossible precision strike requirements against massive targets, contrasting futuristic computerized HUDs with historical twin-nail wooden sights. (0:00)
- Pilots during the attack runs share nearly verbatim dialogue regarding target scale, decoy maneuvers across the structure, and defensive flak estimates divided between surface emplacements and towers. (0:50)
- Both climaxes follow an identical sequence of events: premature celebration of a false hit, starboard system battle damage, and an astonished crew reaction upon the target's final collapse. (1:35)
Detailed notes
## Background Published on YouTube by the channel The Non-Conformist on August 12, 2014, this video features a side-by-side comparison between scenes from George Lucas's Star Wars (1977) and Michael Anderson's The Dam Busters (1955). The video description notes that it demonstrates how sequences from the 1955 British war classic directly parallel the climactic assault on the Death Star.
## TL;DR The video demonstrates the extensive cinematic and narrative influence of The Dam Busters on the climactic Death Star trench run in Star Wars. It systematically aligns the tactical mission briefings, mechanical and computer-assisted sighting methods, and pre-assault radio roll calls between RAF No. 617 Squadron and Rebel starfighter pilots. During the attack runs, both films feature nearly identical dialogue regarding target scale, decoy maneuvers to draw defensive flak, and estimates of enemy gun batteries. The comparison concludes with matching narrative beats of premature victory celebrations, crippling starboard damage to allied craft, and the ultimate destruction of the primary target.
## Atmosphere & style The presentation creates a revelatory and tense experience, allowing the synchronized audio and visual edits to demonstrate the cinematic parallels without intrusive narration. The pacing moves from methodical, analytical mission briefings into the escalating chaos of aerial combat, punctuated by frantic cockpit cross-talk and rattling defensive flak. The side-by-side audio interplay highlights the near-identical delivery of pilots facing overwhelming odds, building toward a shared catharsis as both operations culminate in catastrophic structural breaches.
## Bulletin - [00:00](https://www.youtube.com/watch?v=lNdb03Hw18M&t=0s) The side-by-side comparison demonstrates that George Lucas's climactic Death Star trench run in Star Wars (1977) heavily borrowed dialogue, staging, and narrative beats from The Dam Busters (1955). - [00:00](https://www.youtube.com/watch?v=lNdb03Hw18M&t=0s) Mission briefings in both films establish near-impossible precision strike requirements against massive targets, contrasting futuristic computerized HUDs with historical twin-nail wooden sights. - [00:50](https://www.youtube.com/watch?v=lNdb03Hw18M&t=50s) Pilots during the attack runs share nearly verbatim dialogue regarding target scale, decoy maneuvers across the structure, and defensive flak estimates divided between surface emplacements and towers. - [01:35](https://www.youtube.com/watch?v=lNdb03Hw18M&t=95s) Both climaxes follow an identical sequence of events: premature celebration of a false hit, starboard system battle damage, and an astonished crew reaction upon the target's final collapse.
## Key takeaways - [00:00](https://www.youtube.com/watch?v=lNdb03Hw18M&t=0s) General Dodonna's Death Star briefing mirrors Barnes Wallis's technical presentation in The Dam Busters, focusing on exploiting a critical structural vulnerability through extreme bombing precision. - [00:00](https://www.youtube.com/watch?v=lNdb03Hw18M&t=0s) Aiming procedures contrast Rebel starfighters' computerized targeting computers with the RAF 617 Squadron's calibrated wooden peephole sights aligned with dam towers at 600 yards. - [00:00](https://www.youtube.com/watch?v=lNdb03Hw18M&t=0s) Pre-attack radio check-ins display a parallel rhythmic cadence between Red Squadron's standing-by callouts and the British Lancaster bomber crews checking in with flight leaders. - [00:50](https://www.youtube.com/watch?v=lNdb03Hw18M&t=50s) Upon reaching the target, pilots in both films voice identical shock at the sheer scale of the Death Star and the Möhne Dam. - [00:50](https://www.youtube.com/watch?v=lNdb03Hw18M&t=50s) Squadron leaders in both productions order identical decoy tactics, deliberately cutting across the target axis to draw defensive anti-aircraft fire away from attacking bombers. - [00:50](https://www.youtube.com/watch?v=lNdb03Hw18M&t=50s) Attacking pilots assess defensive fire with matching dialogue syntax, estimating gun batteries split between ground or surface locations and elevated masonry towers. - [00:50](https://www.youtube.com/watch?v=lNdb03Hw18M&t=50s) Tense attack-run cockpit cross-talk matches closely, blending rapid distance tracking, calls to pull up, and commands to maintain steady flight through heavy flak. - [01:35](https://www.youtube.com/watch?v=lNdb03Hw18M&t=95s) The narrative structure of the first bombing run mirrors frame-by-frame false hope, where initial claims of success are promptly contradicted by observers noting the target held. - [01:35](https://www.youtube.com/watch?v=lNdb03Hw18M&t=95s) Cockpit attrition and escalating tension are conveyed through matching radio reports of catastrophic damage to starboard engines and wings. - [01:35](https://www.youtube.com/watch?v=lNdb03Hw18M&t=95s) The final successful ordnance delivery breaches the barrier, provoking synchronized cries of shock and triumph from witnessing aircrews in both films.
## Detailed walkthrough ### [00:00](https://www.youtube.com/watch?v=lNdb03Hw18M&t=0s) Mission Briefing and Targeting Calculations
The side-by-side comparison begins in the tactical briefing rooms of both operations, illustrating how the attack on the Death Star mirrors Operation Chastise. In *Star Wars*, General Dodonna addresses the Rebel pilots gathered around a holographic schematic, explaining the precise geometric vulnerability of the Galactic Empire's superweapon: “Only a precise hit will set up a chain reaction.” He cautions the squadron that the thermal exhaust port target area is a mere two meters wide. Running concurrently in *The Dam Busters*, Barnes Wallis presents his daring engineering concept to military commanders, laying out the physics required to rupture the German dams. Wallis points out the staggering difficulty of conventional high-altitude bombing, asking the brass, “Drop a 10 ton bomb from 40,000 feet that would seal itself in the roots of the wall.” He elaborates that while the subterranean shock waves would trigger a localized earthquake, practical ballistics make high-altitude precision impossible, questioning: “Well the shock waves would be tremendous, a real earthquake. But could you hit a target that size from 8 Miles up?”
The presentation then shifts to the cockpits, contrasting the aiming mechanisms developed to execute these high-stakes precision strikes. While the Rebel starfighters rely on computerized heads-up displays, with flight control instructing them to “Switch to targeting computer,” the Royal Air Force bomber crews of No. 617 Squadron rely on a remarkably simple, calibrated wooden sight. The Lancaster bomber crew explains the mechanical rangefinding trick: “Your bomb aimer keeps his eye to this little peephole, and when these two nails at the end of the arms are in direct alignment with the towers, then you'll be exactly 600 yards from the wall and away goes your bomb.” The audio tracks subsequently blend the pre-assault radio check-ins, juxtaposing Red Squadron's roll call—with pilots confirming, “Red 6 standing by,” “Red 3 standing by,” and “Red 2 standing by”—against the British bomber crews methodically reporting readiness over their intercoms with repeated confirmations of “Here leader.”
| Cinematic Element | *The Dam Busters* (1955) | *Star Wars* (1977) | |:--- |:--- |:--- | | **Tactical Vulnerability** | Weakness at the foundation of the Möhne Dam requiring direct shockwaves. | Thermal exhaust port leading directly into the reactor core. | | **Sighting Mechanism** | Triangular wooden sight aligning twin nails with the dam's towers at 600 yards. | Onboard computerized targeting crosshairs. | | **Squadron Check-In** | Lancaster bomber crews reporting in sequence to Wing Commander Guy Gibson. | Red Squadron and Gold Squadron starfighters checking in with flight leaders. |
[00:50](https://www.youtube.com/watch?v=lNdb03Hw18M&t=50s) Commencing the Attack Run and Drawing Flak
As both flight groups arrive within sight of their colossal targets, the dialogue directly matches the pilots' awe and mounting apprehension. In *Star Wars*, an X-wing pilot gazes at the planetary battle station, remarking, “Look at the size of that thing!” In nearly identical phrasing, a British airman in *The Dam Busters* stares out through his cockpit canopy at the massive concrete expanse of the Möhne Dam, exclaiming, “My goodness it's big isn't it? Can we really break that?” To penetrate heavy defensive perimeters, flight leaders in both films implement an identical combat tactic: flying decoy passes along the superstructure to draw defensive fire away from the primary bombing craft. Luke Skywalker or his wingmen plan maneuvers across the Death Star surface, with a pilot declaring, “I'm going to cut across the axis and try and draw their fire.” This mirrors Wing Commander Guy Gibson’s radioed command to his squadron over the reservoir: “I'll fly across the dam as you make your run and try and draw the flak off you.”
The attack runs commence in parallel as Gold Leader announces, “This is Gold leader. We're starting our attack run,” paralleled by Gibson's straightforward callsign transmission, “I'm going in to attack.” As the bombers approach along the trench and water channel, pilots quickly tally the intense defensive flak emplacements lining the target zone. Dutch Vander prompts his veteran wingman with “How many guns do you think Gold Five?” to which Pops Davish estimates, “Say about 20 guns, some on the surface some on the towers.” Over the Möhne reservoir, Gibson similarly checks with his gunner: “How many guns you think there are Trevor?” Trevor provides a practically identical assessment: “I’d say there’s about 10 guns. Some in the field and some in the towers.” As defensive fire intensifies and pilots fight through canopy turbulence and mounting flak, both films cut between frantic cockpit cross-talk, with commands to “Pull up!” giving way to intense concentration as bomb aimers track distance markers, muttering, “Should be able to see it by now,” and urging, “Steady, steady.”
- **Scale reactions**: Both sets of pilots voice overt disbelief when viewing the monumental scale of the target for the first time. - **Decoy tactics**: Both mission leaders deliberately sacrifice altitude and position to draw anti-aircraft artillery away from the active bomber. - **Defensive assessments**: Inquiries regarding enemy firepower follow identical syntax, noting defensive batteries split between surface ground emplacements and elevated masonry towers.
[01:35](https://www.youtube.com/watch?v=lNdb03Hw18M&t=95s) Failed Torpedo Runs, Battle Damage, and Final Breach
The climactic bombing sequences demonstrate identical rhythms of initial failure, premature celebration, cockpit attrition, and ultimate breakthrough. After a pilot releases his payload with shouts of “It's away! It’s a hit!”, observation control quickly crushes the brief jubilation: “Negative, negative. It didn't go in. Just impacted on the surface.” *The Dam Busters* mirrors this false victory beat frame-by-frame: water erupts in an immense geyser and aircrew members excitedly declare, “It's gone we've done it!”, only for Gibson and his observers to clarify through the settling spray, “We haven't. It's still there.”
```mermaid flowchart LR accTitle: Attack Run Progression accDescr: Flowchart showing the narrative beats shared between the bombing runs in both films. subgraph S1["Run 1: First Attempt"] A["Delivery: 'It's away!'"] --> B["False Hope: Premature Victory"] B --> C["Reality: Target Withstands Hit"] end subgraph S2["Run 2: Attrition & Final Strike"] D["System Damage: Engine/Wing Lost"] --> E["Final Ordinance Warning"] E --> F["Breach: Complete Target Destruction"] end C --> D ```
As the sorties grind down, the remaining bombers suffer catastrophic engine damage from ground fire. Over the Death Star trench, an attack fighter calls in systems failure, reporting, “Hey there, I just lost my starboard engine.” In *The Dam Busters*, a pilot checks in with a crippled aircraft, asking, “Hey Popsy, are you hit?”, to which the pilot grimly responds, “Starboard wing. But we're all right, we can make it.” With ordinance running critically low, Gibson radios his final available Lancaster bomber: “You've got the last bomb Les, so take your time.” The comparison concludes with the successful terminal detonation. As the final weapon penetrates the barrier, the wall gives way to catastrophic structural failure, prompting identical cries of triumph and shock from the crews watching the destruction unfold: “It's gone, look! My God!”
## Mentioned Star Wars, The Dam Busters, General Dodonna, Barnes Wallis, Guy Gibson, Luke Skywalker, Dutch Vander, Pops Davish, Death Star, Möhne Dam, Operation Chastise, No. 617 Squadron, Royal Air Force, Red Squadron, Gold Squadron, Avro Lancaster
## Video description Side-by-side comparison of scenes from Star Wars (1977) with scenes from The Dam Busters (1955).
-------------------------------------------------------------
Like the content? Consider donating to support the channel:
Paypal: https://www.paypal.com/donate/?hosted_button_id=HHA4YBH8CJ3FS
[Source](https://www.youtube.com/watch?v=lNdb03Hw18M)