Provinciano Compresses Retro City Rampage to Run on Real 1989 NES
VblankEntertainment
Rewriting the entire codebase in bare-metal assembly and aggressively compressing tile budgets proves open-world driving games could have functioned on original 1989 console hardware.
AI-assisted summary of The Making of: ROM City Rampage (Retro City Rampage) — original source. Check the original for full context.
Source published:
Key ideas
- Brian Provinciano ported the core open-world mechanics of Retro City Rampage to execute natively on authentic NES hardware under the title ROM City Rampage. (0:08)
- Adapting modern PC assets required crunching roughly 30,000 environmental tiles down to under 8,000, and compressing vehicle sprites through horizontal mirroring and lossy perceptual tile merging. (2:12)
- Because modern C++ could not run on the 1.78 MHz 6502 processor, development was conducted in custom macro assembly paired with bank-switching across a 512 KB cartridge ROM. (4:26)
- Screen updates were constrained by the console's VBlank window, limiting writes to one or two 32-byte tile rows per frame while hardware scroll registers created smooth scrolling. (5:47)
- The entire 2.5-hour soundtrack was produced for the NES's five-channel audio architecture using tracker formats, consuming just 1.5 megabytes of total storage. (7:06)
Detailed notes
## Background Published on YouTube by VblankEntertainment on February 27, 2013, this video presentation breaks down the technical engineering behind *ROM City Rampage*. The video description explains how the core of *Retro City Rampage* was scaled down to run on genuine 8-bit NES hardware and illustrates how classic 8-bit games were built.
## TL;DR Developer Brian Provinciano details his journey converting *Retro City Rampage* into a fully functional 8-bit build capable of executing directly on original Nintendo Entertainment System hardware. Constrained by a 1.78 MHz 6502 CPU, 10 KB of RAM, and strict hardware tile and scanline limits, he had to discard high-level code, write a custom macro assembler, and heavily compress environmental and vehicle sprites. The postmortem details the mechanics of hardware tile scrolling during the vertical blanking interval, dynamic memory bank switching, and authentic 5-channel tracker audio composition. Ultimately, the project demonstrates that an open-world driving and shooting game could have legitimately run on a commercial game cartridge in 1989.
## Atmosphere & style The presentation is analytical, pragmatic, and quietly enthusiastic, unfolding like a masterclass in vintage console architecture from a solitary engineering artisan. Provinciano speaks with clear, unpretentious authority, stripping away modern misconceptions about retro aesthetics to reveal the ruthless physical realities of early computing. Watching it feels like peering over a programmer's shoulder into memory maps and assembly routines, capturing the satisfying, puzzle-like joy of squeezing complex gameplay into microscopic hardware limits.
## Bulletin - [00:08](https://www.youtube.com/watch?v=Hvx4xXhZMrU&t=8s) Brian Provinciano ported the core open-world mechanics of Retro City Rampage to execute natively on authentic NES hardware under the title ROM City Rampage. - [02:12](https://www.youtube.com/watch?v=Hvx4xXhZMrU&t=132s) Adapting modern PC assets required crunching roughly 30,000 environmental tiles down to under 8,000, and compressing vehicle sprites through horizontal mirroring and lossy perceptual tile merging. - [04:26](https://www.youtube.com/watch?v=Hvx4xXhZMrU&t=266s) Because modern C++ could not run on the 1.78 MHz 6502 processor, development was conducted in custom macro assembly paired with bank-switching across a 512 KB cartridge ROM. - [05:47](https://www.youtube.com/watch?v=Hvx4xXhZMrU&t=347s) Screen updates were constrained by the console's VBlank window, limiting writes to one or two 32-byte tile rows per frame while hardware scroll registers created smooth scrolling. - [07:06](https://www.youtube.com/watch?v=Hvx4xXhZMrU&t=426s) The entire 2.5-hour soundtrack was produced for the NES's five-channel audio architecture using tracker formats, consuming just 1.5 megabytes of total storage.
## Key takeaways - [00:08](https://www.youtube.com/watch?v=Hvx4xXhZMrU&t=8s) The NES target architecture operates on a Ricoh 2A03 / MOS 6502 8-bit CPU clocked at 1.78 MHz with just 10 KB of total RAM. - [00:08](https://www.youtube.com/watch?v=Hvx4xXhZMrU&t=8s) The term '8-bit' historically refers to processor architecture rather than color depth, as the NES displays only up to 13 colors on-screen simultaneously from 2-bit-per-pixel tiles. - [02:12](https://www.youtube.com/watch?v=Hvx4xXhZMrU&t=132s) Environmental tiles were reduced from approximately 30,000 to below 8,000 by stripping decorative geometry, bespoke storefronts, and multi-tile sidewalk patterns. - [02:12](https://www.youtube.com/watch?v=Hvx4xXhZMrU&t=132s) Pedestrian walking animations were compressed from 16 angles to nine via horizontal hardware flipping, and head variations were restricted to eight cardinal directions. - [02:12](https://www.youtube.com/watch?v=Hvx4xXhZMrU&t=132s) Car sprite requirements were reduced below the 128-tile hardware limit using symmetry and an automated algorithm merging tiles with at least 58 matching pixels out of 64. - [02:12](https://www.youtube.com/watch?v=Hvx4xXhZMrU&t=132s) NES scanlines drop rendering beyond eight sprites, necessitating frame-by-frame sprite slot cycling to trigger controlled flicker rather than full object disappearance. - [04:26](https://www.youtube.com/watch?v=Hvx4xXhZMrU&t=266s) None of the high-level C++ code from Retro City Rampage could be reused, requiring bare-metal 6502 assembly authored via a custom high-level macro assembler. - [04:26](https://www.youtube.com/watch?v=Hvx4xXhZMrU&t=266s) A 512 KB program ROM was mapped into the CPU's fixed 32 KB address space by partitioning code across dynamically swapped 8 KB banks. - [05:47](https://www.youtube.com/watch?v=Hvx4xXhZMrU&t=347s) VRAM is locked during active raster beam drawing, leaving only the brief VBlank interval to transfer video data and write tile updates. - [05:47](https://www.youtube.com/watch?v=Hvx4xXhZMrU&t=347s) Because VBlank only allows updating 1–2 tile rows per frame, historical 8-bit game design heavily favored side-scrollers that stream data at display edges. - [07:06](https://www.youtube.com/watch?v=Hvx4xXhZMrU&t=426s) Debugging was achieved by modifying a custom emulator to read assembler-generated symbol maps for real-time variable watch and collision overlay rendering. - [07:06](https://www.youtube.com/watch?v=Hvx4xXhZMrU&t=426s) Audio was composed in ModPlug Tracker for the NES's five native sound channels: two pulse waves, one triangle wave, one noise channel, and one 1-bit DPCM channel. - [07:06](https://www.youtube.com/watch?v=Hvx4xXhZMrU&t=426s) Tracker compositions had to synchronize tempos perfectly with 50 Hz or 60 Hz frame loops to prevent vibrato and pitch sweeps from detuning. - [07:06](https://www.youtube.com/watch?v=Hvx4xXhZMrU&t=426s) Adhering to hardware tracker music compressed over two and a half hours of music into 1.5 MB, helping keep the Nintendo Wii build of Retro City Rampage down to 10 MB. - [09:30](https://www.youtube.com/watch?v=Hvx4xXhZMrU&t=570s) The project serves as proof that open-world driving and shooting action could technically run within the authentic physical constraints of a 1989 NES cartridge.
## Detailed walkthrough ### [00:08](https://www.youtube.com/watch?v=Hvx4xXhZMrU&t=8s) Origins of ROM City Rampage and the 8-Bit Reality
Before creating *Retro City Rampage*, developer Brian Provinciano was building a genuine 8-bit game engineered to execute directly on original hardware. Over time, the friction of fighting severe system boundaries pulled his attention away from gameplay design, leading him to put the project on ice in order to focus purely on making the richest game possible. Brian Provinciano recalled the pivot: “My focus shifted though as I became less interested in battling the hardware limitations and more in creating the best possible game so I shelved it and started working on RCR.” Once *Retro City Rampage* was shipped and completed, he returned to the dormant codebase to demonstrate exactly what late-1980s console architecture could achieve when pushed to its limits.
The target environment is built around the Ricoh 2A03 / MOS Technology 6502 8-bit processor clocked at 1.78 MHz, the same underlying CPU family found in the Commodore 64, Apple II, and Nintendo Entertainment System. The physical memory boundaries are tight: 10 kilobytes of total system RAM, comprising a 2 KB base supplemented by 8 KB of extended work RAM. Only 32 KB of program ROM can be mapped into active memory at any single moment for code and static data, paired with 4 KB of active sprite graphics ROM. Through cartridge mapper hardware, the project leverages a 256 KB background graphics ROM.
To cope with microscopic memory capacities and cycle budgets, the console uses hardware tile mapping instead of flat framebuffers. Visual scenes are decomposed into grids of 8x8 pixel tiles, and any redundant copies are stripped out of storage. Background visuals can show 13 colors on-screen at once, but tiles are restricted to 2 bits per pixel, meaning an individual tile can only reference four colors. Four distinct palettes are available, each containing three selectable shades alongside a single unified background color. Addressing a common retro gaming misconception, Brian Provinciano explained: “Note that when a game is labeled as 8-bit, it's referring to the CPU.” True 8-bit color depth yields 256 simultaneous colors, an advancement that did not become mainstream until 16-bit consoles and PC VGA graphics arrived.
- **CPU:** 6502 8-bit processor running at 1.78 MHz. - **System Memory:** 10 KB RAM total (2 KB internal base RAM + 8 KB extended RAM). - **ROM Windows:** 32 KB active program ROM window; 4 KB active sprite pattern table. - **Cartridge ROM:** 256 KB background pattern ROM enabled by cartridge banking. - **Tile Architecture:** 8x8 pixel blocks at 2 bits per pixel (4 colors per tile out of 4 selectable palettes sharing 1 common color).
---
[02:12](https://www.youtube.com/watch?v=Hvx4xXhZMrU&t=132s) Tile Crunching: Environments, Pedestrians, and Vehicles
Porting the open world of *Retro City Rampage* into NES hardware demanded an aggressive asset diet. The modern game world relied on roughly 30,000 distinct tiles, but the 8-bit target hardware required keeping that budget strictly below 8,000. To clear that threshold, unique single-use tiles like bespoke storefront lettering, decorative statues, and varied foliage were eliminated first. Street geometry had to be normalized; instead of the multi-tile decorative sidewalk paving in the original game, sidewalks were simplified into a single repeating tile. Dynamic environmental props were also removed because the sprite hardware lacked the capacity to display them.
Sprite budgets required equally ruthless compression. For pedestrian characters, 64 tiles were allocated to accommodate seven archetypes walking in 16 directions across a three-frame animation cycle. Because the PPU allows horizontal hardware flipping, walking left and walking right can share identical tile data, shrinking the 16 directional sets down to nine. The North and South walking loops were trimmed from three frames down to two using mirroring tricks. Furthermore, rather than rendering distinct angled head angles for all 16 movement angles, head graphics were only created for the primary eight directions, compressing the nine sets down to five.
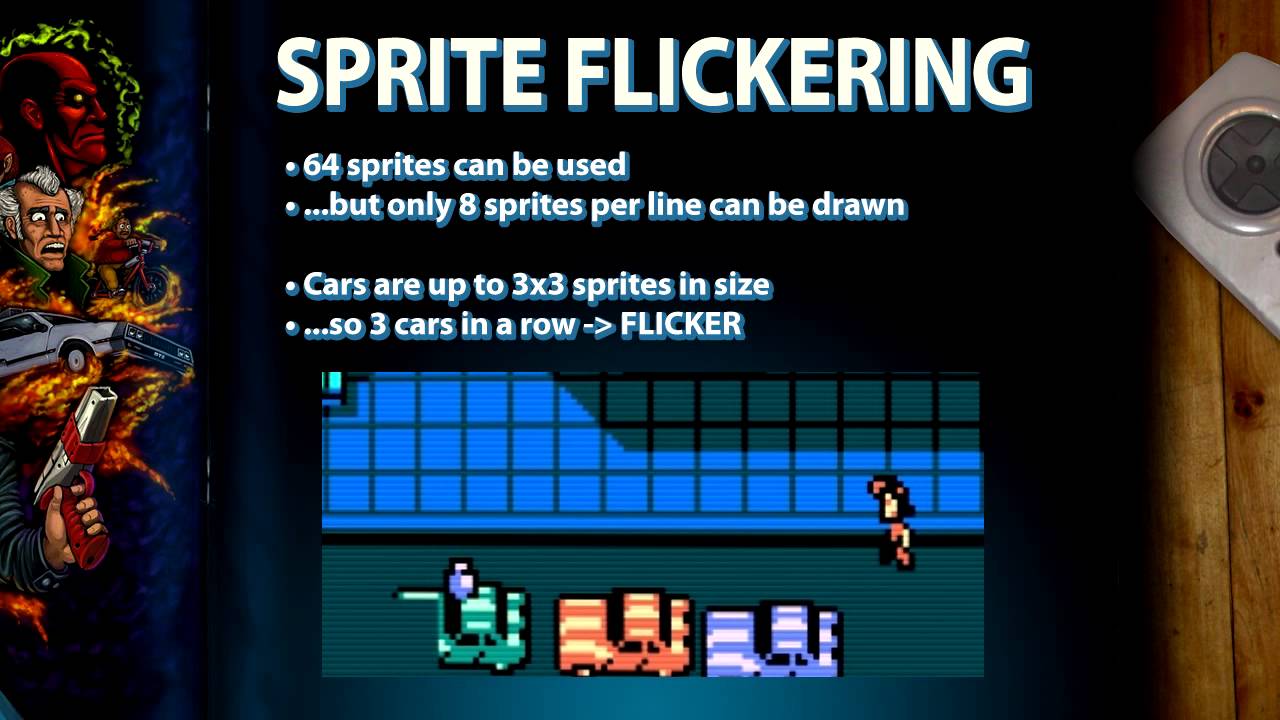
Vehicles were even more challenging: each car measures 24x24 pixels (a 3x3 grid of 8x8 tiles) and rotates through 16 driving angles. Factoring in a civilian vehicle and two variations of police cars, a naive implementation required 288 tiles, far surpassing the hard ceiling of 128 tiles. Horizontal mirroring shaved the 16 angles down to nine, dropping the requirement to 162 tiles, and trimming tiles from non-diagonal orientations brought it to 144. To conquer the remaining overrun, an automated perceptual similarity algorithm was implemented: if two 64-pixel tiles shared at least 58 identical pixels, they were collapsed into a single tile. This reduced individual 24x24 car angles from nine unique tiles down to seven. Furthermore, the notorious NES sprite flicker is explained: the PPU can track 64 sprites overall, but can only draw eight per horizontal scanline. Because each car is three sprites wide, placing more than two vehicles on the same horizontal plane exceeds the scanline limit. The console simply drops rendering on the ninth sprite, requiring the game engine's software code to manually cycle sprite draw orders between frames to generate an alternating flicker rather than letting objects disappear completely.
```mermaid flowchart TD accTitle: Vehicle Tile Compression Flow accDescr: Pipeline showing how car sprite tiles are compressed from 288 down to fit under the 128 tile hardware budget.
subgraph Mirroring["Directional Reduction"] A["Raw 16-Angle Cars<br/>288 Tiles"] -->|"Mirror 16 directions to 9"| B["Mirrored Orientations<br/>162 Tiles"] B -->|"Trim non-diagonal tiles"| C["Cardinal Optimization<br/>144 Tiles"] end
subgraph Similarity["Pixel Merging"] C -->|"Compare 8x8 tiles<br/>(Match >= 58/64 px)"| D["Perceptual Tile Merging<br/>7 tiles per car instead of 9"] D --> E["Final Asset Set<br/>Under 128 Tile Limit"] end ```
- **Environment Tile Reduction:** Slashed from ~30,000 tiles to under 8,000 tiles. - **Pedestrian Sprite Savings:** 16 walk directions compressed to nine via horizontal flipping; North/South walk animations cut to two frames; head rotations restricted to eight primary directions, reducing nine animation sets to five. - **Car Sprite Budget:** 24x24 pixels (3x3 tiles per frame) across two police cars and standard cars dropped from 288 to 144 tiles via directional symmetry, then below 128 tiles using lossy tile merging (treating tiles matching 58 of 64 pixels as identical). - **Scanline Constraint:** Maximum 8 hardware sprites per horizontal scanline; 3-tile-wide vehicles cause dropout if more than two cars align horizontally, requiring game code to rotate sprite slots each frame.
---
[04:26](https://www.youtube.com/watch?v=Hvx4xXhZMrU&t=266s) Bare-Metal Assembly, Custom Tooling, and Bank Switching
Standard modern development practices could not bridge the gap to vintage hardware. Brian Provinciano emphasized the absolute break from the PC codebase: “With its 1.78 MHz CPU, high-level languages such as C++ are out of the question; not a single line of code from RCR could be used.” Developers working on the 6502 must program directly in bare-metal assembly. Rather than writing raw, unadorned machine instructions, he engineered an open-source high-level macro assembler that combined the raw execution speed of hand-coded assembly with syntactic abstractions familiar from C.
This proprietary assembler introduced structured control flow constructs, cleaner loop implementations, preprocessor directives, structs, and switch-case syntax. Behind the scenes, these macros expanded into optimal assembly instructions, preserving cycle-level performance while drastically accelerating development.
The architecture also presented major memory management hurdles. The cartridge contained 512 KB of total program ROM, but the 6502 memory map only exposes a 32 KB window partitioned into four 8 KB slots. Accessing the broader library of routines and game data requires swapping 8 KB banks dynamically in and out of those active slots. Whenever routine code or data arrays exceeded a bank’s 8 KB limit, segments had to be split across boundaries. This introduced runtime overhead, as functions had to bank-switch target data into an active window and swap the previous bank back upon completion.
---
[05:47](https://www.youtube.com/watch?v=Hvx4xXhZMrU&t=347s) The Vertical Blanking Interval and Hardware Tile Scrolling
Console rendering on classic CRT televisions operates on rigid timing constraints tied to the regional AC power grid, running at either 60 Hz (NTSC) or 50 Hz (PAL). During the majority of each frame, the electron beam is actively drawing the raster image pixel by pixel from top to bottom. The Picture Processing Unit (PPU) locks its internal VRAM bus during active scanline rendering. The only opportunity for the CPU to push new graphical data to video memory occurs during the vertical blanking interval—the brief window when the electron beam turns off and repositions from the bottom-right corner back to the top-left of the display.
Because the system possesses neither the raw clock cycles nor the memory bandwidth to recalculate screen buffers on a per-pixel basis, it relies on tilemaps. The full 256x240 pixel canvas is mapped into a grid of 32x30 bytes representing 8x8 character tiles. Even so, the VBlank duration is so constrained that the CPU cannot write an entire 960-byte frame during a single interval. Instead, the engine can only transfer a couple of tile rows or columns while the beam resets. Brian Provinciano observed how this hardware reality directed the history of game design: “Instead, you were mostly limited to just a couple of rows at a time, but this was perfect for the popular side-scrollers of the day, making them no coincidence.”
By writing a single 32-byte row into video memory during VBlank, the processor updates 256 horizontal pixels. The engine continuously pans the hardware scroll registers up and down. As the camera traverses the world, the tilemap wraps seamlessly across hardware nametables, generating the illusion of an infinite scrolling landscape out of minimal byte transfers.
```mermaid flowchart LR accTitle: NES Frame Timing and VBlank Execution Loop accDescr: Visual flow showing active CRT raster scanning followed by the narrow VBlank window where video memory writes occur.
subgraph ActiveRaster["Active Screen Draw (Majority of Frame)"] A["Electron Beam Draws Screen<br/>Top to Bottom (256x240 px)"] --> B["VRAM Bus Locked<br/>Game Logic & Physics Update"] end
subgraph VBlank["VBlank Interval (Beam Repositioning)"] B --> C["Beam Reaches Bottom<br/>VBlank NMI Fires"] C --> D["Write 1-2 Tile Rows (32 Bytes/Row)<br/>Update Sprite OAM & Scroll Registers"] D --> E["Beam Resets to Top-Left"] end
E --> A ```
- **Frame Rates:** 60 Hz (NTSC) or 50 Hz (PAL). - **VRAM Screen Matrix:** 256x240 pixels governed by 32x30 tile indices (960 bytes). - **VBlank Throughput:** Restricted to updating roughly one or two 32-byte rows per blanking period, rendering 256 screen pixels per row write. - **Scroll Mechanism:** Hardware scroll registers offset the display coordinate across wrapping nametables while incoming map boundaries stream in at the edges.
---
[07:06](https://www.youtube.com/watch?v=Hvx4xXhZMrU&t=426s) Emulation Debugging Workarounds and Authentic 5-Channel Audio
Debugging bare-metal NES software poses severe practical hurdles: the hardware provides no native watch windows, source-level debuggers, debug visualization hooks, or even basic `printf` text streaming. Rather than spending months constructing a ground-up development environment, Brian Provinciano repurposed tools he had already developed: “Writing a full emulator and IDE with all of these features would have taken a fair bit of time, so I took a shortcut.” His custom assembler generated memory map files detailing the precise locations of variables, structs, and arrays. He modified his custom emulator to parse these map files at runtime, presenting real-time variable inspections, injecting function hooks, and rendering graphical collision boundaries directly on top of the emulation layer.
Audio development maintained strict adherence to the NES’s Ricoh audio processing unit specifications, which provides five distinct sound channels: - Two pulse/square wave channels for melodies and harmonies - One triangle wave channel primarily utilized for bass lines - One white noise channel for percussive hits - One 1-bit delta pulse-code modulation (DPCM) channel for playback of compressed digital samples
The soundtrack was composed within ModPlug Tracker using the standard Impulse Tracker (`.it`) format, and then converted to play on real hardware via the `IT2NSF` utility. The primary technical hurdle stemmed from song tempos; if tracker tempos failed to divide evenly into the console's 50 Hz or 60 Hz update loop, pitch sweeps and vibrato modulations sounded noticeably off-key.
While the source audio was composed to strictly authentic specs, the runtime engine in *Retro City Rampage* took liberties with channel allocation. Real NES software had to constantly make trade-offs: either sound effects had to temporarily silence an active music channel, or specific channels had to be hard-reserved (such as dedicating triangle and noise channels exclusively to sound effects while leaving the square waves for melody). The PC release circumvented these drops by allowing dynamic fading and multi-channel sound effect playback. Sticking to authentic hardware-targeted tracker music also offered an unexpected file size advantage: over two and a half hours of soundtrack was compressed into a minuscule 1.5 megabytes of tracker data, enabling the entire Nintendo Wii release of *Retro City Rampage* to weigh in at just 10 megabytes.
---
[09:30](https://www.youtube.com/watch?v=Hvx4xXhZMrU&t=570s) Engine Optimization, Structural Geometry, and the 1989 Baseline
Reflecting on the code, Brian Provinciano noted that most of the 8-bit codebase was written a decade prior. Rebuilding the architecture from scratch with modern insights would yield far more efficient subroutines and potentially double the runtime frame rate. On vintage hardware, structural design choices directly dictate engine stability; altering the on-screen size of dynamic game objects alone can easily determine whether the renderer sustains 60 frames per second or collapses to 30. He compared the mental challenge of fitting code, bank routines, and pixel art into microscopic limits to classic spatial puzzles: “And while it can get very complicated, it's also very fun figuring out how to make everything fit just right, not unlike a game of Tetris.”
The resulting build, titled *ROM City Rampage*, runs entirely within the operational capabilities of authentic hardware. Side-by-side comparisons demonstrate that while the 8-bit version is visibly stripped of modern lighting, complex pedestrian varieties, and fine decorative map props, its open-world urban driving and shooting core remains intact. The finished project stands as a working proof-of-concept that the underlying game could have physically shipped on an NES cartridge in 1989.
## Notable quotes > [00:08](https://www.youtube.com/watch?v=Hvx4xXhZMrU&t=8s) Note that when a game is labeled as 8-bit, it's referring to the CPU. — Brian Provinciano
## Mentioned Brian Provinciano, Retro City Rampage, ROM City Rampage, Ricoh 2A03, MOS Technology 6502, Commodore 64, Apple II, Nintendo Entertainment System, Picture Processing Unit (PPU), ModPlug Tracker, IT2NSF, Nintendo Wii
## Video description How Retro City Rampage's core was crunched down to a REAL 8-BIT game and how 8-BIT games are made. TWITTER: @BriProv / @RetroCR - https://vblank.com
[Source](https://www.youtube.com/watch?v=Hvx4xXhZMrU)