Symbolics Unifies 3D Modeling, Paint and Animation on Lisp Hardware
Red Martian
An integrated object-oriented Lisp architecture eliminates digital production bottlenecks by allowing 3D geometry, animation curves, and raster paint tools to exchange data bidirectionally without external video input.
AI-assisted summary of SYMBOLICS S-PACKAGES 3D GRAPHICS AND ANIMATION DEMO — original source. Check the original for full context.
Source published:
Key ideas
- The Symbolics Graphics Division demonstrated the S-Products suite (Geometry, Dynamics, Render, and Paint), showcasing a fully integrated, non-siloed Lisp-based pipeline where 3D geometry, motion scripts, and 2D raster painting cross-communicate freely. (0:42)
- S-Dynamics introduced continuous single-skin displacement animation on 'smart objects,' supporting up to hundreds of stacked behavioral layers—such as locomotion, breathing, and facial phonemes—without geometric seam tearing. (15:25)
- S-Paint operates on a true 32-bit framebuffer architecture (24-bit RGB plus an 8-bit, 256-level alpha stencil channel) with procedural intensity/chroma keying and seamless canvas wrap-around texture tiling. (23:00)
- Via the S-Record module, the unified suite directly controls automated frame-by-frame recording and outputs to international broadcast formats including NTSC, PAL, and early HDTV. (27:30)
Detailed notes
## Background This demonstration was uploaded to YouTube by the channel Red Martian on August 8, 2013. According to the page description, it features the Symbolics Graphics Division showcasing their S-PACKAGE 3D color graphics system, software that was later used to develop the Nintendo 64.
## TL;DR Host Matt Elson demonstrates the integrated architecture of the Symbolics S-Products suite running in an object-oriented Lisp environment. The presentation details 3D modeling and CAD data ingestion in S-Geometry, dynamic timeline scripting and single-skin organic mesh deformation in S-Dynamics, and full 32-bit raster compositing and brush manipulation in S-Paint. It culminates with photorealistic shading and rendering passes in S-Render, showcasing how seamless cross-module communication allows artists to model, animate, paint, and render complex synthetic scenes without leaving the system before exporting via S-Record.
## Atmosphere & style The presentation carries the measured, authoritative, and deeply technical tone of a high-end Silicon Valley workstation demo from computer graphics' golden era. Matt Elson speaks with steady, unhurried confidence, walking through intricate workflows while highlighting the ergonomic efficiency of the three-button mouse status bar and dynamic Lisp environment. Watching the demonstration evokes a sense of retro-futuristic marvel, as cutting-edge organic mesh deformations, interactive curve scrubs, and real-time shading passes unfold smoothly on historic computing hardware.
## Bulletin - [00:42](https://www.youtube.com/watch?v=gV5obrYaogU&t=42s) The Symbolics Graphics Division demonstrated the S-Products suite (Geometry, Dynamics, Render, and Paint), showcasing a fully integrated, non-siloed Lisp-based pipeline where 3D geometry, motion scripts, and 2D raster painting cross-communicate freely. - [15:25](https://www.youtube.com/watch?v=gV5obrYaogU&t=925s) S-Dynamics introduced continuous single-skin displacement animation on 'smart objects,' supporting up to hundreds of stacked behavioral layers—such as locomotion, breathing, and facial phonemes—without geometric seam tearing. - [23:00](https://www.youtube.com/watch?v=gV5obrYaogU&t=1380s) S-Paint operates on a true 32-bit framebuffer architecture (24-bit RGB plus an 8-bit, 256-level alpha stencil channel) with procedural intensity/chroma keying and seamless canvas wrap-around texture tiling. - [27:30](https://www.youtube.com/watch?v=gV5obrYaogU&t=1650s) Via the S-Record module, the unified suite directly controls automated frame-by-frame recording and outputs to international broadcast formats including NTSC, PAL, and early HDTV.
## Key takeaways - [00:42](https://www.youtube.com/watch?v=gV5obrYaogU&t=42s) The S-Products suite connects Geometry, Dynamics, Render, and Paint into a simultaneous, non-blocking Lisp Machine multitasking environment. - [02:03](https://www.youtube.com/watch?v=gV5obrYaogU&t=123s) Built in object-oriented Lisp, the 3D Geometry viewport allows direct inspection and translation of scene elements at the body, face, edge, and vertex levels. - [05:31](https://www.youtube.com/watch?v=gV5obrYaogU&t=331s) The interactive modeling workflow accelerates user rhythm by snapping mouse actions to previous tools and providing real-time dynamic mouse status documentation. - [08:52](https://www.youtube.com/watch?v=gV5obrYaogU&t=532s) Geometry supports native Platonic solids, numeric CAD precision, digitized floor plan encoding, and industrial CAD data interchange (CADAM, CATIA, and IGES). - [11:30](https://www.youtube.com/watch?v=gV5obrYaogU&t=690s) Dynamics formats temporal animation graphically, displaying time along the horizontal axis and transformation channels along vertical stacked tracks. - [14:12](https://www.youtube.com/watch?v=gV5obrYaogU&t=852s) Animation motion curves can be reshaped interactively, scrubbed at variable speeds, and smoothed using low-pass filters to eliminate digitized input wobbles. - [14:12](https://www.youtube.com/watch?v=gV5obrYaogU&t=852s) Modular animation cycles can be authored once and instanced into master timelines, with stretch and squash controls directly governing playback frequency. - [15:25](https://www.youtube.com/watch?v=gV5obrYaogU&t=925s) Single-skin organic meshes utilize stacked behavioral displacement layers without geometric seam tearing, supporting hundreds of simultaneous modifiers. - [16:48](https://www.youtube.com/watch?v=gV5obrYaogU&t=1008s) Complex facial speech rigs rely on low-polygon proxy 'slab' structures for interactive scripting before driving recursively smoothed final meshes. - [18:27](https://www.youtube.com/watch?v=gV5obrYaogU&t=1107s) S-Paint features an expandable tree-based brush system with client-partitioned preset libraries and painting modes that stamp, tile, or reveal underlying layers. - [20:26](https://www.youtube.com/watch?v=gV5obrYaogU&t=1226s) Typography functions seamlessly in both 2D and 3D, allowing identical font definitions to be typeset flat in Paint or extruded into dimensional objects in Geometry. - [20:26](https://www.youtube.com/watch?v=gV5obrYaogU&t=1226s) Screen-shifting canvas tools expose outer edges in the center of the viewport, enabling artists to blend out seams for mathematically seamless repeating texture maps. - [23:00](https://www.youtube.com/watch?v=gV5obrYaogU&t=1380s) S-Paint's 32-bit framebuffer reserves 8 bits for a 256-level alpha stencil, extractable via per-channel RGB intensity keys or interactive chroma keys. - [25:07](https://www.youtube.com/watch?v=gV5obrYaogU&t=1507s) S-Render generates 100% synthetic photorealistic imagery within the software ecosystem using Gouraud and Phong shading paired with bump, diffuse, reflection, and opacity maps. - [26:33](https://www.youtube.com/watch?v=gV5obrYaogU&t=1593s) Subdivision and algorithmic smoothing allow rapid escalation of mesh complexity in minutes without manual point re-encoding. - [27:30](https://www.youtube.com/watch?v=gV5obrYaogU&t=1650s) The integrated pipeline enables hybrid 2D/3D workflows, letting artists project custom raster paint textures directly onto 3D surfaces before recording out to NTSC, PAL, or HDTV via S-Record.
## Detailed walkthrough ### [00:42](https://www.youtube.com/watch?v=gV5obrYaogU&t=42s) Overview of Symbolics S-Products and System Architecture
Host Matt Elson introduces the Symbolics S-Products, breaking down the core software suite that comprises the graphics environment on the Symbolics Lisp Machine. The suite is anchored by four primary modules alongside a dedicated video control utility. Geometry is used for building 3D objects and defining spatial relationships; Dynamics handles animation scripting and structures time; Render processes the 3D scene geometry, lights, and textures into rendered images; and Paint is an integrated raster painting package. These are complemented by S-Record, which governs video hardware and automated frame-by-frame recording.
Rather than existing as siloed, sequential utilities, the S-Products are architected as an integrated ecosystem with extensive cross-communication. Geometry and Dynamics talk directly to each other and can feed scene data into Render either independently or together. Render and Paint exchange image data, allowing artists to paint directly on rendered surfaces or generate maps for rendering. Geometry can communicate with Paint, Dynamics interfaces with Paint for rotoscoping or texture shifts, and both Dynamics and Paint interface directly with S-Record to control machine-driven video recording output. Elson stresses that this open pipeline is designed to eliminate workflow bottlenecks: “The benefits of this are that we have a fully integrated environment where you're never locked out of one program in favor of another and everything can communicate with anything else giving you full access to all the products and therefore the most power to be gained from them.”
```mermaid flowchart TD accTitle: Symbolics S-Products System Architecture accDescr: Interconnections between Geometry, Dynamics, Render, Paint, and S-Record.
subgraph Core["Core 3D & Animation"] GEO["Geometry\n(Spatial/Objects)"] DYN["Dynamics\n(Time/Animation)"] end
subgraph Imaging["Rendering & 2D"] RND["Render\n(3D Scene Rendering)"] PNT["Paint\n(Integrated 2D System)"] end
REC["S-Record\n(Video Control)"]
GEO <--> DYN GEO --> RND DYN --> RND GEO <--> PNT DYN <--> PNT RND <--> PNT DYN --> REC PNT --> REC ```
[02:03](https://www.youtube.com/watch?v=gV5obrYaogU&t=123s) The Geometry Environment and Object-Oriented Editing
Entering the Geometry configuration screen, Elson presents the 3D world space viewport. The global origin is centered at (0, 0, 0), with labeled positive X, Y, and Z axes. The positive ZX ground plane is denoted by a visible triangle, the positive Y axis is connected vertically, and the negative coordinate directions are demarcated by visible gaps in the axis lines to give users an immediate mental coordinate reference. The interface surrounds the main viewport with tactile controls: object sensitivities are arranged across the top edge, camera sensitivities line the bottom, and primary menus run down the side of the display. A contextual fifth menu pops up directly at the mouse cursor on demand, placed there because it is accessed so frequently that traveling to static screen edges would waste time.
At the very bottom of the display sits a listening window where the operator can enter Lisp commands or read system responses, bordered beneath by a persistent black bar called the mouse status line. This line acts as dynamic, context-sensitive documentation, continuously updating to reflect the exact left-, middle-, and right-button mappings for whichever tool or geometry element is currently hovered over. Elson describes the three-button mouse as acting like a miniature keyboard in practice, removing the need to memorize hotkeys or navigate away from the viewport to find operational choices.
Using a newly initialized wireframe cube, Elson highlights two key software design paradigms: - **True Camera Orbit vs. World Motion:** Orbiting around the cube preserves its stationary world coordinates; toggling axis visibility confirms that the camera moves through 3D space while the object remains fixed at the origin. - **Default Hidden-Surface Removal:** Unlike standard wireframe displays of the era that leave backfacing lines visible and create optical ambiguity, the system removes occluded edges by default so complex spatial volumes remain instantly readable.
Under the hood, the entire system is built in object-oriented Lisp, giving the software deep inspectability: “We program in Lisp, and not only in Lisp, but we program in object-oriented Lisp.” Because elements are first-class software objects, the user can directly query and manipulate any component in the scene hierarchy. Selecting an entire polyhedron exposes high-level global edits, but the user can also drill down to inspect and transform individual or grouped polygonal faces, line segments and edges, or individual vertices, translating them across X, Y, or Z space using 2D mouse movements mapped onto the 3D coordinate system.
[05:31](https://www.youtube.com/watch?v=gV5obrYaogU&t=331s) Rapid 3D Modeling: Constructing an Airplane
To illustrate the speed of the interactive modeling workflow, Elson constructs a stylized airplane starting entirely from a default cube. He begins by selecting the visible front and side edges, orbiting the camera to grab the occluded rear edge, and executing a cut command that divides the segments into thirds. Displaying the resulting vertices, he cuts the forward edge down the middle and slices the top polygon into three distinct triangular sections. The software optimizes user rhythm by snapping the mouse pointer directly back onto the previously executed command button: “You'll notice that my mouse appears on top of the last choice that I just made, which is cut, so as I work I begin to accelerate because the system is configuring itself to my working methods on the fly.”
Without ever transforming the underlying world coordinate system, Elson maneuvers the camera around the geometry to shape each section of the aircraft: - **Tail and Fin:** The top polygon is extruded outward along its surface normal (perpendicular at 90 degrees), scaled down, and translated rearward along the Z axis. - **Wings:** Selecting the two newly formed lateral triangles, Elson flips the camera to orthographic top and front orientations. He extrudes the faces outward, scales them down toward their shared midpoint, offsets them outward along their element normals, and shifts them rearward in Z to establish a swept wing form. - **Fuselage and Nose Cone:** Grabbing the front quad face, he extrudes it forward twice in succession along its normal, scales the second extrusion inward to form a tapered nose cone, extrudes one final time, and collapses the terminal face into a sharp vertex to form a pitot-style nose needle. - **Wing Sweep and Aerodynamic Smoothing:** Grabbing the leading-edge vertices of both wings, he drags them forward along the Z axis to produce an aggressive delta-wing angle.
With the basic hard-edged form complete, Elson applies an algorithmic smoothing pass over the faceted geometry, converting the angular box model into an aerodynamic, curved aircraft hull.
[08:52](https://www.youtube.com/watch?v=gV5obrYaogU&t=532s) Primitives, CAD Data Exchange, and Architectural Modeling
Elson shifts from freehand polyhedral modeling to mathematical primitives and external data integration. Geometry natively generates regular Platonic solids—tetrahedrons, octahedrons, and icosahedrons—alongside standard geometric primitives such as cubes, cylinders, and spheres. Operators can instantiate these primitives using preset default parameters or define their dimensions interactively with the mouse. Furthermore, every interactive mouse action in the environment is mirrored by exact numeric input parameters, permitting engineering-grade precision when freehand modeling is insufficient.
The software also functions as an ingestion and exchange hub for external technical assets. The environment can encode digitized data from architectural floor plans and 3D drafting layouts, and it features built-in import and export filters for major industry CAD formats of the period, including CADAM, CATIA, and IGES.
To demonstrate structural editing, Elson constructs a model of a house: - He first enters 2D outline vertices directly into the viewport to establish the house's footprint and profile. - To create a pitched, sloping roof overhang on the gable end, he selects the roof face, locks the rotation pivot directly to the segment along the bottom edge of the face, and tilts it downward. Elson remarks on this flexibility: “It's a very powerful aspect of the environment that you can reach in and treat these objects in all sorts of different ways and manners; they're very, very malleable objects.” - Adding a chimney feature, he picks the chimney's intersecting line segments and slides them dynamically along the roofline until the placement looks correct. - Extraneous construction edges are cleaned up using a dissolve tool, leaving a clean, manifold architectural model ready for texturing or animation.
[11:30](https://www.youtube.com/watch?v=gV5obrYaogU&t=690s) Animation in Dynamics: The Dome Script and Motion Playback
Once modeling is finalized, the asset can be animated by transitioning into the Dynamics system. The Symbolics interface splits dynamically, placing Geometry across the top half of the screen and Dynamics across the bottom. Elson emphasizes that this unified multitasking environment is central to the machine's power: “This a very, very important and powerful feature of the environment that you can have both programs running simultaneously, that you're never locked out of one, you're never closed out of one program in favor of another program.”
The Dynamics workspace formats animation visually: time advances horizontally from left to right along the timeline, while spatial and hierarchical transformation channels are stacked vertically from top to bottom. This layout allows artists to read, manipulate, and shape numerical data as visual function curves. Elson loads a 10-second animation script featuring an architectural dome and an escaping vehicle: - **Hierarchical Actor Tree:** The script tree splits into three main branches: the Dome, the Doors, and the Camera. - **Visibility vs. Motion Channels:** Opening the Dome branch displays no motion curve tracks because its only parameter is a simple boolean visibility toggle. - **Coordinated Door Mechanics:** Expanding the Doors branch reveals sub-tracks for the left and right doors. Zooming into the timeline reveals three distinct timing segments per door: an initial curve governing the sliding opening motion, followed by a sustained hold segment keeping them open. - **Camera Path:** The camera is scripted to pitch upward and fly directly out through the roof opening just as the doors part.
When previewing animations, the Symbolics environment caches the rendered vector passes as temporary bitmap files, granting the animator flexible motion analysis tools during playback: - Playback can run at real-time speeds, in reverse, or bounce back and forth continuously. - Velocity can be throttled interactively up to 10× in either direction (demonstrated running smoothly at 300% speed). - The mouse acts as a manual scrub wheel: moving the mouse horizontally lets the user scrub forward and backward across the timeline to freeze and evaluate individual frames.
Elson demonstrates how motion curves can be reshaped interactively, showing an irregular, hand-drawn curve mapped to the camera's translation channel to simulate the low-frequency rumble of rocket engines firing during takeoff, and points out that redrawing this spline can instantly alter the movement from a stochastic mechanical vibration to an entirely different motion profile.
[14:12](https://www.youtube.com/watch?v=gV5obrYaogU&t=852s) Hierarchical Structuring and Temporal Dynamics
When freehand input produces an unsteady line or an unwanted “drunken wobble,” the system allows the animator to clean up the motion curve immediately using a low-pass filter to smooth out irregularities. The power of this dynamic manipulation is demonstrated through a bird model in flight, which serves as a prime example of hierarchical object structuring. The bird’s wing consists of six distinct segments chained together, with each component structured hierarchically into the preceding one. When viewed on the color display, the individual pieces naturally intersect and interpenetrate through the flap cycle without requiring manual polygon collision recalculations.
Because S-Dynamics treats temporal data as visual assets, an animator can construct a self-contained cyclical motion and embed it directly into larger production timelines. A two-second flight cycle script is created once and dropped into a 28-second flythrough sequence through a New York City environment. Within the timeline script editor, this master bird cycle is duplicated into sequential blocks, then graphically stretched and squashed. Compressing the timeline blocks progressively increases the flap frequency, allowing the bird to accelerate smoothly as it dives through the urban canyon.
“Part of the beauty of Dynamics is that we can treat our temporal data graphically so once I have defined this single script for the bird flying and its 2C page case we can then take and insert that into a larger script in this case the 28 second sequence here for the New York City flythrough,” the presenter explains.
- Wing hierarchy: Six segmented polygon pieces nested sequentially from shoulder to wingtip. - Motion curve refinement: Low-pass filtering eliminates wobbles from digitized or drawn motion curves. - Master cycle reuse: A 2-second flight loop controls the primary flapping mechanics. - Timeline manipulation: Graphical stretching and squashing adjusts speed and playback rate inside the 28-second master animation.
[15:25](https://www.youtube.com/watch?v=gV5obrYaogU&t=925s) Single-Skin Displacements and Smart Objects
Beyond standard multi-part kinematic hierarchies, the system introduces surface displacements acting upon what the demonstrator describes as "smart objects." Rather than assembling an articulated character out of separate rigid geometric components that hinge at seams, displacement animation operates on seamless, single-skin meshes. Animators can program these models with fundamental organic behaviors such as breathing, walking, and talking. A human test figure demonstrates this progression: starting from the point where he first learns basic locomotion—stepping right foot forward, then left foot forward—the system shows him sitting down, crossing his arms and legs, and lying down to sleep. The presenter quips about character behavior when instancing multiple actors: “And of course one person by thems might go to sleep but if you get a bunch of them what do they do they inevitably party.”
The capability extends across diverse biological forms. Lower on the taxonomic hierarchy, an articulated snake demonstrates localized muscle contraction, visible as waves of tension traveling down through the body and tapering toward the tail. The displacement architecture is pushed further with an animated Doberman Pinscher running continuously on a single-skin polygonal body. Because the displacements can be modulated continuously, the dog's paws never strike the ground the exact same way twice, and head turning can occur independently while the quadruped gait cycle repeats.
“We can layer on these displacements as deep as we want to go if you want 300 layers of displacements that's fine there's no software limitations,” the demonstrator emphasizes, highlighting that the underlying code imposes no arbitrary ceilings on modifier stacking.
```mermaid flowchart TD accTitle: Layered Displacements on a Single-Skin Mesh accDescr: Diagram illustrating how foundational meshes receive multiple stacked behavioral displacement layers without geometric seam tearing.
subgraph Base ["Base Geometry"] Mesh["Single-Skin Manifold Mesh"] end
subgraph Displacements ["Displacement Modifier Stack"] Loco["Locomotion Layer (Walking / Running)"] Organic["Secondary Dynamics (Breathing / Flexing)"] Express["Micro-Gestures (Looking around / Phonemes)"] end
subgraph Output ["Deformed Output"] Anim["Seamless Organic Animation (Up to 300+ Layers)"] end
Mesh --> Loco Loco --> Organic Organic --> Express Express --> Anim ```
[16:48](https://www.youtube.com/watch?v=gV5obrYaogU&t=1008s) High-Level Abstraction and Facial Animation Scripts
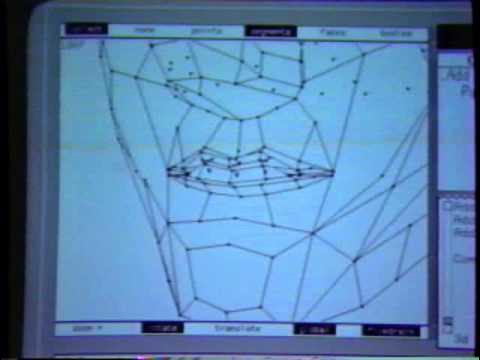
Facial speech animation leverages high-level geometric abstraction. Rather than burdening the animator with dense, high-polygon representations during choreography, the facial rig begins as a sparse "slab structure" composed of broad polygonal patches. Animators teach the coarse model specific phonemes and emotional expressions in isolation, which are then compiled into a comprehensive playback script. This low-polygon proxy provides interactive frame rates during editing. Once the timing and expressive cues are dialed in, the low-resolution geometry can be duplicated, recursively smoothed, and driven directly by the identical motion script to yield a final high-resolution performance.
Analyzing the script reveals that the composite facial performance resolves into four distinct motion tracks operating simultaneously: 1. Primary jaw motion (mouth opening and closing). 2. Lateral lip retraction (mouth corners pulling back). 3. Pursed lips or pout (forming the vocalized "ooh" sound). 4. Terminal emotional transition (the smile rising across the lower face).
The script timeline interface lets the animator scrub forward and backward using the mouse across an inclined curve. As the playhead ascends the incline on the first track, the mouth cycles through rhythmic "close-open" states. Below that track, the lateral corner pulls trigger, followed on the third tier by the rounded lip displacement, until the bottom tier introduces the final upward smile curve.
“We animate with the fewest number of polygons we can then take and copy this simple object and smooth it and then drive a smooth object in this animation,” the presenter notes regarding the workflow optimization.
[18:27](https://www.youtube.com/watch?v=gV5obrYaogU&t=1107s) The S-Paint Interface and Brush Architecture
The demonstration transitions into the 2D domain with S-Paint. The graphical user interface is organized as an expandable tree structure running from left to right, where primary function categories form the trunk and detailed modifier parameters fan out as branches. Two visual anchor points remain completely static regardless of menu traversal: a green status column and a persistent color-mixing palette area.
At the top of the menu tree sits the brush sub-system, offering a comprehensive selection of digital painting tools: - Airbrushes for diffuse atmospheric shading and soft transitions. - Blending brushes that calculate color intermixing across existing pixels to simulate traditional wet oil paint. - Cutout brushes capable of picking up arbitrary canvas regions to stamp them elsewhere with hard or soft feathered borders. - Diffusion brushes that actively soften sharp boundary edges and blend neighboring pixel matrices to emulate physical lens defocus or edge bleeding for compositing. - Round brushes providing uniform, predictable line work across the display. - Speckle brushes that randomize droplet distributions to replicate chalk, charcoal, and toothy paper textures.
The brush management system allows artists to create, customize, and store an unlimited variety of brush presets. The demonstrator points out that digital studios can maintain dedicated brush directories partitioned by client—saving distinct asset libraries for Client A, Client B, and Client C to maintain specific brand aesthetics across projects. Furthermore, a brush’s application mode can be modified on the fly: rather than applying flat pigmentation, it can be configured to reveal underlying stored imagery, sweep structural graphic patterns, or tile complex bitmaps directly onto the canvas.
“We can make and save an unlimited number and kind of brushes you can make a library of brushes for client a client b client c and then call them back up at any particular time while keeping them uh separate,” the host explains.
[20:26](https://www.youtube.com/watch?v=gV5obrYaogU&t=1226s) Vector Shapes, Typography, and Surface Operations
The shape generation module supports primitive and vector operations, including circles, rectangles, freeform polygons, ellipses, and linear splines (both connected chains and discrete segments). Text handling inside the Symbolics graphics environment is uniquely integrated across dimensional workflows: typography can be typeset, kerned, and styled as flat artwork inside S-Paint, or the identical digital font definitions can be piped into 3D modeling space, extruded into dimensional signifiers, and manipulated within 3D coordinate space.
The shape interface organizes user selections into a two-column hierarchy: - The first column dictates the interior fill contents (solid colors, multi-stop linear gradients, four-color corner gradients, palette-mapped ramps, speckled fields, or scaled images). - The second column dictates the transfer mode used to fuse the shape onto the canvas (opacity blends, mosaic pixelation filters, recoloring passes, or texture brushing).
```mermaid flowchart LR accTitle: S-Paint Shape Application Architecture accDescr: A two-column interface logic separating interior shape contents from the transfer mode applied to the canvas.
subgraph Column1 ["First Column: Contents"] C1["Solid Color"] C2["4-Color & Palette Gradients"] C3["Resized External Bitmaps"] end
subgraph Column2 ["Second Column: Application Mode"] M1["Solid Stencil & Opacity"] M2["Recolor & Shading"] M3["Mosaic & Filter Passes"] end
subgraph Result ["Canvas Operation"] Final["Seamless Texture Map / Composite"] end
Column1 --> Result Column2 --> Result ```
Under the miscellaneous menu, artists have access to a suite of region transformation tools. Sections of the canvas can be cloned, translated across the workspace, scaled, repositioned, or stamped down with automated drop shadows. The system also includes coordinate grid overlays and specialized screen-shifting mechanics designed for surface texture creation. By using the screen-shifting tool, an artist can wrap canvas quadrants around the display borders, exposing the outer perimeter seams directly in the center of the viewport. The artist paints out the seam artifacts with standard blending tools and shifts the canvas back, producing mathematically perfect, tileable texture, bump, and opacity maps for downstream 3D rendering.
“Text in the symbolics environment is both two-dimensional and three-dimensional when you're working with it you can work with it in paint and it's completely two-dimensional but you can use the same font in three dimensions extrude it and play with it move it around in three space,” the demonstrator highlights.
[23:00](https://www.youtube.com/watch?v=gV5obrYaogU&t=1380s) 32-Bit Compositing and Stencil Channel Generation
S-Paint includes a dedicated two-dimensional animation module that interfaces directly with the 3D pipeline. Underpinning the entire paint environment is a true 32-bit framebuffer architecture: 24 bits are allocated to standard RGB color (8 bits per channel), while the remaining 8 bits drive a dedicated stencil (alpha) channel providing 256 discrete levels of transparency. This fine-grained alpha resolution gives the artist meticulous control over multi-layer compositing and optical effects.
The 8-bit stencil can be established through three primary methodologies: - Direct brushwork: Painting masking densities directly onto the image canvas using soft or hard media. - Vector fill shapes: Imposing geometric primitives filled with continuous opacity gradients across target regions. - Key extraction: Generating masks procedurally via intensity keys or chroma keys.
When running an intensity key, the matte can be extracted independently from the red, green, or blue color channels. On a red-channel intensity key, high-luminance white regions define 100% stencil opacity, while red visualization feedback reveals unprotected pixel areas. Switching the extraction target to the blue channel yields an entirely different silhouette, isolating background elements away from foreground figures.
For flesh-tone isolation, the chroma key tool samples an average skin value directly from the canvas and registers it onto the current color bar. Sliders allow real-time calibration of key hardness and edge softness. The demonstrator proves the efficacy of the keying engine by pulling a clean matte around a woman’s face, dropping a red-to-yellow directional gradient over her features, and then inverting the stencil to colorize the surrounding field, creating instantaneous stylized posterization graphics.
“The paint system is a 32-bit paint system 24 bits for RGB and eight bits for the alpha or stencil Channel depending upon how you'd like to use it the stencil is uh 256 level of opacity and this allows us to do all kinds of very subtle and sophisticated compositing,” the presenter states.
- Framebuffer distribution: 24-bit RGB truecolor accompanied by an 8-bit alpha stencil channel. - Alpha depth: 256 gradations of transparency for clean sub-pixel edge blending. - Matte generation modes: Manual brush stenciling, procedural gradient fills, RGB channel intensity keying, and multi-parameter chroma keying. - Mask previewing: Real-time visual overlay (white for opaque stencil, red for masked/unprotected areas).
[25:07](https://www.youtube.com/watch?v=gV5obrYaogU&t=1507s) S-Render: Photorealistic Shading and Synthetic Reality
The workflow culminates in S-Render, the module responsible for converting mathematical 3D geometry into finished raster imagery. S-Render evaluates scene geometry, material definitions, and environmental lighting setups to compute optical interaction across surfaces. The system can simulate a broad spectrum of material physicalities, including metals, polished woods, refractive glass, and rough concrete.
Inside the render parameter menu, artists configure surface illumination models. S-Render provides access to Gouraud smooth shading, Phong shading with specular highlights, and coordinated mapping channels: - Diffuse texture mapping to wrap surface graphics across geometry. - Bump mapping to calculate false surface relief and micro-roughness via perturbed surface normals. - Reflection mapping to simulate environmental sheen and mirroring. - Opacity mapping to control localized translucency across surfaces.
The demonstrator underscores that the Symbolics environment is completely self-contained. Rather than relying on digitized real-world video plates or externally generated assets, the software enables artists to model, texture, animate, and shade entirely photorealistic imagery inside a unified software ecosystem. To illustrate this progression from initial primitive form to photorealism, the presenter pulls up the foundational wireframe mesh of the Doberman Pinscher, demonstrating how bare geometry acts as the starting canvas for complete synthetic realization.
“We're quite proud of the fact that you can have totally believable images in the symbolic environment that are 100% synthetics painted inside the environment built inside the environment rendered inside the environment with no external data coming in except the hand and the eye of the artist,” the host asserts.
[26:33](https://www.youtube.com/watch?v=gV5obrYaogU&t=1593s) Polygonal Complexity and Surface Shading of the Dog Model
The demonstration illustrates the efficiency of the Symbolics modeling workflow through the progressive refinement of a 3D dog model. Beginning with a rudimentary low-polygon form, the system smoothes the geometry and scales it upward to successively higher levels of polygonal complexity. The narrator emphasizes that moving through these stages of detail required minimal effort on the operator's part, noting: “The simple to the more complex dogs took approximately a minute each to create just by smoothing the dog off we didn't have to go through and re-encode every new point.” This workflow eliminates the tedious task of manually calculating or placing coordinate points by hand.
```mermaid flowchart TD accTitle: Model Refinement and Shading Pipeline accDescr: Pipeline showing the progression from low-poly gray clay geometry to shaded and textured models. subgraph Geo["Geometry & Complexity"] A["Low-Polygon Base Dog"] --> B["Iterative Subdivision & Smoothing"] B --> C["High-Complexity Polygon Mesh"] end subgraph Shading["Rendering & Shading Variations"] C --> D["Faceted Shading (Clay Gray)"] C --> E["Smooth Shading (Clay Gray)"] D --> F["Faceted Gold Reflection Map"] E --> G["Smooth Gold Reflection Map"] end ```
The presentation then shifts to surface properties and rendering styles. The model is first displayed using a basic gray clay appearance with simple slab surfaces and faceted shading, leaving individual polygon boundaries clearly visible. By enabling smooth shading, the faceted seams disappear into clean, continuous surfaces, though the narrator acknowledges that a plain gray finish remains somewhat unappealing. To demonstrate material versatility, a reflection map is mapped onto the mesh, transforming the dog into polished, gleaming gold. The system also retains the ability to toggle between shading techniques instantly, showcasing the same reflective gold dog with faceted shading left on to create a stylized, jewel-cut metallic look.
- Model creation time: approximately one minute per refinement stage by smoothing rather than re-encoding mesh vertices. - Surface treatments demonstrated: flat gray clay faceted shading, smoothed gray clay shading, and smooth versus faceted gold reflection mapping.
[27:30](https://www.youtube.com/watch?v=gV5obrYaogU&t=1650s) Paint Integration and Final Overview of the S-Products Suite
Moving beyond pure 3D rendering, the demonstration highlights the hybrid workflow made possible by integrating geometric data directly into the paint system. Using the underlying 3D dog geometry as a canvas, artists can project or paint diverse textures and stylistic treatments onto the screen. The narrator presents an eclectic series of artistic variations: a bursting "fireworks" dog, a soft terrycloth fabric model, an electric neon outline model, and a spooky, stylized Halloween-themed model. This ability to merge procedural 3D forms with 2D raster painting tools provides rapid artistic flexibility without requiring complex custom shaders or physical simulation.
```mermaid flowchart LR accTitle: Symbolics S-Packages Core Architecture accDescr: Diagram illustrating the four core Symbolics packages outputting via S-Record to global video formats. subgraph Suite["Core Symbolics S-Packages"] direction TB G["S-Geometry"] D["S-Dynamics"] R["S-Render"] P["S-Paint"] end subgraph Output["Output Pipeline"] SR["S-Record"] VF["Worldwide Video Formats<br/>(NTSC / PAL / HDTV)"] end Suite --> SR --> VF ```
The presentation concludes with a formal recap of the entire Symbolics graphics environment, summarizing the software suite as four tightly coupled foundation packages: S-Geometry, S-Dynamics, S-Render, and S-Paint. As the narrator explains: “The combination of these four products allow you to create virtually anything that you can imagine.” To complete the production pipeline, the suite pairs with the S-Record animation control and device software, allowing finished frames and animation sequences to be recorded out directly to any standard international broadcast video format, including NTSC, PAL, or high-definition television (HDTV).
- Textured model variants shown: fireworks, soft terrycloth, neon, and Halloween. - Four core constituent packages: Geometry, Dynamics, Render, and Paint. - Output formats supported via S-Record: NTSC, PAL, and HDTV.
## Notable quotes > [00:42](https://www.youtube.com/watch?v=gV5obrYaogU&t=42s) we have a fully integrated environment where you're never locked out of one program in favor of another and everything can communicate with anything else giving you full access to all the products and therefore the most power to be gained from them. — Matt Elson
## Mentioned Matt Elson, Symbolics Graphics Division, Symbolics Lisp Machine, S-Products, S-Geometry, S-Dynamics, S-Render, S-Paint, S-Record, Nintendo 64, Lisp, CADAM, CATIA, IGES, Gouraud shading, Phong shading, NTSC, PAL, HDTV, Red Martian
## Video description Symbolics Graphics Division demonstration of the S-PACKAGE 3D color graphics system. This software was later used to develop the Nintendo 64.
[Source](https://www.youtube.com/watch?v=gV5obrYaogU)