Jim Lill Proves Electric Guitar Tone Depends on Pickups, Not Wood
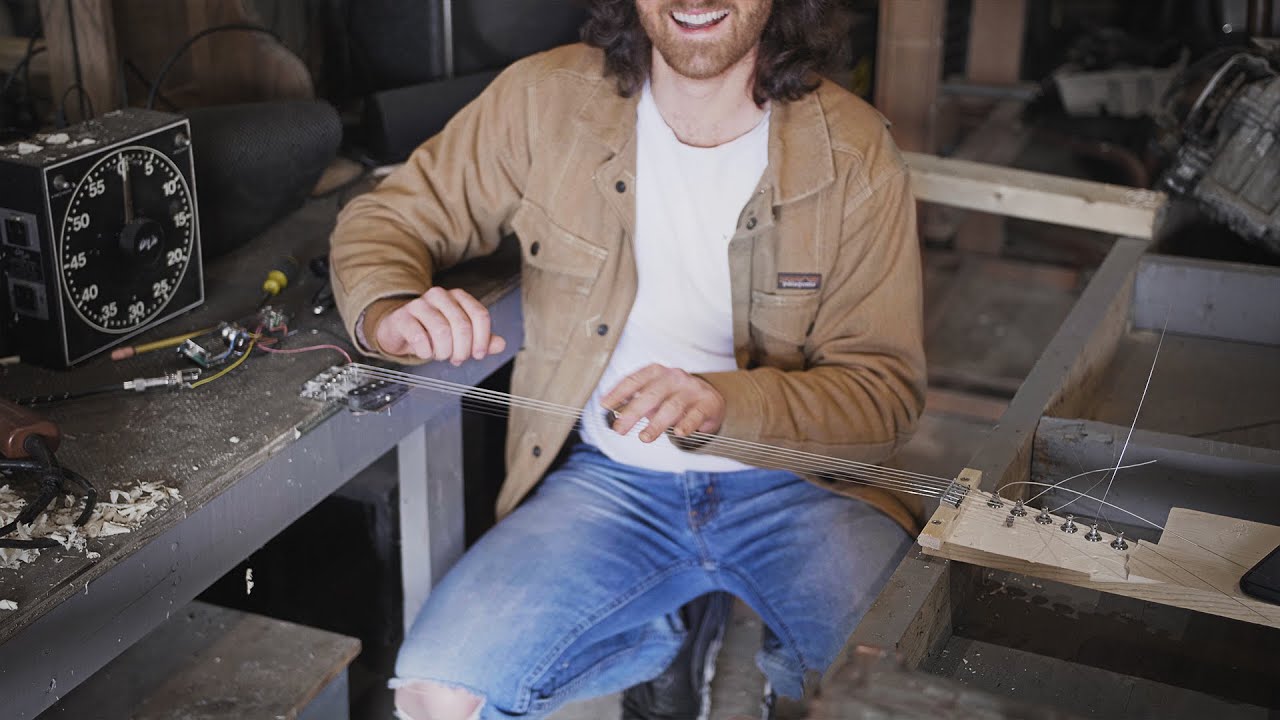
Tested: Where Does The Tone Come From In An Electric Guitar? — Jim Lill

Jim Lill

Controlled acoustic tests reveal that an electric guitar's amplified sound is governed entirely by pickup geometry, string specifications, and circuit load rather than body or neck materials.

AI-assisted summary of Tested: Where Does The Tone Come From In An Electric Guitar? — original source. Check the original for full context.

Source published:

Key ideas

  • Expert boutique guitar builders fail to reach consensus on the top factors that influence electric guitar tone, prompting a controlled experiment to isolate what actually matters. (0:00)
  • Equalizing pickup height and string clearance using precision feeler gauges eliminated all audible differences between a $100 budget Partscaster and a high-end Tom Anderson Telecaster. (4:47)
  • A crude 2x4 framing stud guitar matched the tone of the boutique instrument once a standard 250k control pot circuit was added to prevent unloaded treble harshness. (6:07)
  • An 'Air Guitar' built across open space between a workbench and a weighted shelf proved identical in amplified tone to a standard guitar, showing body wood, neck construction, and headstock design have no audible impact on magnetic output. (8:44)

Detailed notes

## Background "Tested: Where Does The Tone Come From In An Electric Guitar?" was created and published by Jim Lill on YouTube on January 24, 2022. In the video description, Lill explains that he set out to rigorously test as many physical components of an electric guitar as possible to separate genuine acoustic factors from commonly repeated industry folklore.

## TL;DR Investigating what truly dictates electric guitar sound, Jim Lill compares a high-end custom Tom Anderson Telecaster against a cheap $100 DIY Partscaster under strictly controlled recording conditions. After realizing early tests on headstock mass, bridge plates, and neck wood were skewed by accidental shifts in pickup height, he equalizes pickup-to-string distance with feeler gauges, finding the two guitars sound completely identical. To push the hypothesis to its absolute limit, he builds a functional guitar out of a framing 2x4 and ultimately constructs an open-air rig strung between a workbench and a weighted shop shelf. When matched for scale length, strings, pickup geometry, and potentiometer loading, both makeshift contraptions sound indistinguishable from the boutique guitar, proving that tonewood and body construction do not affect the amplified magnetic signal.

## Atmosphere & style The presentation carries the engaging, inquisitive vibe of a pragmatic workshop experiment, blending deadpan humor with rigorous scientific curiosity. Jim's willingness to admit his own procedural errors—such as questioning his initial findings when a flimsy pickup mount shifted—lends the video an authentic, humble, and thoroughly persuasive narrative arc. It feels like watching a grounded, mad-scientist demonstration unfold, progressing from simple component swaps to an audacious contraption braced by heavy engine blocks, all capped off by a satisfying and playful musical payoff.

## Bulletin - [00:00](https://www.youtube.com/watch?v=n02tImce3AE&t=0s) Expert boutique guitar builders fail to reach consensus on the top factors that influence electric guitar tone, prompting a controlled experiment to isolate what actually matters. - [04:47](https://www.youtube.com/watch?v=n02tImce3AE&t=287s) Equalizing pickup height and string clearance using precision feeler gauges eliminated all audible differences between a $100 budget Partscaster and a high-end Tom Anderson Telecaster. - [06:07](https://www.youtube.com/watch?v=n02tImce3AE&t=367s) A crude 2x4 framing stud guitar matched the tone of the boutique instrument once a standard 250k control pot circuit was added to prevent unloaded treble harshness. - [08:44](https://www.youtube.com/watch?v=n02tImce3AE&t=524s) An 'Air Guitar' built across open space between a workbench and a weighted shelf proved identical in amplified tone to a standard guitar, showing body wood, neck construction, and headstock design have no audible impact on magnetic output.

## Key takeaways - [00:00](https://www.youtube.com/watch?v=n02tImce3AE&t=0s) Boutique guitar builders consulted by Jim Lill could not agree on the top factors influencing electric guitar tone. - [00:00](https://www.youtube.com/watch?v=n02tImce3AE&t=0s) A $100 DIY kit guitar served as the sacrificial test mule compared against a custom-built Tom Anderson Telecaster. - [00:00](https://www.youtube.com/watch?v=n02tImce3AE&t=0s) All extraneous variables—including player technique, pick velocity, cables, amplifier, microphone, and interface—were held strictly constant. - [02:00](https://www.youtube.com/watch?v=n02tImce3AE&t=120s) Initial modifications such as altering headstock shape, swapping bridge saddles, and changing neck joint tightness produced questionable or inconsistent tonal shifts. - [02:00](https://www.youtube.com/watch?v=n02tImce3AE&t=120s) A flimsy temporary pickup mount revealed that tiny, unmeasured variations in pickup height and distance to strings were contaminating test results. - [02:00](https://www.youtube.com/watch?v=n02tImce3AE&t=120s) Bolting a mismatched neck caused extreme string action, demonstrating that string-to-pickup distance easily overpowers wood composition. - [04:47](https://www.youtube.com/watch?v=n02tImce3AE&t=287s) Using feeler gauges to match exact pickup pole piece clearance to the strings made the $100 Partscaster sound virtually indistinguishable from the Tom Anderson. - [04:47](https://www.youtube.com/watch?v=n02tImce3AE&t=287s) Equalizing physical geometry narrowed the list of potential tone variables down to pickup specs, string properties, scale length, and pickup placement. - [06:07](https://www.youtube.com/watch?v=n02tImce3AE&t=367s) A guitar built from a scrap 2x4 framing stud initially sounded overly bright because the pickup was wired directly to the jack, bypassing volume and tone pot resistance. - [06:07](https://www.youtube.com/watch?v=n02tImce3AE&t=367s) Adding standard 250k potentiometers to the 2x4 guitar made it sound completely identical to the master-built Tom Anderson guitar. - [08:44](https://www.youtube.com/watch?v=n02tImce3AE&t=524s) The 'Air Guitar' apparatus eliminated the neck and body entirely by mounting strings, tuners, and a bridge across empty air between a shelf and a workbench. - [08:44](https://www.youtube.com/watch?v=n02tImce3AE&t=524s) The Air Guitar sounded tonally identical to the Tom Anderson, disproving theories that body resonance, neck wood, or headstock mass alter magnetic pickup tone. - [08:44](https://www.youtube.com/watch?v=n02tImce3AE&t=524s) Amplified electric guitar tone is definitively governed by string properties, scale length, pickup design, pickup location/slant/height, and circuit potentiometer loading.

## Detailed walkthrough ### [00:00](https://www.youtube.com/watch?v=n02tImce3AE&t=0s) The Tone Quest and the $100 Partscaster

Over the holidays, Jim Lill set out to answer a question that has divided musicians for decades: what actually makes one electric guitar sound different from another when plugged into the very same amplifier? Tone folklore insists that every single component on a guitar—from wood species to hardware finishes—shapes the amplified output. Yet Jim realized he did not know whether any of those claims were backed by hard evidence. To kick off the project, he emailed three high-end boutique guitar builders whose instruments he personally owns, plays, and loves, asking them each for their top five factors that influence amplified guitar sound. When their replies arrived, Jim was stunned: their lists barely agreed with one another, showing how subjective and inconsistent even expert industry opinions can be.

To systematically dismantle and verify these factors, Jim needed a sacrificial guitar—an instrument he could saw apart, drill into, and alter aggressively without remorse. He purchased a $100 DIY guitar kit and assembled it into a rough test mule, nicknamed the "Partscaster." As a reference benchmark, he tested this budget build against his prized, custom-built Tom Anderson Telecaster, an instrument where virtually every single spec and construction detail is premium and radically different from the cheap kit.

Jim took great care to isolate the guitar itself by strictly controlling every extraneous variable in the recording chain. As he notes: “The only difference here and with any test in this video is the guitars.” Everything after the guitar (cables, amplifier, microphone, recording interface) remained identical, and everything before the guitar (the player, picks, string gauge, pick location, pick velocity, and attack angle) was kept as tightly consistent as humanly possible so that any acoustic shift heard could be blamed solely on the guitar itself.

```mermaid flowchart LR accTitle: Signal Chain Rig Control accDescr: Diagram illustrating the controlled inputs, the test guitars, and the identical downstream chain.

subgraph Inputs["Strictly Controlled Inputs"] P["Player & Picks"] A["Pick Attack & Velocity"] S["String Gauge & Pick Location"] end

subgraph TestSubject["Guitar Variable"] G["Test Guitar<br/>(Partscaster vs. Anderson)"] end

subgraph Downstream["Constant Downstream Signal"] Amp["Guitar Cable & Amp"] Mic["Microphone & Interface"] end

Inputs --> TestSubject TestSubject --> Downstream ```

[02:00](https://www.youtube.com/watch?v=n02tImce3AE&t=120s) Initial Modifications and Questioning the Methodology

Jim began chipping away at the long list of putative tone factors. His first modification was swapping the cheap stock bridge pickup in the Partscaster for a Seymour Duncan Vintage Stack, matching the pickup model installed in his Tom Anderson. Once the pickup was swapped, he ran an A/B test between the two guitars, followed by a quick test varying pickup height from medium down to extremely low, and then cranked up very high.

From there, Jim ran through a flurry of common tone-wood and hardware myths: - Sanding the oversized kit paddle headstock down to a conventional, vintage-style shape. - Loosening the neck joint screws versus having them clamped down tightly to test neck-to-body coupling. - Swapping bridge saddles between brass and steel. - Swapping the thick, modern steel bridge plate that came with the kit for a traditional, thin-gauge steel "ashtray" style bridge plate. - Top-loading strings through the bridge plate versus feeding them string-through-body style via ferrules. - Installing a Stratocaster-style bridge with no surrounding metal plate at all.

When conducting the Strat bridge test without a bridge plate, the experiment unraveled. Jim had fashioned a crude, makeshift mount to hold the pickup suspended in place, but it was structurally flimsy. As he strummed, the pickup shifted slightly, creating audible volume and frequency variations within the very same take. Jim realized with sinking frustration that he had not been rigorously measuring or controlling pickup-to-string clearance across his earlier tests. This cast doubt over all of his prior work: were the perceived differences in headstock mass, bridge metals, or neck joint tightness actually real, or were they merely artifacts of the pickup shifting half a millimeter during disassembly?

The problem peaked when testing necks. Jim bolted the unfinished maple-fretboard Partscaster neck onto a blue Stratocaster copy equipped with a finished rosewood board. Because the neck heel angle failed to match the pocket, the string action shot up to a cartoonish height. Jim made a telling prediction: “With the strings so far away the tone would sound weaker no matter what the difference is in the necks were.” The resulting sound confirmed his suspicion—distance was completely overpowering wood composition.

[04:47](https://www.youtube.com/watch?v=n02tImce3AE&t=287s) The Feeler Gauge Turning Point

Realizing that pickup proximity might be masking or fabricating tonal differences, Jim completely revised his experimental discipline. He grabbed a set of precision feeler gauges and measured the exact distance from the pickup pole pieces to the low E and high E strings on his Tom Anderson Telecaster. He then painstakingly adjusted the Partscaster's Seymour Duncan Vintage Stack to mirror those exact millimeter measurements.

When he plugged both guitars back in and strummed, the result was staggering: the $100 budget Partscaster and the boutique Tom Anderson sounded essentially indistinguishable. Reflecting on the playback, Jim admitted: “This was a turning point for me.” The two instruments had almost nothing in common in terms of wood selection, finish, or craftsmanship, yet matched sonically once geometry was equalized.

At that stage, the shared characteristics between the Anderson and the Partscaster were reduced to a remarkably brief list: - String brand, gauge, and tuning - Scale length - Pickup model (Seymour Duncan Vintage Stack) - Pickup height/distance relative to the strings - Pickup placement along the string line - Pickup slant angle - Body shape silhouette (both being general Telecaster shapes)

[06:07](https://www.youtube.com/watch?v=n02tImce3AE&t=367s) The 2x4 Scrap Wood Guitar

Skeptical that body wood contributed anything noticeable to the amplified sound, Jim decided to build an extreme test instrument. Walking out to his barn, he pulled down a piece of crude 2x4 framing lumber. He screwed a neck sourced from a '72 reissue Thinline Telecaster (which featured a thick gloss polyurethane finish, a 7.25-inch vintage fretboard radius, and a 3-bolt neck plate with a tilt mechanism) onto the rough-sawn stud. He installed a top-loading bridge plate fitted with steel saddles, bolted on another Seymour Duncan Vintage Stack pickup adjusted militantly to the Anderson's height specs, and wired the pickup straight to a 1/4-inch output jack, bypassing volume and tone pots entirely.

The initial strum test of the 2x4 guitar did not sound right; it had an unpleasant, piercing, brittle high-end edge compared to the Anderson. Jim momentarily wondered if the pine/fir 2x4 or the thick neck finish was bleeding odd resonances into the sound. However, he quickly suspected a simpler circuit culprit: on normal electric guitars, volume and tone potentiometers impose a constant electrical resistance load that bleeds a portion of ultra-high frequencies off to ground. By wiring the pickup directly to the output jack, he was hearing the raw, unloaded resonant peak of the pickup.

Jim wired a standard guitar control harness with 250k pots back into the 2x4 assembly and ran the test again. The result was definitive: the rough 2x4 sounded completely identical to the master-built Tom Anderson. As Jim declared: “This was the Bingo moment for me.”

```mermaid flowchart TD accTitle: Evolution of Disproven Tone Variables accDescr: Breakdown of factors tested and confirmed to have no distinct effect on amplified tone versus factors that define tone.

subgraph Disproven["Variables with No Distinct Amplified Effect"] W["Body Wood Species & Quality"] N["Neck Finish & Joint Tightness"] H["Headstock Mass & Shape"] B["Bridge Mass & Mounting Style"] S["Top-Load vs. String-Through"] end

subgraph Decisive["Variables Controlling Amplified Tone"] P["Pickup Model & Circuit Load"] D["Pickup Distance to Strings"] L["Pickup Location & Slant Angle"] G["String Type, Gauge & Scale Length"] end

Disproven -.->|"Controlled Testing Shows"| Decisive ```

[08:44](https://www.youtube.com/watch?v=n02tImce3AE&t=524s) The "Air Guitar" and the Real Sources of Tone

Despite having video and audio evidence that a chunk of construction lumber sounds identical to a high-end guitar, Jim knew standard internet skepticism would dismiss the test. As Jim reflected: “I had this voice in my head of all the players and Builders out there who have thought about electric guitar a certain way for much longer than I have and that seeing a 2x4 plank guitar still might not be a grand enough gesture to push past deeply rooted beliefs.” He chose to remove the guitar body and neck from the equation entirely.

Jim built the "Air Guitar." For the base, he used a sturdy motorcycle workbench built by his father in 1990. Several feet away, he inverted an old shop shelf, sat it across two chairs, and weighed it down with two heavy Honda engines. To prevent string tension from pulling the shelf into the bench, he braced the two structures apart with lengths of 2x4 lumber. For a headstock, he drilled guitar tuning machines into a standalone wooden block on the shelf. The nut consisted of the base casting of a metal Floyd Rose locking nut. Spanned across empty air at a precise 25.5-inch scale length, the strings terminated at a steel bridge screwed directly into the workbench surface. A Seymour Duncan Vintage Stack was mounted in the bridge plate, set to matching pickup height, and wired out to a loose Telecaster control plate equipped with a 250k volume pot, which ran directly into the combo amp.

Both the air guitar and the Tom Anderson Telecaster were tuned to open D. Jim picked both instruments across identical string locations with matching pick attacks. The recordings were tonally indistinguishable, proving that guitar body resonance, neck wood, fretboard material, and headstock mass exert zero meaningful influence on the magnetic pickup's output.

Jim compiled the final, definitive list of properties that govern the electric guitar's amplified sound: - Tuning and pitch - String gauge and alloy composition - Scale length - Pickup design and internal specs - Pickup distance to the strings - Pickup placement along the string's length - Pickup slant angle - Effective pot resistance load in the control circuit

Jim wrapped up the session satisfied with the test findings, promising to dive deeper into pickup geometry and electronic loading in future experiments before jamming out over the end credits on his open-air workbench rig.

## Mentioned Jim Lill, Tom Anderson, Tom Anderson Telecaster, Partscaster, Seymour Duncan Vintage Stack, Seymour Duncan, Stratocaster, '72 reissue Thinline Telecaster, Floyd Rose, Honda

## Video description This did not go how I thought it would.

0:00 - What am I doing? 1:00 - Introducing the Partscaster 2:00 - First Tests 3:43 - Questioning My Methods 4:47 - The Height Revelation 6:07 - The 2x4 Guitar 8:44 - The Air Guitar 11:01 - Outro Jam

My website is JimLillMusic.com. I'm @jimlill on instagram.

____

Lately I’ve been looking for where tone comes from.

I did a video a few months ago where I started down the path of actually testing things in the signal chain to see if they make a difference or not, and I was surprised at some of the results.

The rush I got out of finding reality and realizing that most “facts” about tone must come from people who are just repeating stuff instead of actually testing them made me want to go farther.

In this video, I go farther.

I test as many aspects of the electric guitar that I can, with the goal of figuring out which parts contribute to the amplified tone and which don’t.

See (and hear) for yourself.

-Jim, 1/24/22

[Source](https://www.youtube.com/watch?v=n02tImce3AE)

中文简报

吉姆·利尔证实电吉他音色取决于拾音器而非木材 严格对照的声学测试表明,电吉他的扩音音色完全由拾音器几何结构、琴弦规格和电路负载决定,而非琴身或琴颈材料。 为了探究究竟是什么决定了电吉他的声音,吉姆·利尔在严格受控的录音条件下,将一把高端定制的汤姆·安德森Telecaster与一把售价100美元的廉价DIY组装吉他进行了对比。在意识到早期关于琴头质量、琴桥板和琴颈木材的测试因拾音器高度的意外变化而产生偏差后,他使用塞尺校准了拾音器与琴弦的间距,发现这两把吉他的声音变得完全相同。为了将该假设推向极致,他用一根建筑木料打造了一把可用吉他,并最终在工作台和加重货架之间的开放空间搭建了一套悬空装置。在有效弦长、琴弦、拾音器位置和电位器负载相匹配的情况下,这两套临时装置的声音与精品吉他毫无二致,这证明了所谓“音色木”与琴身结构并不会影响放大的磁性信号。 顶级精品吉他制琴师对影响电吉他音色的首要因素未能达成共识,促使这项旨在分离关键因素的对照实验应运而生。 (0:00) 利用精密塞尺校准拾音器高度与琴弦间隙后,彻底消除了百元廉价组装琴与高端汤姆·安德森Telecaster之间所有可听出的差异。 (4:47) 在接入标准的250k控制电位器电路以防止空载导致高频刺耳后,粗糙的木料吉他便能发出与精品琴完全一致的音色。 (6:07) 在工作台与加重货架之间的开放空间打造的“悬空吉他”,在扩音音色上与标准吉他相同,表明琴身木材、琴颈结构和琴头设计对磁性输出均无听觉上的影响。 (8:44)

Reading summary

Across a series of controlled acoustic and electrical tests, Jim Lill demonstrates that an electric guitar's amplified tone is governed by string properties, pickup geometry, and circuit loading, rather than traditional tonewoods, structural joints, or hardware mass. Expert Disagreement and Strict Variable Control (0:00) Lill initiated his investigation after polling three boutique guitar builders on their top five tonal factors and discovering that their lists showed almost no consensus. To evaluate these competing claims objectively, Lill compared a custom-crafted Tom Anderson Telecaster against a $100 DIY kit "Partscaster." To isolate the instrument from external interference, he held all downstream audio elements constant—including the guitar cable, amplifier, microphone, and recording interface. Upstream performance variables, such as pick thickness, pick velocity, attack angle, and string contact points, were kept strictly uniform so that any audible change could be attributed solely to the guitar. Pickup Proximity as the Primary Confounder (4:47) Early modifications on the Partscaster tested neck-joint tightness, headstock mass, brass versus steel saddles, bridge plate thicknesses, and string-through versus top-loading configurations. However, Lill discovered that minor structural shifts caused the magnetic pickup to move fractionally relative to the strings, introducing volume and frequency variances that mimicked hardware differences. When an ill-fitting neck swap pushed string action upward, the output weakened dramatically, indicating that string-to-pickup distance overpowered the influence of the neck wood. Employing precision feeler gauges, Lill equalized the Partscaster's Seymour Duncan Vintage Stack pickup height to the exact millimeter dimensions of the Tom Anderson. Once the pickup-to-string distances, scale lengths, and string gauges were aligned, the $100 kit guitar and the boutique instrument sounded virtually indistinguishable, establishing pickup geometry as a decisive factor. Scrap Lumber and Circuit Resistance (6:07) To challenge the premise that body tonewood shapes amplified tone, Lill mounted a 1972 reissue Thinline Telecaster neck and a bridge onto a piece of rough 2x4 framing lumber sourced from his barn. Wired directly to an output jack without potentiometers, the 2x4 guitar produced an unpleasantly harsh, brittle top end. Lill traced this response to the absence of the electrical load typically exerted by volume and tone controls, which bleeds off extreme high-frequency resonant peaks. Once a standard control harness with 250k potentiometers was reintroduced, the 2x4 assembly matched the sonic profile of the Tom Anderson guitar. The Air Guitar and Core Tone Parameters (8:44) To completely eliminate body and neck resonance from the equation, Lill assembled the "Air Guitar." He anchored guitar strings across a 25.5-inch span suspended between an inverted metal shop shelf weighted down by two Honda engines and a 1990 motorcycle workbench. The setup used a block of wood with tuning pegs, a Floyd Rose locking nut base, and a bridge plate mounted directly to the workbench. Tuned to open D and wired through a 250k volume pot, the open-air test rig produced audio identical to the Tom Anderson. From these tests, Lill identified the definitive contributors to amplified tone: pitch and tuning, string gauge and alloy, scale length, pickup internal specifications, pickup distance from strings, pickup placement along the string line, pickup slant angle, and the electrical resistance load of the control circuit. Lill concluded that body wood species, neck finishes, headstock mass, and mechanical coupling do not register meaningful differences through a magnetic pickup, noting plans for future experiments focused specifically on pickup geometry and electronic circuit loads.

精炼阅读摘要

吉姆·利尔(Jim Lill)通过一系列严格控制变量的实测表明,木料种类、琴体结构与五金工艺等传统吉他制作元素对电吉他的通电放大音色几乎没有影响;真正决定插电音色的是琴弦属性、拾音器规格与几何安装位置,以及控制电路中的电阻负载。 行业共识分歧与变量控制的陷阱 (0:00) 在着手测试之前,吉姆·利尔向三位他所熟知的高端定制吉他制琴师询问影响电吉他音色的前五大要素,收到的答复却几乎毫无重合,显示出业内专家经验的主观与不一致。为此,利尔购买了一套100美元的廉价DIY吉他套件组装成测试用吉他(Partscaster),并以规格极高且结构完全不同的Tom Anderson Telecaster作为基准对照。为了确保任何音色变化都仅由吉他本身产生,利尔在弹奏端严格控制拨片规格、击弦力度、击弦角度与位置,在后级录音端则使线材、音箱、麦克风和音频接口全程保持完全一致。 然而,早期的组件改造测试迅速遭遇了方法论瓶颈。利尔先后测试了削减琴头面积、松动琴颈螺丝、更换黄铜与钢制弦鞍、对比厚薄桥板以及采用穿体与非穿体上弦等多种变量。当他在无底板的Stratocaster琴桥测试中使用简易支架固定拾音器时,拾音器在弹奏中的轻微晃动导致了明显的音量与频响波动;在更换不同琴颈时,琴颈开槽角度不匹配导致的弦距暴增也完全压制了木质本身的可能影响。利尔由此意识到,此前观察到的细微音色差异极可能是拆装过程中拾音器与琴弦距离发生微小位移所致的伪影。 厚薄规校准下的音色均等化 (4:47) 为了排除拾音器间距所带来的严重干扰,利尔改用精密厚薄规进行精准几何校准。他精确测量了Tom Anderson吉他上拾音器磁柱到低音E弦和高音E弦的毫米级间距,并将百元Partscaster上安装的同款Seymour Duncan Vintage Stack拾音器精细调整至完全相同的高度。 在确保两把吉他的有效弦长、琴弦品牌与规格、拾音器型号、拾音器高度、拾音器斜率及沿弦位置完全一致后,利尔重新进行了插电对比。录音回放显示,百元廉价组装琴与高昂的手工定制琴在听感上几乎无法区分。这一测试成为整项研究的核心转折点,有力证明了拾音器与琴弦之间的空间几何关系能够完全掩盖两款乐器在木料选择、漆面工艺及结构细节上的巨大差异。 极限实测:2x4木料与空气吉他 (6:07) 为彻底求证琴体木材共振是否会在通电后影响声音,利尔用一根粗糙的2x4建筑规格废木方作为琴身,装上带有厚聚酯漆面的1972年复刻Thinline琴颈、钢弦鞍琴桥和同款拾音器。初次测试中木方吉他出现了刺耳的高频,利尔迅速排除了木料材质问题,指出这是由于电路未连接音量和音色电位器、缺少阻抗负载而暴露出的拾音器原始谐振峰;当重新接入带有250k电位器的标准控制电路后,2x4木方吉他与Tom Anderson的音色再度完全一致。 为应对吉他社群可能持有的传统执念,利尔进一步打造了完全摒除琴体和琴颈的“空气吉他”。他以重型摩托车工作台和两台本田发动机压住的倒置货架为基础支点,用木料对抗琴弦张力,在空中悬空拉出25.5英寸的标准有效弦长,并将拾音器与琴桥直接固定在工作台上。在开放D调弦和相同弹拨条件下,这台悬空设备与高端定制吉他的录音音色毫无二致,彻底证实了琴体共鸣、琴颈材质、指板木料及琴头质量均不对磁电转换输出产生具有实际意义的影响。 决定电吉他放大音色的核心物理要素 (8:44) 利尔通过一系列受控实验最终梳理出真正主导电吉他插电音色输出的物理清单。这些决定性要素包括:定弦音高与调弦、琴弦的粗细规格及合金材料成分、乐器的有效弦长、拾音器的内部电磁设计规格、拾音器磁极与琴弦的垂直距离、拾音器沿琴弦方向的水平排布位置、拾音器的倾斜角度,以及整个控制电路中电位器等元器件所施加的实际阻抗负载。 这一结论重构了电吉他音色生成的因果链条。它表明电吉他作为一种基于电磁感应的乐器,拾音器本质上是在读取金属琴弦在磁场中的物理振动并转化为电信号,而传统声学乐器中所强调的木材声学传导与箱体共鸣,在电吉他的信号链中并不构成塑造放大音色的实质要素。 利尔通过多组控制变量实验,从物理层面解构了关于“音色木”与琴体工艺对电吉他插电音色产生决定性作用的传统认知。虽然这些发现证明了拾音器几何定位与电路负载的核心地位,但利尔也表示,未来仍有必要对拾音器微观几何位置与电路阻抗变化的细致机制进行更深一步的独立测试。

Detailed notes — zh

## Background 该视频由音乐人兼创作者 Jim Lill 于 2022 年 1 月 24 日发布在 YouTube 频道上。视频简介表明,作者试图通过严谨的实测打破吉他界人云亦云的音色传言,探究电吉他在插上音箱放大后,究竟哪些部件真正影响音色、哪些部件毫无作用。 ## TL;DR Jim Lill 从三位高端制琴师相互矛盾的观点出发,使用一把 100 美元的套件琴与顶级 Tom Anderson 吉他进行严格的变量控制对比测试。在排查过程中,他发现拾音器高度与微小位移对音色起到了压倒性的掩盖作用,而一旦使用塞尺精确对齐拾音器与琴弦距离,廉价琴与昂贵琴的音色差距便几乎消失。为了进一步验证传统“音色木材(Tonewood)”理论,他先后打造了粗糙的 2x4 建筑木方吉他以及两端架在工作台与发动机之间、完全没有琴身的“空气吉他”。实测表明,只要有效弦长、拾音器规格与空间相对位置,以及电路电位器阻值保持一致,吉他就能发出完全相同的通电音色,彻底证伪了琴体木材与琴颈结构对放大音色的决定性神话。 ## Atmosphere & style 整部视频散发着一种极具理科极客气质的实证探索精神,节奏紧凑、平实质朴而又充满颠覆感。Jim Lill 没有故弄玄虚的玄学说辞,而是以近乎冷酷的自省与严谨,直面早期实验中的漏洞并迅速修正。当简陋的 2x4 废木方甚至架在摩托车修理台上的“空气吉他”发出与顶级吉他毫无二致的声音时,那种打破传统吉他圈数十年迷信的“尤里卡时刻”极具视听冲击力,令人在会心一笑的同时大呼过瘾。 ## Bulletin - [04:47](https://www.youtube.com/watch?v=n02tImce3AE&t=287s) 经过多项严格控制变量的实测,Jim Lill 证实传统所谓的“音色木材”(Tonewood)、琴体结构甚至琴颈材质对电吉他通电放大后的音色几乎没有可辨识的影响。 - [02:00](https://www.youtube.com/watch?v=n02tImce3AE&t=120s) 拾音器与琴弦的垂直距离被证明是决定音色的压倒性变量,微小的间距偏差会严重掩盖或伪造零部件材质所带来的听感差异。 - [08:44](https://www.youtube.com/watch?v=n02tImce3AE&t=524s) 即使完全舍弃琴身、仅用摩托车工作台与置物铁架支撑琴弦搭建的“空气吉他”,只要对齐拾音器与电气参数,就能发出与万元级 Tom Anderson 完全一致的音色。 - [08:44](https://www.youtube.com/watch?v=n02tImce3AE&t=524s) 研究最终归纳出真正决定电吉他通电音色的 8 大核心物理与电气要素,包括定弦、琴弦、有效弦长、拾音器规格与位置参数以及音量电位器阻值。 ## Key takeaways - [00:05](https://www.youtube.com/watch?v=n02tImce3AE&t=5s) 顶尖独立制琴师对影响电吉他音色核心要素的观点截然不同,反映出吉他界长期流传的音色常识缺乏严谨的实证支撑。 - [02:00](https://www.youtube.com/watch?v=n02tImce3AE&t=120s) 早期测试表明,更换同款拾音器能使廉价套件琴的音色迅速向高端基准琴靠拢,而拾音器高度变化会带来极为显著的动态与频响改变。 - [02:00](https://www.youtube.com/watch?v=n02tImce3AE&t=120s) 机械固定不稳导致的拾音器微量晃动与弦距误差,容易伪造出琴头形状、琴颈螺丝松紧或琴桥材质影响音色的假象。 - [04:47](https://www.youtube.com/watch?v=n02tImce3AE&t=287s) 使用塞尺精确统一拾音器与琴弦间距后,百元级廉价杂木套件琴与高档 Tom Anderson 的通电音色听感几乎完全相同。 - [06:07](https://www.youtube.com/watch?v=n02tImce3AE&t=367s) 利用废旧建筑 2x4 木方拼装的无琴体吉他再次重现了基准琴的核心音色,进一步动摇了琴体共振和优质木材决定论。 - [06:07](https://www.youtube.com/watch?v=n02tImce3AE&t=367s) 吉他电路中的电位器阻值(如 250k)起到了关键的高频滤波作用;拾音器直接连输出插孔产生的刺耳毛刺感是缺少电位器回路所致,而非缺乏木材共振。 - [08:44](https://www.youtube.com/watch?v=n02tImce3AE&t=524s) 终极测试打造的“空气吉他”彻底排除了琴身木材,依靠摩托车工作台与本田发动机配重固定琴弦,依然完美还原了标准 Telecaster 音色。 - [08:44](https://www.youtube.com/watch?v=n02tImce3AE&t=524s) 实测证伪了琴体木材、琴身形状、实心或空心设计、琴头质量、琴颈漆面厚度以及指板材质对放大后电信号音色的实质影响。 - [08:44](https://www.youtube.com/watch?v=n02tImce3AE&t=524s) 电吉他通电音色的本质完全取决于琴弦状态、定弦、有效弦长、拾音器几何定位(垂直距离、水平位置、倾角)及电路阻值这 8 项要素。 ## Detailed walkthrough ### [00:05](https://www.youtube.com/watch?v=n02tImce3AE&t=5s) 探寻电吉他音色真相:制琴师的意见分歧与百元套件琴 在休假期间,Jim Lill 决心弄清一个困扰吉他界多年的核心问题:当插进同一台音箱时,到底是什么决定了电吉他的通电放大音色(amplified tone)?为什么不同的电吉他听起来千差万别?市面上几乎所有言论都声称吉他上的每一个微小部件都会对声音产生影响,但他从未见过有人用严格的音视频对照实验去验证这些说法。为了获取专业视角,Jim 首先向三位他极其欣赏且亲自弹过其作品的高端独立制琴师(Luthier)发了邮件,询问同一个问题:“在电吉他中,哪五个因素对放大后的音色影响最大?”然而,三位大师给出的答案却南辕北辙,彼此的清单差异极大,这让 Jim 意识到所谓的“音色常识”或许缺乏坚实的实证基础。 为了毫无心理负担地随意切割、改装和更换零部件,Jim 花了 100 美元买了一套最便宜的组装琴(Partscaster)套件并亲手组装起来。作为音色基准对照,他拿出了自己的高端主力琴——Tom Anderson Telecaster。这两把琴在做工、木材、结构和品质上几乎毫无共同点。在整个测试过程中,Jim 严格锁定了吉他以外的所有变量:音箱与后续信号链完全相同,吉他前端的弹奏者、拨片、琴弦、拨片触弦位置、触弦力度与速度也都尽可能维持绝对一致,确保耳朵听到的任何差异都仅仅来自于吉他本身的物理变化。面对制琴师们列出的一长串潜在影响因素,Jim 决定一项一项进行实测排查。 对于制琴师们的意见分歧,Jim Lill 直言:“I was surprised at how different their lists were from each other, and with these factors in mind, I needed a test guitar that I could hack up and change parts on without feeling stress.” ```mermaid flowchart TD accTitle: 电吉他音色对照实验变量控制 accDescr: 展示吉他测试中严格控制的输入端变量、待测试的吉他端变量以及固定的输出端信号链。 subgraph Input ["弹奏输入端(严格控制)"] P["同一演奏者"] Pick["相同规格拨片"] Pos["固定拨弦位置与角度"] Vel["相同击弦力度与速度"] end subgraph Guitar ["核心测试对象"] TestG["测试琴(套件琴 / 2x4木方 / 空气吉他)"] <--> Anderson["对照基准:Tom Anderson Telecaster"] end subgraph Output ["输出与录音链(完全一致)"] Cable["同一吉他线"] Amp["同一台吉他音箱"] Mic["固定拾音麦克风与音频接口"] end Input --> Guitar --> Output ``` --- ### [02:00](https://www.youtube.com/watch?v=n02tImce3AE&t=120s) 早期改件测试与变量控制的怀疑 Jim 开启了一系列逐步拆换部件的对比测试。首先,他将套件琴上廉价的原始拾音器换成与 Tom Anderson 上同款的 Seymour Duncan Vintage Stack 拾音器,音色立刻大幅靠拢。随后他测试了拾音器高度对声音的影响,先将其调得极低,再调到极高,音色产生了极其明显的动态与频响变化。接着,他马不停蹄地测试了更多传统观点认为决定音色的细节:将原装大琴头打磨锯切成标准的 Tele 琴头形状;对比琴颈连接螺丝紧固与松动的差异;对比黄铜弦鞍(Brass Saddles)与钢制弦鞍(Steel Saddles)的差别;用传统冲压薄钢板的烟灰缸琴桥(Ashtray Bridge)替换套件自带的长厚钢桥;对比琴弦穿体(String-through body)与琴桥后穿式(Top-loading)的张力与声音差别;以及换上完全不带金属底板的 Stratocaster 独立弦鞍琴桥。 然而,在进行无底板 Strat 琴桥测试时,由于临时制作的拾音器固定架非常简陋且不稳固,拾音器在测试过程中不断轻微晃动。Jim 沮丧地发现,即便是同一次录音,拾音器极其微小的位移都会带来不可忽视的声音差异。这促使他开始深刻反思此前测试的有效性:之前测试琴头形状、琴颈螺丝松紧或琴桥材质时所听到的细微差别,究竟是部件本身的贡献,还是改装前后拾音器与琴弦的距离发生了微小偏差所致?这种怀疑在他测试两根琴颈时达到了顶峰——当他把未涂漆枫木指板的套件琴颈装到一把蓝色 Strat 琴体上,试图与带漆玫瑰木指板对比时,因琴颈根部切角不匹配,导致弦距(Action)异常高。测试前 Jim 便预言,只要弦离拾音器太远,无论木材本身有何特质,声音都必然显得单薄无力,而测试结果完全证实了他的预判。 面对粗糙测试暴露出的隐患,Jim Lill 反思道:“The differences I noticed even during the same take based on tiny amounts the pickup was moving frustrated me because I couldn't accurately test the Strat bridge and I hadn't really been paying close attention to how close the pickup was to the strings, so I started to wonder whether the tests I had done were even valid.” - **测试的吉他变量**:琴头质量与形状、琴颈连接处螺丝松紧度、黄铜与钢制弦鞍材质、冲压薄钢板与厚钢板琴桥、穿体与后穿过弦方式、无底板拾音器悬空。 - **发现的实验漏洞**:拾音器垂直高度与琴弦间距未精确量化,机械固定不稳导致的微量位移会掩盖或伪造部件材质的差异。 --- ### [04:47](https://www.youtube.com/watch?v=n02tImce3AE&t=287s) 拾音器高度的顿悟:严控距离后的惊人一致 在意识到弦距与拾音器间距是压倒性的变量后,Jim 决定采取极端严谨的测量手段。他找来塞尺(Feeler Gauge),精细测量了 Tom Anderson 吉他上一弦与六弦到 Seymour Duncan 拾音器磁柱顶端的精确距离,并将这套数据一毫不差地复制到 100 美元的套件琴上。再次插上音箱录音试听时,惊人的结果出现了:两把造价悬殊的吉他发出了近乎完全相同的声音,音色轮廓、频响细节与动态质感几乎难分彼此。 这次对比成为了整个探究过程的关键转折点。这两把吉他除了安装了相同的 Seymour Duncan Vintage Stack 拾音器、拥有相同的有效弦长、250k 电位器阻值以及精确一致的拾音器高度与斜角外,其他一切物理条件都截然不同——从极其昂贵的风干木材到廉价的拼接杂木,从精密的琴颈榫卯到粗制滥造的接合部。如果一千多元的高端吉他与廉价套件琴在对齐这些关键参数后听起来毫无二致,那么传统吉他理论中被奉为神明的“琴体共振”与“音色木材(Tonewood)”是否真的对电信号有实质贡献?Jim 决定走出舒适区,去验证一个更大胆的猜想:吉他琴体本身到底有没有用? 面对调准拾音器间距后的震撼听感,Jim Lill 总结道:“This was a turning point for me. There were a lot of things different about these two guitars and not a lot that was the same at this point in testing.” | 对比维度 | Tom Anderson Telecaster(参考基准) | 100 美元组装套件琴(Partscaster) | |:--- |:--- |:--- | | **琴体木材与做工** | 顶级选材、高精度工艺与优质漆面 | 廉价工业拼接木材、粗糙做工 | | **琴颈与接合方式** | 精密装配、特定指板弧度与高级手感 | 廉价未完工枫木琴颈、普通四螺栓连接 | | **拾音器型号** | Seymour Duncan Vintage Stack | Seymour Duncan Vintage Stack | | **拾音器与琴弦间距** | 使用塞尺精密测量的标准高度 | 使用塞尺精确匹配至与 Anderson 琴完全一致 | | **通电放大音色听感** | 丰满、清晰的传统 Tele 声音 | **与 Anderson 琴几乎无法区分** | --- ### [06:07](https://www.youtube.com/watch?v=n02tImce3AE&t=367s) 2x4 木方吉他与电路电位器的决定性影响 为了从根本上颠覆琴体木材的影响,Jim 走到自家谷仓,随手捡起了一块用于建筑工地的 2x4 废旧工程木方。他把一根拆自 1972 年复刻版 Thinline Tele 上的琴颈用螺栓固定在这根杂木方上。这根琴颈本身具有非常厚重的亮光漆面、三螺栓连接结构以及 7.25 英寸的小指板弧度。他在木方上安装了带有钢制弦鞍的琴桥,采用后穿弦方式,将 Seymour Duncan Vintage Stack 拾音器安装在桥上,并严格用塞尺校准了拾音器高度。最初,为了消除电路干扰,他将拾音器引线直接焊接在输出插孔(Output Jack)上,中间没有经过任何音量或音色电位器。 试听录音时,2x4 木方吉他听起来依然非常接近 Anderson,但高频段明显带有一种刺耳的毛刺感(harsh top end),无法做到百分百重合。Jim 最初闪过一丝犹疑,心想难道琴体木材或琴颈漆面真的在发挥神秘作用?但他立刻转念意识到,传统吉他电路中的音量与音色电位器并不是透明的导体,电位器的阻值(即便完全开到最大)也会持续将一部分高频信号泄放导入接地端。而自己刚刚将拾音器直通输出插孔,完全缺失了这部分高频衰减回路。于是,他立即在木方上补装了一套标准的 Telecaster 控制电路总成(包含 250k 音量电位器)。 接入电位器后的再次测试彻底击碎了怀疑——2x4 木方吉他的音色与昂贵的 Tom Anderson 实现了天衣无缝的重合。无论是中低频的下潜、扫弦的瞬态,还是高频的延展,听感上完全就是同一把琴。 看到这一幕,Jim Lill 兴奋地宣布:“This was the bingo moment for me. I had the data, I captured it on video, you just saw it.” - **2x4 木方吉他配置**:谷仓废旧 2x4 建筑松木方、72 Thinline 复刻琴颈(厚聚氨酯漆面、三螺栓固定、7.25" 指板弧度)、钢制弦鞍后穿弦桥、直通输出(初期)改接入 250k 控制总成(后期)。 - **关键电学机制**:吉他电路中的电位器阻值(如 250k)会构成低通滤波特性,将微量超高频滤入地线;拾音器直通插孔会导致异常刺耳的高频,并非木材物理振动缺失所致。 --- ### [08:44](https://www.youtube.com/watch?v=n02tImce3AE&t=524s) 终极极端测试:“空气吉他”彻底打破木材神话 尽管 2x4 木方吉他的测试数据已经极其确凿,但 Jim 脑海中依然回响着众多乐手和老派制琴师的声音——那些根深蒂固的传统信仰绝不会因为一块木方就被轻易动摇。人们仍会辩解称:“那块木方好歹也是木头,它依然在提供木质共振。”为了彻底粉碎这种质疑,Jim 决定将实验推向不可思议的物理极限,打造一把彻底没有琴身的“空气吉他(The Air Guitar)”。 这台庞大怪异的装置由两件完全不相干的物件拼凑而成:一侧是 Jim 的父亲在 1990 年亲手制作的一张用于维修摩托车的厚重木工工作台;另一侧是倒扣在两把椅子上的置物铁架,铁架上方压着两台沉重的本田(Honda)发动机作为配重防止倾覆。两根 2x4 木方横向顶在工作台与置物架之间形成刚性支撑,防止上弦拉紧时琴弦将两者拉近。在置物架一端,Jim 钉了一块带弦钮的木块充当琴头,琴枕则直接借用了一套适用于 Floyd Rose 双摇系统的金属锁弦枕下半部分。距离琴枕恰好 25.5 英寸标准有效弦长(Scale Length)的位置,钢制后穿弦桥与 Seymour Duncan Vintage Stack 拾音器被直接用螺丝拧死在摩托车维修工作台面上。拾音器连接到一个完全悬空外置的 Tele 控制铁板上(配备 250k 音量电位器),再插线接入同一台音箱。在琴枕与琴桥之间,除了悬空的六根琴弦外,琴身部分只有纯粹的空气。 两把琴均调至开放 D 定弦(Open D),拾音器间隙严格校对,并在琴弦同一相对位置进行多次扫弦对比。通过音箱放出的声音再次令人目瞪口呆:这把用摩托车工作台、本田发动机与空气拼凑而成的怪兽,发出与顶级 Tom Anderson 毫无差别的纯正 Telecaster 音色。Jim 在片尾畅快淋漓地弹奏起这架空气吉他,并总结出了真正决定电吉他通电音色的八大核心要素。 列举最终结论时,Jim Lill 逐字阐明:“Here are the things that the Anderson and the air guitar had in common: tuning, strings, scale length, pickup, pickup distance to strings, pickup position along the strings, pickup slant angle, and effective volume pot value.” - **决定电吉他通电音色的 8 个核心物理与电气要素**: 1. 调音定弦(Tuning) 2. 琴弦规格与状态(Strings) 3. 有效弦长(Scale Length,测试中统一为 25.5 英寸) 4. 拾音器本体规格与设计(Pickup) 5. 拾音器与琴弦的垂直间距(Pickup distance to strings) 6. 拾音器沿弦长方向的水平拾音位置(Pickup position along the strings) 7. 拾音器的摆放倾斜角度(Pickup slant angle) 8. 电路中音量电位器的有效阻值(Effective volume pot value) - **被证伪的无关/次要变量**:琴体木材种类(Tonewood)、琴身形状与尺寸、琴体有无(实心、空心乃至完全悬空)、琴头形状与质量、琴颈漆面厚薄、琴颈指板材质(枫木与玫瑰木)、琴颈连接螺栓数量(三钉、四钉或固定在工作台上)。 ## Mentioned Jim Lill, Tom Anderson, Tom Anderson Telecaster, Seymour Duncan, Seymour Duncan Vintage Stack, Telecaster, Stratocaster, Floyd Rose, Honda ## Video description This did not go how I thought it would. 0:00 - What am I doing? 1:00 - Introducing the Partscaster 2:00 - First Tests 3:43 - Questioning My Methods 4:47 - The Height Revelation 6:07 - The 2x4 Guitar 8:44 - The Air Guitar 11:01 - Outro Jam My website is JimLillMusic.com. I'm @jimlill on instagram. ____ Lately I’ve been looking for where tone comes from. I did a video a few months ago where I started down the path of actually testing things in the signal chain to see if they make a difference or not, and I was surprised at some of the results. The rush I got out of finding reality and realizing that most “facts” about tone must come from people who are just repeating stuff instead of actually testing them made me want to go farther. In this video, I go farther. I test as many aspects of the electric guitar that I can, with the goal of figuring out which parts contribute to the amplified tone and which don’t. See (and hear) for yourself. -Jim, 1/24/22 [Source](https://www.youtube.com/watch?v=n02tImce3AE)

Original transcript

[0:01] [Music] [0:05] over the holidays I wanted to find out [0:07] the truth about where the tone comes [0:09] from in an electric guitar what makes [0:11] one electric guitar sound different from [0:13] another when they're plugged into the [0:14] same amp I've read and heard all sorts [0:17] of ways that every single part on the [0:18] guitar can make a difference in the [0:20] sound but I don't actually know if any [0:21] of that's true I wanted to take the time [0:23] to actually test them and capture the [0:25] results with audio and video so you guys [0:28] can see for yourself and decide what you [0:29] think important too first thing I did [0:31] was email three very high-end guitar [0:33] Builders whose guitars I've personally [0:35] played and enjoyed very much and I asked [0:37] them the question what five factors in [0:40] an electric guitar make the most [0:42] difference in the Amplified sound here's [0:44] how they [0:49] responded I was surprised at how [0:51] different their lists were from each [0:52] other and with these factors in mind I [0:55] needed a test guitar that I could hack [0:57] up and change Parts on without feeling [0:58] stress so so I bought a kit for $100 and [1:01] put it [1:04] [Music] [1:08] together as a baseline I tested it [1:10] against my Tom Anderson Telly because [1:12] almost everything about the Anderson is [1:14] different than the parts caster [1:17] [Music] [1:19] [Applause] [1:20] [Music] [1:32] the only difference here and with any [1:33] test in this video is the guitars [1:36] everything after the guitar is identical [1:38] and everything before the guitar so the [1:40] player the pcks the strings the spot on [1:42] the strings where the pick hits how hard [1:44] the pick hits how fast the pick hits all [1:47] that is controlled as tightly as I can [1:49] so the only difference that you're [1:50] hearing is the difference between the [1:52] [Music] [1:54] guitars this list is long but it's [1:56] finite so I started chipping away at it [2:00] the first thing I did was replace the [2:01] pickup in the parts Caster with a [2:02] Seymour Duncan vintage stack and tested [2:06] [Music] [2:10] that and after testing that I compared [2:13] it to the Anderson which also has a [2:14] vintage stack [2:20] [Music] [2:30] then I tried a pickup height test the [2:32] pickup was set at kind of a medium level [2:33] so then I cranked it down really low and [2:35] then up really high to see if that made [2:37] a [2:38] [Music] [2:43] difference after that I continued [2:45] forward through a bunch of tests [2:46] including standing the headstock down to [2:48] a normal [2:52] [Music] [2:54] [Applause] [2:55] shape having a loose versus tight neck [2:58] joint [3:01] [Music] [3:04] I tried brass Saddles versus [3:08] [Music] [3:14] steel using a traditional thin steel [3:16] ashtray Bridge instead of the longer [3:18] thicker Steel Bridge that came with the [3:21] [Applause] [3:22] [Music] [3:24] kit I tried toploading the strings [3:27] versus putting the strings through the [3:28] body [3:31] [Music] [3:36] and I tried using a strap Bridge with no [3:40] [Music] [3:42] plate when I did the no plate test the [3:45] crewed pickup Mount I fashioned wasn't [3:47] very stable and I couldn't keep the [3:49] pickup in one spot the differences I [3:51] noticed even during the same take based [3:53] on tiny amounts the pickup was moving [3:55] frustrated me because I couldn't [3:56] accurately test the strap bridge and I [3:58] hadn't really been paying close to [3:59] attention to how close the pickup was to [4:01] the strings so I started to wonder [4:03] whether the tests I had done were even [4:04] valid and if any difference heard [4:06] between the bridges or the neck joint or [4:08] the headstock shape was just from the [4:11] pickup being slightly different [4:12] distances from the strings before and [4:14] after the modifications I had done this [4:16] came to a head when I was testing necks [4:18] and I had put the parts Caster neck on [4:20] my blue Strat copy to see how much [4:22] difference in unfinished Maple fretboard [4:23] neck had from a finished rosewood [4:25] fretboard neck the heel angle didn't [4:27] exactly match so the action was [4:29] ridiculously high and I made the [4:31] prediction before testing that with the [4:33] strings so far away the tone would sound [4:35] weaker no matter what the difference is [4:37] in the next [4:40] [Music] [4:42] [Applause] [4:47] were so I asked myself what if I [4:50] militantly matched the distance from the [4:52] pickup to the strings I got my feeler [4:54] gauges and measured the distance from [4:56] the low E string to the pickup and the [4:58] high E string to the pickup on my [5:00] Anderson and matched it as close as I [5:02] could on the parts Caster then I tested [5:04] it [5:07] [Music] [5:44] this was a turning point for me there [5:46] were a lot of things different about [5:47] these two guitars and not a lot that was [5:49] the same at this point in testing here's [5:52] a list of all the things that these two [5:53] guitars had in [5:55] common I became more interested in [5:58] testing the things that were on this [5:59] list and a big one was the guitar body [6:02] what if I took a radically different [6:04] approach could it sound the same as my [6:06] Anderson I'm out in the barn and it's [6:09] time to pick a new guitar [6:18] so this one looks good to [6:23] [Applause] [6:25] me got it [6:35] to this is the 2x4 guitar it was made [6:38] from a piece of scrapwood bolted to a [6:40] neck from a 72 reissue Thinline Telly [6:43] the neck has a thick finish on it and a [6:44] three bolt neck joint the neck radius is [6:47] 7.25 in steel Saddles were installed in [6:50] place of the brass ones on the bridge [6:51] the strings are top loaded the pickup [6:54] was wired directly to the output Jack [6:56] with no electronics in between but it [6:58] had a seamour dunk con vintage stack [7:00] pickup just like the Anderson and the [7:02] height had been precisely adjusted so I [7:04] tested [7:08] [Music] [7:23] it I couldn't get it to exactly match I [7:26] thought maybe the body wood does play a [7:28] role or maybe it's something to do with [7:30] the neck finish but I was hearing a [7:33] harsh top end so my thought was that [7:36] maybe it's because I wired straight from [7:38] the pickup to the output Jack and didn't [7:40] include any Electronics to bleed highs [7:42] off to ground so I installed Electronics [7:46] [Music] [7:59] a [8:01] [Music] [8:08] [Music] [8:32] this was the Bingo moment for me I had [8:34] the data I captured it on video you just [8:37] saw it at this point here's what the two [8:39] guitars did have in [8:41] common that's a pretty small list I was [8:44] satisfied with my research and ready to [8:45] stop but I had this voice in my head of [8:48] all the players and Builders out there [8:50] who have thought about electric guitar a [8:51] certain way for much longer than I have [8:54] and that seeing a 2x4 plank guitar still [8:57] might not be a grand enough gesture to [8:59] push past deeply rooted beliefs so I [9:01] went even farther for one last [9:06] test this is the air guitar I made it [9:09] out of a bench and a shelf my dad made [9:12] the bench in 1990 for repairing [9:14] motorcycles the Shelf is upside down [9:16] sitting on two chairs and weighted down [9:18] with a pair of Honda [9:19] engines the ends of the Shelf are braced [9:22] against the bench with 2x4s so the [9:24] strings don't pull the Shelf closer to [9:26] the bench when tuned up the headstock is [9:28] a piece of wood with tuners put in it [9:31] the nut is the bottom half of a metal [9:33] locking nut meant to go with the Floyd [9:34] Rose type Bridge 25 1/2 Ines away are [9:38] the steel saddles on the steel top [9:39] loaded Bridge with a Seymour Duncan [9:41] vintage stack mounted in the plate and [9:43] all of that screwed into the bench the [9:45] pickup is wired to a disembodied Telly [9:48] control plate with a 250k volume pot [9:51] this is wired to a Jack and a guitar [9:53] cable goes from the Jack straight to my [9:55] combo amp the air guitar was tuned to [9:58] open D and so is my Anderson Telly I [10:01] matched their pickup heights and [10:02] strummed an open cord on both multiple [10:04] times on the same spot on the strings [10:08] [Music] [10:19] [Music] [10:36] here are the things that the Anderson [10:37] and the air guitar had in common [10:40] tuning [10:42] strings scale length pickup pick up [10:47] distance to Strings pick up position [10:49] along the strings pick up slant angle [10:53] and effective volume pop value in the [10:55] future I'll be looking deeper into these [10:57] factors hopefully you'll join me [11:01] [Music] [11:30] [Music] [11:39] [Music] [11:49] that's awesome [11:51] [Music]